 | This is very |
| handy when |
| trying to |
| write multiple |
| lines in |
| relation |
| to an image. |
Table of Contents
Tables |
The <TABLE> and </TABLE> tags must surround the entire table definition. The first item inside the table is the CAPTION, which is optional. Then you can have any number of rows defined by the <TR>and </TR> (Table Row) tags. Within a row you can have any number of cells defined by the <TD>...</TD> (Table Data) or <TH>...</TH> (Table Header) tags. Each row of a table is, essentially, formatted independently of the rows above and below it. This lets you easily display tables like the one above with a single cell, such as Table Attributes, spanning columns of the table.
Here is a simple table example, -- a table with 3 rows and 4 columns
   <TABLE BORDER>
   <caption align="bottom">This is the Table Caption</caption>
   <TR>
   <TH>Heading 1<TH> Heading 2<TH> Heading 3<TH> Heading 4
   <TR>
   <TD>0.32</TD><TD>1.2</TD><TD>3.2</TD><TD>alpha</TD>
   <TR>
   <TD>0.44 </TD><TD>0.3</TD><TD>7.2</TD><TD>beta</TD>
   </TABLE>
This table is displayed as:
| Heading 1 | Heading 2 | Heading 3 | Heading 4 |
|---|---|---|---|
| 0.32 | 1.2 | 3.2 | alpha |
| 0.44 | 0.3 | 7.2 | beta |
this also has not end tags for tr, td, or th.
| Heading 1 | Heading 2 | Heading 3 | Heading 4 |
|---|---|---|---|
| 0.32 | 1.2 | 3.2 | alpha stuff |
| 0.44 | 0.3 | 7.2 | beta stuff |
center>
tags around the table as so:
   <center>
   <TABLE BORDER>

   ...

   </TABLE>
   </center>
| Heading 1 | Heading 2 | Heading 3 | Heading 4 |
|---|---|---|---|
| 0.32 | 1.2 | 3.2 | alpha |
| 0.44 | 0.3 | 7.2 | beta |
<table border> <TR> <TH> Head 1 <TH> Head 2 </TR> <TR> <TD> 4.11 <TD> 4.23 </TR> </table> |
| ||||
<table border=18> <TR> <TH> Head 1 <TH> Head 2 </TR> <TR> <TD> 4.11 <TD> 4.23 </TR> </table> |
| ||||
<table border cellpadding=18> <TR> <TH> Head 1 <TH> Head 2 </TR> <TR> <TD> 4.11 <TD> 4.23 </TR> </table> |
| ||||
<table border cellspacing=18> <TR> <TH> Head 1 <TH> Head 2 </TR> <TR> <TD> 4.11 <TD> 4.23 </TR> </table> |
| ||||
<table border width=80%> <TR> <TH> Head 1 <TH> Head 2 </TR> <TR> <TD> 4.11 <TD> 4.23 </TR> </table> |
|||||
|
|||||
<table border width=80> <TR> <TH> Head 1 <TH> Head 2 </TR> <TR> <TD> 4.11 <TD> 4.23 </TR> </table> |
|
||||
The following table, illustrating TR attributes:
<table border width=80% height=80%>
<TR>                 <TD> Head 1  <BR>bloop </TD> <TD> Head  </TR>
<TR ALIGN="left">    <TD> Left 1  <BR>left  </TD> <TD> Left  </TR>
<TR ALIGN="center">  <TD> Center  <BR>center</TD> <TD> Center</TR>
<TR ALIGN="right">   <TD> Right   <BR>right </TD> <TD> Right </TR>
<TR VALIGN="top">    <TD> Top     <BR>top   </TD> <TD> Top   </TR>
<TR VALIGN="bottom"> <TD> Bottom  <BR>bottom</TD> <TD> Bottom</TR>
</table>
is displayed by your browser as: (I hope your browser supports tables!)
| Head 1 bloop | Head |
| Left left | Left |
| Center center | Center |
| Right right | Right |
| Top top | Top |
| Bottom bottom | Bottom |
As the following example illustrates, alignment attributes on TD or TH attributes override those alignments specified by the TR
<table border width=50% height=45%>
<TR align="center" valign="center">
    <TD align="left" valign="top">left&th;br>top&th;/TD>
    <TD align="left" valign="top">left/top&th;/TD
</TR>
<TR align="center" valign="center">
    <TD align="right" valign="bottom">right&th;br>bottom&th;/TD>
    <TD align="right" valign="bottom">right/bottom&th;/TD
</TR>
<TR>
    <TD align="center" valign="center">center&th;br>center&th;/TD>
    <TD align="center" valign="center">center/center&th;/TD
</TR>
</table>
Is displayed as:
| left top |
left/top |
| right bottom |
right/bottom |
| center center |
center/center |
<table border width=100% height=35%>
<tr align="center">
   <td colspan=3>This text will span three columns&th;/td>
   <td>and this one, only one</td>
<tr align="center">
   <td rowspan=3>This text will span three rows</td>
   <td>one</td><td>one</td><td>one</td>
<tr align="center">
   <td>one</td><td>one</td><td>one</td>
<tr align="center">
   <td>one</td><td>one</td><td>one</td>
</table>
| This text will span three columns | and this one, only one | ||
| This text will span three rows | one | one | one |
| one | one | one | |
| one | one | one | |
   <table>
   <td rowspan=7><img src="goofy.gif"></td>
   <td align="left">This is very </td>
   <tr><td align="left">handy when </td>
   <tr><td align="left">trying to </td>
   <tr><td align="left"> write multiple </td>
   <tr><td align="left">lines in </td>
   <tr><td align="left">relation </td>
   <tr><td align="left">to an image. </td>
   </table>
| This is very |
| handy when |
| trying to |
| write multiple |
| lines in |
| relation |
| to an image. |
I went the really cheap way out on the Frames part of my demonstration.
First create an image. (or do like I did and pick one done for you). I used
both Xpaint and XV to manipulate my images.
Next create an imagemap map file containing the coordinates of the links.
A common scheme for an imagemap is a collection of points, polygons,
rectangles and circles, each containing a short text description of
some piece of information or some information server; interconnections
are conveyed through lines or arcs. Try to keep the individual items
in the map spaced out far enough so a user will clearly know what he or
she is clicking on.
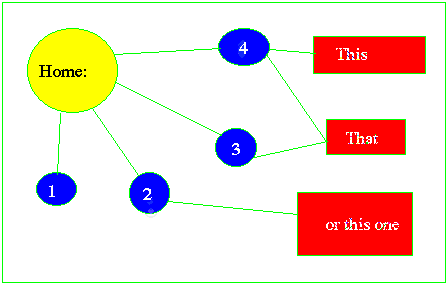
EXAMPLE:
Here is a link to THE best page I have found for the creation of frames.
It is complete and easy to follow.
Frames Tutorial
Image Maps

(window one)
(window two)
(door)
(sky)
(roof)
(other)
Lines beginning with # are comments. Every other non-blank line consists of the following:
method URL coord1 coord2 ... coordn
   default prest3.html#IMAGE

   rect win1.html 110,210 150,290
   rect door.html 170,230 220,330
   rect win2.html 250,210 290,290
   poly roof.html 80,180 200,70 330,180
   rect sky.html 40,40 360,330
This file is linked to your document in the following manner:
   <a href="IMAGEMAPS/home.map" >
   <img src="IMAGEMAPS/home.gif" ismap></a>
center edgepoint
upper-left lower-right
thePoint
/docs/tutorials
http://www.yahoo.com/
Circles, polygons, and points are available in addition to rectangular areas. These areas may overlap. In the case of overlap, the first link listed in the map file that is mapped to the point selected will be used. See the official documentation for more details. I would generally recommend that the whole imagemap be linked to something so that the default is never used. You may want to use xv (xv-3.00a.tar.Z) for X or Paint Shop Pro (pspro200.zip) for Windows to obtain the pixel coordinates for the map file. Other useful graphics programs are also available.