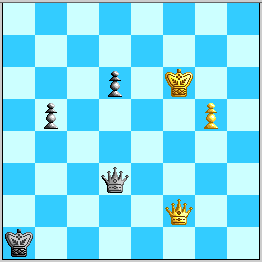
Diagram 1: Find White's winning plan.
Diagram 1: Find White's winning plan.
In the discussion of Move 54, we argued that 55. g6 fails to win after 55...Qc3+ 56. Kf7 Qc7+ 57. Kf8 Qc8+! 58. Kg7 d5! White's Queen seems nice on f2, but we shall see shortly that it is a tad better on e1 controlling the e-file, and that "tad" seems to be just enough to win!
55. Qe1+!
It appears that both Black King moves must be treated independently, and we consider the apparently weaker one first.
A. 55. ... Ka2
Below in the treatment of 55...Kb2, we shall explain why 56. g6 may fail to win here. However, what I feared in a post I made in October was the natural centralizing check:
56. Qe6+ ...
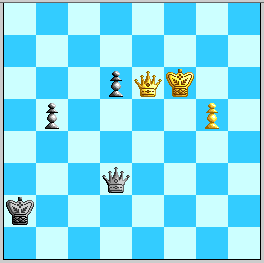
Diagram 2, after 56. Qe6+. Is this White's only way to win?
(A1) 56...d5 57. g6 and:
(A1a) 57...Qf3+ 58. Ke7 Qc3/g3/g2 59. Qf7! is the kind of +/- we know from the 51....Ka1 lines, while 58...Qa3+ 59. Ke8 Qa8+ [again other moves meet 60. Qf7!] 60. Kf7 Qa7+ 61. Qe7 Qf2+ 62. Ke8 is over with Qf7 soon to come.
(A1b) 57...Qc3+ 58. Qe5! Qc6+ (58...Qf3+ 59. Ke7 is again soon out of checks) 59. Kg5 Qc1+ 60. Qf4 Qg1+ 61. Kf6. Now here is a position that was seen in late September with 51. Qh7 Ka1 52. Qg7+ Ka2 53. Qf7+ d5 54. Kh7 Qc2+ 55. g6 b5 56. Kh6 Qh2+ 57. Kg5 Qe5+ 58. Qf5 Qe7+ 59. Qf6 Qe3+ 60. Qf4 Qg1+(?) 61. Kf6---hmmm, same move numbers!
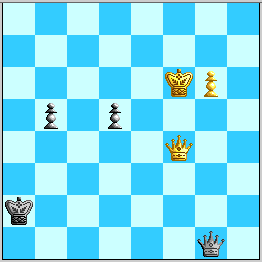
Diagram 3. Can Black to move hold?
Back then I thought that 61...b4 was Black's only move, in view of 61...Qb6+ 62. Kf5! Qa7! 63. Qd2+ Kb1 (Black wants to prevent Qc3+) 64. Qd3+ Kb2 65. Qxb5+ and I always thought winning this pawn with check was a win for White---here EGTB+/- in 47, or 61...d4 62. g7 d3 63. Qd2+ Ka1 64. Qa5+ Kb2 65. Qxb5+ Kc3 66. Qa5+! (we've seen that idea before, and 63...Kb3 64. Qxd3+ also queens quickly). But on 61...b4, 62. Qxb4! is a win for White, in 77! 8/6P1/5K2/1p6/8/1k1Q4/8/6q1+b. I would not have guessed this in September! I had been reluctant to play 60...Qe7+ because of the passive look (to me then) of 61. Kh6 Qe6, but now we know this is OK for Black as 62. Qf3 is met by 62...b4! 63. Kh7 b3 and White is not in time, and more importantly, as you I believe found in a similar position, 62. Qd2+ Kb3 (or 62...Kb1!? 63. Qd3+ Kc1!) 63. Qd3+ Ka4 64. Kh7 Qe7+! is a perpetual check, as Black has the h2-b8 diagonal open as well. Maybe an even better fix there is 58...Qg3+!? as the Qe6 "Pin Battery" is oddly nothing to fear when Black has a b-pawn (while the Qe6 "Pin Battery" wins without it but the Qf7 one no longer does!): 59. Kf6 Qd6+ 60. Qe6 Qf4+ 61. Ke7 Qc7+ 62. Ke8 Qb8+ 63. Kd7 Qb7/a7+ 64. Kd6 b4! is =, e.g. 65. Qf7 Q-any-check 66. Kxd6 EGTB=. Anyway, the above seems enough to prove a White win in line (A1b).
(A1c) 57...Qd4+ 58. Qe5! (again, playing for the Qe6 "Pin Battery" won't work) Qf2+ (...Qb6+ transposes) 59. Ke6 Qb6+ 60. Kf7 and oddly, the lack of ...Qd7+ as an answer (as Black had in line A1b) makes this quickly go downhill for Black---I see little more than 60...Qf2+ 61. Qf6 Qa7+ 62. Qe7 Qf2+ 63. Kf8+/- as before.
(A1d) 57...b4 58. g7 Qc3+ (...Qd4+ 59. Kg6! and soon +/-) 59. Qe5 Qc6+ 60. Kg5 Qc1+ 61. Qf4 Qg1+ 62. Qg4! Qe3+ (62...Qc1+ 63. Kh5 Qh1+ 64. Kg6 Qb1+ 65. Kf7 Qf1+ 66. Ke7 Qe1+ 67. Kd7 is the end) 63. Kh4! and now: (i) 63...Qh6/e7+ 64. Kg3 Qe3+ (Black needs ...d4 in to survive this) 65. Kg2 Qd2+ 66. Kf1 Qc1+ 67. Kf2 Qc5+ 68. Kg2 Qc2+ 69. Kg3 Qd3+ (...Qc3+ 70. Kh2 is sooner) 70. Kh2 Qh7+ 71. Kg1 Qb1+ 72. Kf2+/-, or 71...Qg8 72. Qe2+ Ka3 73. Qf3+ and 74. Qf8+/- as 73...b3 is impossible. (ii) 63...Qe1+ 64. Qg3! Qe7/e4+ (...Qh1+ 65. Kg4 Qe4+ transposes) 65. Kh3! Qe6/h7+ 66. Kg2 Qe4+ (...Qg8 67. Qf2+ and 68. Qf8) 67. Kf1! Qb1+ (...Qc4+ 68. Kg1 Qc1+ 69. Kg2+/-; Black survives if his d-pawn is on d4) 68. Qe1 Qh7 69. Qf2+ Ka1/b1 70. Qg1! (pretty, no?) Qg8 71. Kg2+ Ka2/b2 72. Qf2+ and 73. Qf8+/-. Actually, White is winning here even with Black's pawn still on d6---this position arises in my 54. Qf4 Qd5 analysis.
Black's most challenging reply is
(A2) 56. ... Ka3!
Instead, 56...Ka1 57. g6 leads into White's "basic tempo-up win", and 56...Kb2 has more drawbacks than 56...Ka1 in the resulting lines. The point now is that White has no checks with which to gain time for re-positioning his Queen. The win is still highly delicate.
57. g6 ...
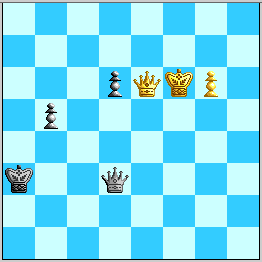
Diagram 4. How can White escape Black's checks?
Now Black has:
(A2a) 57...b4 58. g7 enters the basic win against Ka3. The main line is 58...Qc3+ 59. Kf7 Qc7+ 60. Kg6 Qc2+ 61. Qf5 Qg2+ 62. Kf7 Qb7+ 63. Kf6 Qa8! 64. Qg4! Qd8+ 65. Kf7 Qc7+ 66. Kg6 Qc2+ 67. Kg5! Qb3! 68. Qf5! Qg3+ 69. Kf6 d5! 70. Qe5! Qf2+ 71. Kg6 Qg2+ 72. Kf7 Qf2+ 73. Qf6 Qa7+ 74. Kg6 Qb8 75. Qf3+! Kb2 76. Qf7! and we have a case of the basic Qf7 win with a Black pawn on d5. This should establish in many cases here that Black cannot play ...b4 when White is strongly supporting the reply g7. We also take it as axiomatic that White wins if he achieves g7 with Black's b-pawn still on b5.
(A2b) 57...Qd4+ 58. Kf7 Qf4+ (58...b4 59. g7 wins; 58...Qa7+ 59. Qe7 Qf2+ 60. Ke8 b4 61. g7 Qg2 [61...Qg1 62. Qf7 Qe3+ 63. Kf8 Qh6 64. Qf5 b3 65. Kf7+/-] 62. Qa7+! Kb2 63. Qf7 is a case of the basic Qf7 win; 58...Qf2+ 59. Qf6 Qa7+ 60. Qe7 transposes) 59. Ke8! and now:
A2b1) 59...Qd4 60. Kf8! Qh8+ 61. Kf7 Qh5 62. Qe3+ and:
A2b1a) 62...Ka4 63. Qf4+! b4 64. Kf6! Qd5 65. g7 and we have transposed into the note to Move 53 in the actual game, a quick +/- for White.
A2b1b) 62...Ka2/b2 63. Qf2+ Ka1 (63...Kb1/c1 64. Qf4+/-) 64. Qf6+ Ka2/b1 65. Kf8+/-.
A2b2) 59...Qg3/g5 60. Qf7! Qe5+ (60...b4 61. g7 Qb5+ 62. Kf8 Qb8+ 63. Qe8+/-; 60...Qe3+ 61. Kf8+/-) 61. Kd7 b4 62. g7 Qb5+ 63. Kc8! (the "a-file trap"!) Qa6/c6+ 64. Kb8 Qb6+ 65. Qb7 Qd8+ 66. Qc8! Qb6+ 67. Ka8 Qa5+ 68. Kb7 Qd5+ 69. Kb8! Qb5+ 70. Ka7+/-.
(A2c) 57...Qc3+ 58. Kf7 and now:
(A2c1) 58...Qc7+ 59. Kf8! Qd8+ (59...Qb8+ 60. Qe8+/-) 60. Qe8 Qf6+ 61. Qf7 Qd8+ (61...Qh8+ 62. Ke7 Qe5+ 63. Kd7 transposes to A2b2), and 62...Qh4+ 63. Kd7 will successfully hide on the Queenside) 62. Kg7, and now:
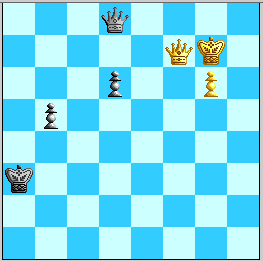
Diagram 5. A coiled spring.
(A2c11) 62...b4 63. Qa7+ Kb2 64. Kf7 Qg5/c8 65. g7 Qf5+ 66. Ke8! Qc8+ (66...Qe6+ 67. Qe7 Qg8+ 68. Qf8 Qe6+ 69. Kd8+/-; other Queen moves by Black allow White to set up the basic Qf7 win) 67. Ke7 b3 (67...Qg4 68. Qf2+ Ka3 69. Qf7! Qe4+ 70. Qe6 heads into the win against Ka3; other tries lose more quickly for Black) 68. Qf2+ Ka3 69. Qf8! Qc7+ 70. Ke6 Qc4+ 71. Kxd6 EGTB+/- #22, or 69...Qb7+ 70. Kxd6 EGTB+/- #20, as has been shown in other places in the whole analysis.
(A2c12) 62...d5 63. Qf8+ is a nasty point..
(A2c13) 62...Qg5 63. Qf3+ K-any 64. Kf7+/-.
(A2c14) 62...Qh4 63. Qf3+ Ka4 (losing the b-pawn is EGTB+/-) 64. Qa8+! Kb4 (64...Kb3 65. Qd5+ Qc4 66. Qxc4+ +/- with check on g8) 65. Qd5! and Black is hornswoggled, soon +/-.
(A2c2) 58...Qf3+ 59. Ke7 Qg2 (59...Qg3 60. Qf7! transposes to A2b2), 59...Qc3 60. Qf5 and 59...Qb7+ 60. Kf6 Qf3+ 61. Qf5 both transpose to the next line) 60. Qe3+ Ka2 (else 61. Qd4+ and 62. g7) 61. Kf7 Qf1+ 62. Ke8 Qg2 63. Qa7+ and 64. g7 wins.
Black's most challenging Queen check at Move 57 is:
58. Qf5! Qc3+
59. Ke7!! ...
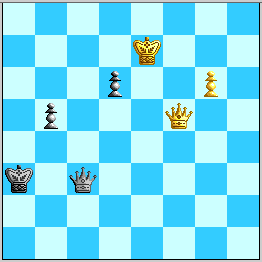
Diagram 6. His Majesty takes a giant step northwest.
If not for this move, Black would draw as 59. Kf7 Qc7+ 60. Kf8 Qd8+ 61. Kg7 b4 or 60. Kg8 b4 61. g7 b3 do not get it done (no checks!) The pretty first point is:
(A2d1) 59...b4 60. Kf8! and:
(A2d11) 60...Qh8+ 61. Kf7 is +/-.
(A2d12) 60...b3 61. g7 exploits the fact that White's Queen covers b1: 61...b2 62. g8=Q b1=Q! (Black has no quiet move to threaten this while denying White harmful checks, but this almost yields a perpetual!) 63. Qxb1 (EGTB+/- #15) Qc8+ 64. Kg7 Qc3+ (64...Qg4+ 65. Qg6) 65. Kg6! Qg3+ 66. Kf7 Qf4+ (Black loses through not being able to reach c4) 67. Ke7 Qh4+ 68. Kf8 (optimal, 68. Kd7 is good too) Qd8+ (or 68...Qf6+ 69. Ke8 Qe5+ 70. Kd7!) 69. Kf7 Qd7+ 70. Kf6 and done.
(A2d13) 60...d5 61. g7 Qc5+ 62. Kf7 Qc7+ 63. Kf6 Qd6+ (63...Qd8+ 64. Kg6 Qe8+ 65. Kh7 Qe7 66. Qf4 Qd7 67. Qf3+ wins; 64...Qd6+ 65. Kh5 transposes) 64. Kg5 Qe7+ (64...Qg3+ transposes) 65. Kg6 Qd6+ 66. Kh5 Qh2+ 67. Kg5 Qg3+ 68. Qg4 Qe5+ (68...Qe3+ 69. Kh4 Qe7/h6+ 70. Kg3+/-) 69. Kh4 Qf6+ 70. Qg5 Qd4+ 71. Kh3+/-.
Hence Black cannot take advantage of the tempo gain. The alternative 59...Qg7+ 60. Qf7 Qe5+ 61. Kd7 transposes into A2b2), and 59...Qe3+ 60. Kf8 loses quickly, so Black must try:
(A2d2) 59...Qc7+
60. Qd7! Qc3
Against other moves, 61. g7, followed or preceded by Qa7+, is the kind of win seen before.
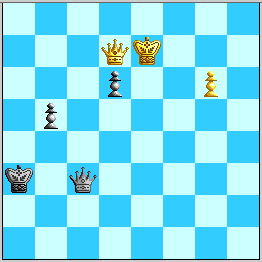
Diagram 7, White to play. Which King move is best?
61. Ke8!! ...
The point of this move is to take away Black's resource 61. Kf8 Qf3+! regaining the long h1-a8 diagonal, when 62. Qf7 Qa8+ does not work for White as it does when Black's King is on b2 or d2. Now all checks on the e-file meet the strong interposition 62. Qe7!, when Black has no checks and is forced into passive defense, e.g. 61...Qe5+ 62. Qe7 Qh5 63. Qf7! Qe5+ 64. Kd7 transposing into A2b2), or 63...Qh8+ 64. Kd7 Qh3+ 65. Kc7 Qc3+ 66. Kb8 Qh8+ 67. Kb7 Qh1+ 68. Ka7 Qg1+ 69. Ka6+/- (a-file trap upcoming). Black is hence down to:
61. ... Qh8+
62. Kf7 Qh5
63. Qa7+ Kb3
Or 63...Kb4 64. Qd4+ Ka5 65. Kf6+/-.
64. Qe3+ Ka2
65. Qf2+
and we have transposed into A2b1).
There are also
A2d3) 59...d5 60. Kf8 Qc5+ 61. Kg8! b4 62. g7 b3 63. Qf8+ Kb4 64. Kf7! +/-, and
A2d4) 59...Qg7+ 60. Qf7 Qe5+ 61. Kd7 winning as above.
This completes White's win against 55...Ka2.
B.
55. ... Kb2
Now 56. Qb4+? ultimately misplaces White's Queen. Instead White chooses to advance now when Black cannot check on the c-file.
56. g6 ...
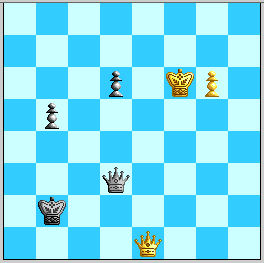
Diagram 8, Black to move. First fork in the long and winding road.
B1) 56...Qd4+ 57. Kf7 and now:
B1a) 57...Qd5+ 58.Qe6 Qb7+ (58...Qf3+ 59.Qf6++-) 59.Kf6 Qf3+ 60.Qf5 Qc3+ 61.Ke7, with:
B1a1) 61...Qc7+ 62.Qd7 Qc4 (62...Qc3 63.Qxb5++-) 63.g7 b4 (63...Qh4+ 64.Kxd6+-; 63...Qe4+ 64.Kxd6+-) 64.Kf8 (64.Kxd6? Qd4+=) 64...Qf4+ 65.Qf7 Qh6 66.Qf5+-
B1a2) 61...Qg7+ 62.Qf7 Qe5+ 63.Kd7 Qh5 (63...b4 64.g7 Qb5+ 65.Kxd6+-) 64.Qf6+ Kc2 65.g7 Qg4+ 66.Kxd6+-
B1b) 57...Qc4+ 58.Qe6 Qc7+ 59.Kf6 Qc3+ 60.Ke7 Qg7+ (60...Qc7+ 61.Qd7 Qc4 62.g7 see 57...Qd5+, Variation B2) 61.Qf7 see 57...Qd5+ (Variation B1a1)
[Also good here is 60. Kf7 Qc7+ (60...Qc4+ 62. Kf8!+/-) 61. Kg8! and:
(a) 61...b4 62. g7 b3 63. Qf6+! and 64. Kh8 should be +/-;
(b) 61...Qe7+ 62. Kh7 Qh4+ 63. Kg7! Now Black King moves are all EGTB+/- in <= 50 moves after 64. Qxb5 (or Qf6+:-), and 63...Qc4 64. Kf8!, 63...b4 64. Qf6+ and 63...Qd4+ 64. Qf6 are all quick, so that should leave only 63...Qe7+. Now 64. Qf7 Qe4! does look OK for Black, an echo of "Position G" one file down, e.g. 65. Qf2+ Ka3 66. Kh4 b4! 67. g7 Qe6+! probably draws. But White has one final nasty trick: 64. Kh6! Qh4+ 65. Qh5 Qf4+ 66. Kh7 and Black cannot simultaneously pin g6 and save b5, or 64...Qe3+ 65. Qg5 Qh3+ 66. Qh5 ditto, so 66...Qe3+ (covering e2!) 67. Kh7 b4! [recall that with WQ at f7 and BK **at a1** this is the holding line in the other 54. Qf4 Qd3 branch with 60...Qe3!] 68. g7 [but the point is that WQ on h5 is useful] Qe4/d3+ 69. Kh8(!) Qc3/d4 70. Qe2+!, and *now* 70...Ka3 71. Kh7! transposes into the branch where my bust (in e-mail yesterday) of Antti's branch with 60...Qd4 seems to work.]
B1c) 57...b4 58. g7 transposes into play seen below after 58...Qf4+ 59. Ke8!, and here 58...Qc4/d5+ 59. Qe6 will at least set up the basic Qf7 win since Black's King is on b2.
B1d) 57...Qf4+ 58. Ke8!
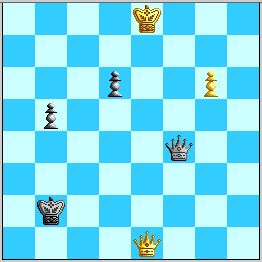
Diagram 9, after 58. Ke8! ---the move KWR saw and feared in October.
B1d1) 58...Qg5 59.Qb4+
B1d11) 59...Kc1 60.Qc3+
B1d111) 60...Kd1 61.g7 Qd5 (61...Qg6+ 62.Kf8 Qf5+ 63.Ke7 Qe4+ 64.Kxd6+-) 62.Ke7 Qg5+ (62...Qe4+ 63.Kxd6+-) 63.Qf6 Qe3+ 64.Kf8+-;
B1d112) 60...Kb1 61.g7 Qd5 (61...Qg6+ 62.Kf8 Qf5+ 63.Ke7 Qe4+ 64.Kxd6+-) 62.Ke7 Qg5+ 63.Qf6 Qe3+ 64.Kf8+-;
B1d12) 59...Kc2 60.Qe4+ Kc3 61.Kf7 Qh5 (61...d5 62.Qf3+ Kc2 63.g7+-) 62.Kf6 b4 63.Qe3+ Kc2 64.g7+-;
B1d2) 58...Qf6 59.Qb4+ Kc2 (59...Kc1 60.Qg4 Qg7 61.Qf4+ Kc2 62.Qf5+ - 59...Kc2) 60.Qg4 Qg7 61.Qf5+ Kc1 62.Qf7 Qe5+ 63.Kd7 Qh5 64.Qf4+ Kc2 65.g7 Qh3+ 66.Kxd6+-;
B1d3) 58...d5
B1d31) 59.g7 Qb8+ 60.Kf7 Qf4+= (60...Qc7+? 61.Qe7+-) ;
B1d32) 59.Qe6! 59...Qb8+ 60.Kf7
B1d321) 60...Qc7+ 61.Qe7 Qc4 (61...Qf4+ 62.Qf6++-) 62.g7 d4+ 63.Qe6 Qc7+ - 60...d4;
B1d322) 60...d4 61.g7
B1d3221) 61...Qc7+ 62.Qe7 Qf4+ 63.Qf6 Qc7+ 64.Ke6 Qc6+ 65.Ke5 Qc5+ 66.Ke4 Qc2+ 67.Kd5 Qc4+ (67...Qb3+ 68.Kc5 Qc4+ 69.Kd6 - 67...Qc4+) 68.Kd6 Qg8 (68...Qb4+ 69.Kd7+-) 69.Qxd4++- (69.Ke7+-) ;
B1d3222) 61...Qb7+ 62.Kf6 (62.Kg6 Qg2+ 63.Kh7 Qh1+ 64.Qh6 Qe4+ 65.Kh8 Qe5=) 62...Qf3+ 63.Ke7
B1d32221) 63...Qa3+ 64.Qd6 Qe3+ 65.Kd7 Qg5 (65...Qh3+ 66.Qe6 Qh7 67.Qf7+-) 66.Qf8 Qd5+ 67.Kc7 Qe5+ 68.Kb7 Qd5+ 69.Ka7+-;
B1d32222) 63...Qb7+ 64.Qd7 Qe4+
B1d322221) 65.Kd6 Qg6+
B1d3222211) 66.Kc5 Qg5+ 67.Kb4 d3! (67...Qd2+ 68.Kxb5+-) 68.Qd4+ Ka2=;
B1d3222212) 66.Kc7 66...Qg3+ 67.Kb7 Qg2+ 68.Ka7 d3 69.Qd4+ (69.Qxb5+ Kc3!!=) 69...Kc2 70.Qc5+ Kb2!=;
B1d322222) 65.Kd8! 65...Qa8+ (65...Qg6 66.Qxd4++-) 66.Kc7
B1d3222221) 66...b4 67.Qxd4++-;
B1d3222222) 66...Qg8 67.Qxd4++-;
B1d3222223) 66...Qa7+ 67.Kc6 Qa6+ (67...Qa8+ 68.Kxb5+-) 68.Kc5 Qa3+ 69.Kb6 Qg3 70.Qxd4++- (70.Qxb5++-) ;
B1d3222224) 66...d3 67.Qxb5++-;
B1d4) 58...b4 59.g7 Qg4 60.Qf2+ Ka3 61.Qa7+! Kb2 (61...Kb3 62.Qf7++-) 62.Qf7 Qc8+ 63.Ke7 Qc7+ 64.Kf6 Qc3+ 65.Kf5 Qe5+ 66.Kg4 Qe4+ 67.Kg3 Qe3+ 68.Kg2 Qe4+ 69.Qf3+- (as in the basic Qf7 win);
B1d5) 58...Qg4! 59. Qf2+ (Does 59. Qd2+ win here?)

Diagram 9a. White has to regroup.
and now:
B1d51) 59...Kb3 60.Qf7+ K-any 61.g7 +/- (For now we take it as axiomatic that g7 wins if neither Black pawn can reach the 5th rank---this can be checked, but note that with Black's Queen on the best square e3, Kxd6 will be EGTB+/- #52 with BK on b4, ;
B1d52) 59...Kc3 60.Qf6+ K-any 61.g7 +/-;
B1d53) 59...Ka1 60.Qf1+ Ka2 (60...Kb2 61.Qxb5++-) 61.Qf7+ - 59...Kb1;
B1d54) 59...Kb1 60.Qf1+ Ka2 (60...Kb2 61.Qxb5++-; 60...Kc2 - 59...Kc1) 61.Qf7+ Ka3 62.Qa7+ - 59...Ka3;
B1d55) 59...Ka3 60.Qa7+
B1d551) 60...Kb3 61.Qf7+ - 59...Kb3 60.Qf7+;
B1d552) 60...Kb2 61.g7
B1d5521) 61...Qc8+ 62.Ke7 Qg4 63.Kd8! Qg2 64.Qd4+ Ka3 65.Qa1+ Kb3 66.Qb1+ Kc3 67.Qh7+-;
B1d5522) 61...Qe6+ 62.Qe7 Qc8+ 63.Kf7 Qc4+ (63...Qf5+ 64.Qf6++-) 64.Kf6 Qf4+ 65.Ke6 Qe4+ (65...Qe5+ 66.Kd7 Qf5+ 67.Kxd6+-) 66.Kxd6+-;
B1d5523) 61...b4 62.Qd7 Qe4+ 63.Kf8 Qf3+ 64.Qf7 Qa8+ 65.Ke7 Qb7+ 66.Ke6 Qc8+ 67.Kxd6+-;
B1d553) 60...Kb4 61.g7
B1d5531) 61...Qe6+ 62.Qe7 Qc8+ 63.Kf7
B1d55311) 63...Qc4+ 64.Kf6 Qf4+ 65.Ke6 Qe4+ (65...Qe5+ 66.Kd7 Qf5+ 67.Kxd6+-) 66.Kxd6+-;
B1d55312) 63...Qf5+ 64.Qf6 Qd7+ 65.Kf8 Qc8+ 66.Ke7 Qc7+ 67.Ke6
B1d553121) 67...Qc4+ 68.Kd7 (68.Kxd6+-) 68...Qg4+ 69.Kc7 Qc4+ 70.Kd8 Qd5 (70...Qg8+ 71.Ke7+-) 71.Qf8+-;
B1d553122) 67...Qc8+ 68.Kxd6+-;
B1d5532) 61...Qc8+ 62.Ke7 Qg4 63.Kd8! Qg2 64.Qd4+ Ka3 65.Kc7! b4 66.Qa1+ Kb3 67.Qb1+ Kc3 68.Qh7+-;
B1d56) 59...Kc1! 60.Qf1+
B1d561) 60...Kd2 61.Kf7
B1d5611) 61...b4 62.g7 Qd7+ 63.Kf6 Qd8+ 64.Kg6 Qe8+ 65.Qf7 Qe4+ 66.Qf5 Qc4 (66...Qe8+ 67.Kh7+-; 66...Qg2+ 67.Qg5++-) 67.Qg5+ Kc2 68.Kh7+-;
B1d5612) 61...Qd7+
B1d56121) 62.Kg8 Qe8+ (62...Qd8+ 63.Qf8 Qd7 64.g7 Qe6+ 65.Kh7 Qe4+ (65...Qh3+ 66.Kg6 Qg4+ 67.Kf6 Qf4+ 68.Ke7 Qe4+ 69.Kxd6+-) 66.Kh6 Qe3+ 67.Kg6 Qe6+ 68.Qf6+-; 62...Qc8+ 63.Kh7 Qg4 64.g7 Qh5+ 65.Kg8 Qe8+ 66.Qf8 Qe6+ - 62...Qd8+) 63.Kh7 Qe4!, or 63. Kg7 Qe5+!
B1d56122) 62.Kf6! Qd8+ 63. Kg7! and now:
B1d561221) 63...Qd7+ 64. Qf7 Qc8 65. Qd5+ is strong---see )
B1d561222) 63...Qe7+ 64. Qf7!
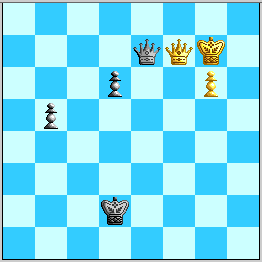
Diagram n. White's King will try to play Pac Man.
and now:
B1d5612221) 64...Qe5+ 65. Kg8! (65. Kf8!? Qh8+ 66. Ke7 Qe5+ 67. Kd7 b4! 68. g7 Qb5+ 69. Ke7 Qb7+ 70. Ke6 Qc8+! 71. Kxd6 Qa6+! EGTB=) b4 66. g7 Qe4 (66...b3 67. Kf8+/-) 67. Qf2+ handled below.
B1d5612222) 64...Qe4 65. Kf8! transposes into 59...Qf5 60. Qe7 Kc2 61. Qc7+ Kd2 62. Qf7 Qe4 63. Kf8 below.
B1d562) 60...Kb2 61.Qxb5+ +-;
B1d563) 60...Kc2 61.Kf7 Qd7+ (61...b4 62.g7 Qd7+ 63.Kf6 Qd8+ 64.Kg6 Qe8+ 65.Qf7 Qe4+ 66.Qf5+-) and now:
B1d5631) 62.Kg8!? and now since 62...b4 63. Qc4+ Kd1 64. Qxb4 is
B1d56311) 62...Qd8+ 63.Qf8 Qd7 64.g7 Qe6+ 65.Kh7 Qe4+ (65...Qh3+ 66.Kg6 Qg4+ 67.Kf6 Qf4+ 68.Ke7 Qe4+ 69.Kxd6+-) 66.Kh6 Qe3+ 67.Kg6 Qe6+ 68.Qf6+-;
B1d56312) 62...Qc8+ 63.Kh7 Qg4 64.g7 Qh5+ 65.Kg8 Qe8+ 66.Qf8 Qe6+ - 62...Qd8+;
B1d56313) 62...Qe8+ and:
B1d563131) 63.Kh7 Qe4! (63...Qe5 64.g7 Qh5+ 65.Kg8 Qe8+ 66.Qf8 Qe6+ - 62...Qd8+) 64.Qf2+ Kc1 65.Kh6 b4 66.g7 Qe6+ 67.Kh5 (67.Kg5 b3=)
B1d5631311) 67...Qh3+ 68.Qh4 Qf3+ 69.Kh6 Qf7 70.Qg5++-;
B1d5631312) 67...Qe5+ 68.Kg6 Qe8+ 69.Qf7 Qe4+ 70.Qf5 Qc4 71.Kh7 (71.Qg5+ Kb2 72.Kh7 Qe4+ 73.Qg6 Qh4+ 74.Qh6 Qe4+ 75.Kh8 Qe5=) 71...Qh4+ 72.Kg8 Qd8+ 73.Qf8 Qg5 (73...Qh4 74.Qf1+ Kb2 75.Kf7 Qh5+ 76.Kf8 Qh6 77.Qf5+-) 74.Qf1+ Kb2 75.Qe2+ Ka1 (75...Kc3 76.Qf3+ Kb2 77.Kf7+-; 75...Kc1 76.Qf3 b3 77.Kf7 b2 78.Qc3+ Kd1 79.Qxb2+-) 76.Qe1+ Ka2 (76...Kb2 77.Qxb4++-) 77.Qe2+ Ka1 (77...Ka3 78.Qf3+ b3 79.Kf7+-) 78.Qf3 Qe7 79.Qd1+ Kb2 (79...Ka2 80.Qa4++- \205 81.Qxb4+) 80.Qd4+ Kc2 81.Kh8+-;
B1d5631313) 67...Qg8! 68.Qf8 Qd5+ 69.Kg6 Qg2+ (69...Qe6+ 70.Qf6 Qc4 71.Kh7 Qe4+ 72.Qg6+-; 69...Qe4+ 70.Kf7 Qf5+ 71.Ke7 Qe5+ 72.Kd7 Qb5+=) 70.Kf6 Qf3+ 71.Ke6 Qe4+ 72.Kd7 Qb7+=;
B1d563132) 63.Kg7 Qe7+ 64.Qf7 Qe4! (64...Qe5+? 65.Kf8 Qh8+ 66. Ke7 Qe5+ 67. Kd7 b4 68. g7 Qb5+ 69. Kc8!+/- owing to eventual crosschecks on the c-file) 65. Kf8
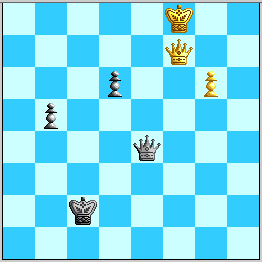
Diagram n. White begins the King Walk.
Qa8+ 66. Ke7 Qb7+ 67. Ke6 Qc8+! 68. Qd7! (68. Kd5 Qa8+! prevents penetration, as unlike the case with Black's King on d2, 69. Kxd6 Qa6+ is EGTB=)

Diagram n. With Black's King on d2 this may be drawn!
and now:
(a) 68...Qg8+
(b) 68...Qc4+ 69. Ke7! and now:
(b1) 69...b4 70. Qf5+! (the point!) Kb2 71. g7 b4 72. Qf2+ Ka3 73. Qf8!!
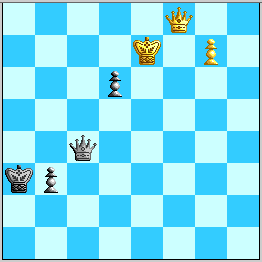
Diagram n, Black to play. The most regal "Pin Battery" of all...
(b2) 68...Qh4+ 69. Kf8!!
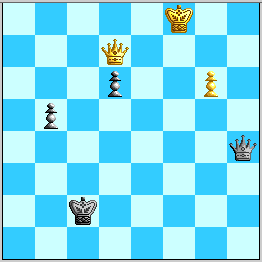
Diagram n. White keeps Black's Queen off the h1-a8 diagonal.
Notice the mirror-image play in this last line and B1d56122)---in one place Black must reply to Qf7 with ...Qe5+!, and the other, with ...Qe4! It is this very last line in particular that seems to be White's bar from winning.
If especially the last part holds up, this completes the bust of 56...Qd4+.
B2) 56. ... Qf3+
57. Kg5 Qg2+
B2a) 57...Qd5+ 58.Kf4 Qd4+ 59.Qe4 Qf2+ 60.Qf3 Qh2+ 61.Qg3 Qd2+ 62.Kf5 Qc2+ 63.Kf6 Qc8 64.Qf2+ (64.Qxd6+-) 64...Ka3 65.Qe3+ Ka4 66.Qd4+ b4 67.g7 Qb8 (67...Qg8 68.Qa7+ Kb5 69.Qd7+ Kc5 70.Qe6+-) 68.Qe4 Ka3 69.Qe6 Qd8+ 70.Kg6+-;
58. Kh6 Qh3+
59. Kg7
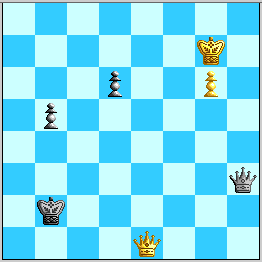
Diagram 10. Is Black done? Far from it!
B2b1) 59...Qd7+ 60.Kf6 d5 61.g7 Qd6+ (61...Qd8+ 62.Qe7 Qb6+ 63.Kf7 Qf2+ 64.Qf6++-) 62.Kg5
B2b11) 62...Qb8 63.Qf2+ Ka1 64.Qf4 Qe8 (64...Qd8+ 65.Qf6++-; 64...Qg8 65.Qf8+-) 65.Qd6!+-;
B2b12) 62...Qd8+ 63.Kh5! Qg8 64.Kg6! Qb8 65.Qe2+ Kb1 (65...Kb3 66.Kh7+-) 66.Kh7+-;
B2b2) 59...d5 60.Qb4+ Kc2 61.Qc5+, and now 61...Kb2 62. Qxb5+ is EGTB+/- #68, while 61...Kd2 62. Qxd5+ is EGTB+/- #76. (The second line looks awful for Black after 62...Kc1 63. Kf7 Qf1+ with the Queen on the first rank, but Black has just enough pesty checks to make it long.)
With the only check and both Pawn moves losing quickly, and King moves not much good either, I originally thought Black was "toasted", but this underestimates the worth of the basic defensive idea of the 58...Qf5 endgame. Both the "creeping moves" 58...Qg4 and 58...Qf5! are tough to beat!
In the rest of the play here, however, the EGTB tables are indispensable not only to verify wins, but even to tell what the strategy is! For example, after 59...Qg4, it appears that 60. Qf2+ only draws: 60...Kc1! 61. Qf1+ Kc2! 62. Kf7 Qd7+ 63. Kf6 Qd8+ 64. Kg7 Qe7+! 65. Qf7 Qe4! 66. Qf2+ Kc1! 67. Qf1+ Kd2!
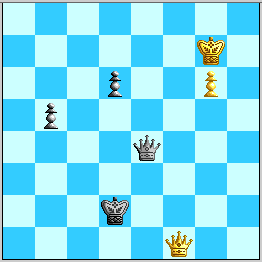
Diagram 11. Just a draw---Black shuttles between c1 and d2.
Black's last was forced as 67...Kc2 68. Qxb5 is
EGTB+/-
#85, but now with the King on d2 the
position
after the capture is drawn by
68...d5! But with Black's Queen on g4, Black
can survive the Qxb5 capture with the King at c2 too---and the reason
Black played there at Move 61 was to render the 66. Kf8 King-walk
idea ineffective, as shown for EGTB reasons below! Another main point
is that if instead 67. Kh6, Black avoids checks or passivity with
67...Qe6 and forges ahead: 67...b4! Now 68. g7 Qe6+ 69. Kg5 b3! or
69. Kh5 Qg8! appear to be drawn! Note the difference from a line
below in which White's King is already on g6. Nor does 68. Qg1+ Kb2!
appear to give White a win, again because of 69. g7 Qe6+ 70. Kh5 Qg8!
or 70. Qg6 Qe3+ 71. Qg5 Qe6+ 72. Kh7 Qe4+! or 72. Kh5 Qg8! We do not
see anything more for White here.
The apparent win against 59...Qg4 is:
60.Qd2+!, with:
B31) 60...Kb3 61.Qd5+! and now:
B311) 61...Qc4 loses quickly to 62.Qxc4+ bxc4 63.Kf6, as White queens with check.
B312) 61...Kb4 62.Kf6 (62.Kf7 Qd7+! 63.Kf6 Qd8+ 64.Kf5 Qc8+ 65.Kg5 Qc1+ 66.Kf6 Qc3+ 67.Ke6 Qc8+ 68.Kxd6 Qd8+! and Black is OK) 62...Qh4+ 63.Kf7 Qf4+ 64.Kg8 Qf6 65.g7 Ka4 66.Kh7 Qh4+ 67.Kg6 Qg4+ 68.Kf6 Qh4+ 69.Kf7 Qf2+ 70.Ke8 Qe3+ 71.Kd8 Qb6+ 72.Kc8, and White wins.
B313) 61...Kc2 (a vulnerable square for the Black king) 62.Kf7 (62.Kf6 should also be good), and now:
B3131) 62...Qf4+ 63.Ke6 Qe3+ (White wins after 63...Qh6 64.Qf5+ Kc3 65.Qf6+ Kc2 66.g7, or 63...Qg4+ 64.Qf5+) 64.Kd7 Qh3+ (64...b4 loses to 65.Qa2+ Kc3 66.g7) 65.Qe6 Qh8 66.Qf7 Qh3+ 67.Kc7, and White wins.
B3132) 62...Qd7+ 63.Kf6 Qd8+ 64.Kf5 Qc8+ 65.Kg5 Qd8+ 66.Kg4 Qb6 (66...Qc8+ loses to 67.Qf5+) 67.Kh5 Qd8 (67...Qb8 loses to 68.g7) 68.g7, and White wins.
B314) 61...Ka4 62.Kf6 Qh4+ 63.Kf7 Qf4+ 64.Kg8 b4 65.Qa2+ Kb5 66.g7 Qf3 (66...d5 loses to 67.Qxd5+, and 66...Qf5 67.Qf7 Qc8+ 68.Kh7 Qh3+ 69.Kg6 Qg3+ transposes) 67.Qf7 Qa8+ 68.Kh7 Qe4+ 69.Kh6 Qe3+ 70.Kg6 Qg3+ 71.Kf5 Qe5+ 72.Kg4 Qe4+ 73.Kg5 Qe3+ 74.Qf4 Qe7+ 75.Kg6 Qe6+ 76.Qf6, and White wins.
B32) 60...Kb1 61.Qd3+ Kc1 62.Kf6! Qh4+ (62...b4 63.g7 Qh4+ 64.Kf7 Qf4+ transposes, while 62...d5 loses to 63.Qe3+ Kb2 64.g7 Qg2 65.Qg5 Qf3+ 66.Kg6 Qe4+ 67.Kf7. White wins after 62...Qf4+ 63.Qf5 Qd4+ 64.Ke7 Qh4+ 65.Qf6 Qe4+ 66.Kxd6) 63. Ke6!
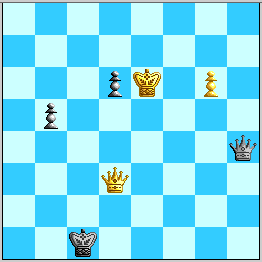
Diagram 12. The most accurate path to g8.
This resembles the main line of the 52...Kc1 draw except that Black is a full tempo down with the b-pawn still at b5, although Black's Queen is more active. Now 63...Qg4+ 64. Qf5 looks strong (more work needed here, but being that tempo up is the reason White should win), so Black must forge ahead.
63...b4 64.g7 Qh6+ 65.Kf7 Qf4+ 66.Kg8, and now:
B321) 66...Kb2 67.Qd5! b3 68.Kh7 Qh4+ 69.Kg6 Qg4+ (69...Qg3+ loses to 70.Kf6 Qf2+ 71.Ke7 Qa7+ 72.Kf8) 70.Kf6 Qf4+ 71.Ke7 Qh4+ 72.Ke8 Qa4+ 73.Kf8 Qf4+ 74.Qf7, and White wins.
B322) 66...b3 loses to 67.Qc3+ Kb1 68.Qxb3+.
B323) 66...d5
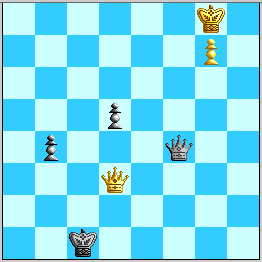
Diagram 13. Sometimes the only legal move is a winning one!
67.Qh3! d4 68.Kh7 Qe4+ 69.Kh6 Qf4+ 70.Kg6 Qd6+ 71.Kh7 Qc7 72.Qh1+, and now:
B3231) 72...Kd2 73.Qg2+ Kc3 74.Kg6 Qd6+ 75.Kh5 Qe5+ 76.Kh4 Qe7+ (76...Qf4+ loses to 77.Qg4) 77.Qg5 Qe4+ 78.Qg4 Qh7+ 79.Kg3 Qg8 80.Qf3+, and White wins.
B3232) 72...Kc2 73.Qg2+ Kc3 transposes to 72...Kd2.
B3233) 72...Kb2 73.Qg2+ Ka3 (73...Kc3 transposes to 72...Kd2) 74.Kg6 Qd6+ 75.Kh5 Qe5+ 76.Kh4 Qe7+ (76...Qf4+ loses to 77.Qg4) 77.Qg5 Qe4+ 78.Qg4 Qh7+ 79.Kg3 Qg8 80.Qf3+, and White wins.
Black can also avoid inserting 67...d4, but White's win is similar (and appears somewhere else in this analysis already). E.g. 67...Kb2 68. Kh7 Qe4+ 69. Kh6 Qf4+ 70. Kg6 Qd6+ 71. Kh7 Qc7 72. Qg2+ Ka3 73. Kh6! and wins much as in the last line. Other details with e.g. 72...Ka1 still need to be filled in here.
This completes White's win against 59...Qg4, but the best is yet to come:
59. ... Qf5!
60. Qe7! ...
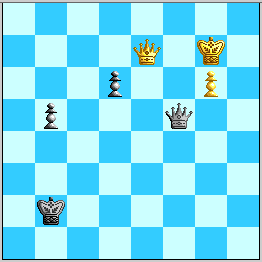
Diagram 14. Black's pawns are still stalled...
Instead, 60. Qh4 fails to 60...Ka3! 61. Kh6 b4! Rather than go passive with 61...Qe6, Black shows that White is too de-centralized: after 62. g7 Qe6+, we see no way to make progress.
The present move, however, takes advantage of Black's King on b2. The Pawns may not move, and 60...Qg4 still leaves the Qf6+ crosscheck problem after 61. Kf7! (As a footnote, if Black's King stood at a2 here, Black would draw by 61. Kf7 b4! 62. Qa7+ Kb1! 63. g7 Qf5+ and now the Qf7 idea is not on with Black's king on b1!)
Play from this point onward is dictated by the table of EGTB results for positions with White's Queen on f7 and King on d6 having taken Black's pawn. For instance, b2 is still a "bogey square" for Black's king with pawns at b5 and g6, as it is with them at b4 and g7 in the basic Qf7 win. The following lines show Black's problems:
60...Ka3 61. Qa7+! Kb2 (bogey is forced) 62. Qf7! Qc8+ 63. Ke7 and wins as all Kxd6 captures in the row for Black's King on b2 are wins, and 63...b4 64. g7 (basic Qf7 win) doesn't change matters.
60...Ka2 61. Qa7+! Kb1 62. Qf7! Now 62...Qe5+ 63. Kf8 is a winning theme seen earlier, and 62...Qg4 63. Qb3+ transposes into line B3). So 62...Qe4, but this plays into the hands of the note about 59...Qg4 60. Qf2+ above: 63. Qf1+! and 64. Qxb5 will be EGTB+/- after 63...Ka2 and 63...Kc2---Black's King is out of reach of the saving square d2!
This suggests Black's recourse: run toward the center!
60. ... Kc2!
Now comes a move by White dictated by the tables:
61. Qc7+!! ...
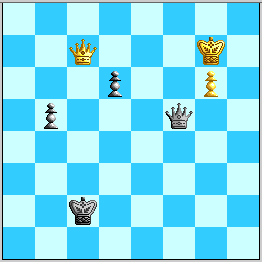
Diagram 15. An ultimate computer move?
As shown above Black cannot go back to the b-file, and a glance at the table shows that 61...Kd1 is a loser. Now between 61...Kd3 and 61...Kd2, the table shows that the latter is better, and it makes the most sense on the board as well (we'll see that it ultimately transposes). So Black's reply is "EGTB forced":
61. ... Kd2!
62. Qf7!
Diagram 16. Setting up the King walk.
Now what was the point of forcing Black's King over to d2? One point is that on 62...Qg4, 63. Qd5+ centralizes with check and should be crushing. But the real point can be seen by looking at the "Qa8" column of the second table in the file kingwalkegtbs.html. With King on c2 the Queen in the corner holds, but with King on d2, it doesn't. And that seems to be why Black loses this entire ending!
62. ... Qe4
63. Kf8! Qa8+
63...b4 fails to 64. Qf2+! and:
(a) 64...Kc1 65. g7 Qa8+ 66. Ke7/f7 Qe4/d5+ (66...Qb7+ 67. Kf6+/-) 67. Kf6 Qe5+ 68. Kg6 and the upcoming interposition will win as shown here;
(b) 64...Kd1 65. g7 Qa8+ 66. Ke7/f7 Qe4/d5+ 67. Kf6 Qe5+ 68. Kg6 Qe6+ 69. Qf6 Qg4+ 70. Kh7 Qh3/h5+ 71. Qh6 Qf5/d3+ 72. Kh8 and now:
b1) 72...Qe5/d4 73. Qh3! Kc1/c2 74. Kh7, and we transpose into the winning lines against 59...Qg4 above.
b2) 72...Qc3 73. Qh1+ Kb2 (73...Kc2 74. Qe4+) 74. Qd5! Qh3+ 75. Kg8 b3 76. Kf7 Qd7+ 77. Kg6! Qg4+ 78. Kf6 transposes to the win at the top of Move54.html (78...Qf4+ 79. Ke7 Qe3+ 80. Kf8 Qf4+ 81. Qf7 Qh6 82. Qf5 d5/K-moves 83. Kf7+/-), or 76...Qe8+ 77. Kh7! Qe7 78. Qd4+ K-any 79. Kh8+/-.
64. Ke7 Qa7/b7+
65. Kf6!
The point is to lure Black's Queen away from c8!
65. ... Qd4/f3/c3+
66. Ke6 Qe3+! (else 67. Kxd6 EGTB+/-)

Diagram 17. How can White get away?
67. Kd7 Qa7+
If 67...b4 here, 68. Qd5+! is smashing.
68. Kc6! Qc5+
The point was 68...Qa8+ 69. Kxd6 EGTB+/- #48! And 68...Qa6+ 69. Kd5! Qa2+ (69...b4 70. Qf4+ Kc3 71. Qd4+ Kb3 72. g7+/-) 70. Kxd6 is ditto. Now after White's next the checks are over and Black looks done, but the reply opens up an amazing maze of new variations.
69. Kb7 b4!
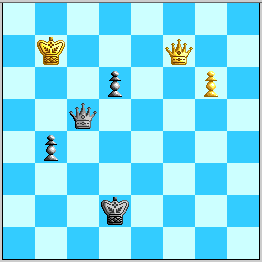
Diagram 18. Just when you think it's over, it's just beginning!
Now 70. g7 seems to fail to win after 70...Qb5+ 71. Kc8 Qc5+!, when 72. Qc7 fails after 72...Qf5+! 73. Kb8 Qg6! 74. Ka7! b3 75. Qb7 Ke2! 76. Qb5+ Kf2 77. Qb6+ Kf1! 78. Qd4 d5!! 79. Kb7 Ke2! 80. Kc7 Qe6 and White just doesn't have enough play.
70. Qf4+! Kc2
Black's last was dictated by the following: on other King moves, 71. g7 Qb5+ 72. Kc7 Qa5+ (72...Qc5+ 73. Kd7 lets White's King rejoin the g-pawn) 73. Kxd6! is EGTB+/- with Black's King on d1, d3, e2, e1. And on 70...Kc3, 71. Qc1+ finishes Black. (If Black's King stood on d3 at Move 70, White would transpose by 70. Qf3+ Kd2/c2 71. Qf4/e4+.)
71 Qe4+! ...
and now:
(i) 71...Kd2 72. Qg2+! Kd3 (going to the c-file makes a later Qc6 interposition killing, and 72...Kd1 73. Qg4+! or 72...Ke1 Qe4+! take away squares that Black's Queen would need) 73. g7 Qb5+ 74. Kc8! Qc5+ 75. Kb8 Qb5+ 76. Qb7 Qg5
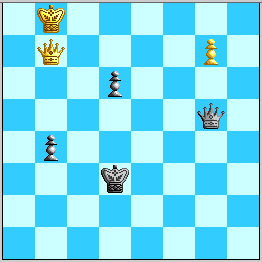
Diagram 19, White to play. Find the gorgeous win.
77. Ka7!! Qg1+ 78. Ka8!! Qg5 79. Kb8!! A poster-child for Zugzwang and Triangulation! (Verified as +/- by MacChess 5.0.1 at 2 billion nodes.)
Last and most, Black has
71...Kb2
72. g7 Qb5+
73. Kc8 Qc5+
74. Kd8 Qg5+
75. Qe7 Qd5!
Welcome to the wild world of the Qe7 Interposition Win (it is a little less wild if Black played 71...Kb3 as 76. Qe3+ would now be a later stage of it)!