
Beginning to Debug with JIVE
November 5, 2007 - 20:45:00 UTC by Jeffrey K. Czyz
This tutorial demonstrates how to initiate debugging with JIVE. It introduces the key concepts of JIVE and also briefly describes each of the views provided by the JIVE perspective. Users new to JIVE should read this tutorial first. A working knowledge of Eclipse is assumed.
Enabling Debugging with JIVE
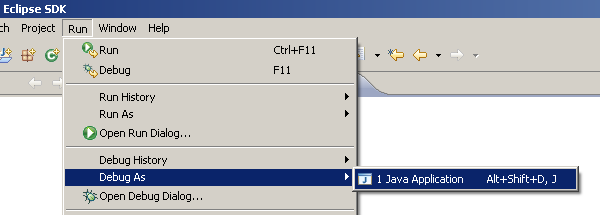
The first step in debugging a program with JIVE is to create a launch configuration for the program. A launch configuration specifies all the necessary information for launching a program, such as the class to be launched, program arguments, JRE, classpath, etc. A default launch configuration is created when a program is first launched through either running or debugging. To debug a program, select Run → Debug As → Java Application.
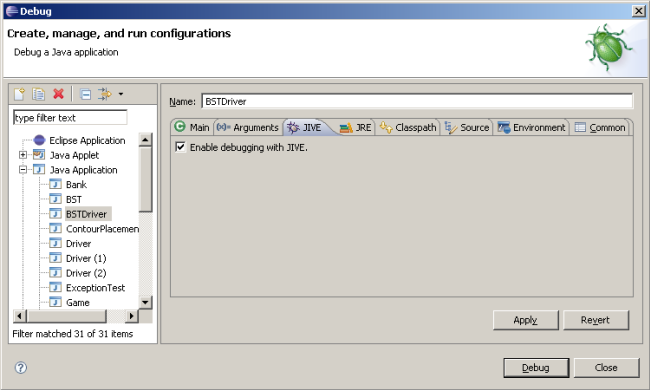
Once a launch configuration is created it will appear listed in both the Run and Debug dialogs. You will need to edit the launch configuration to specify that JIVE should be used when debugging. Select Run → Open Debug Dialog... to open the Debug dialog. Then select the appropriate launch configuration on the left side.

Now that the desired launch configuration is selected, switch to the JIVE tab and check the box next to Enable debugging with JIVE. To save this change and launch the program, select the Debug button at the bottom of the dialog.
JIVE Perspective and Views
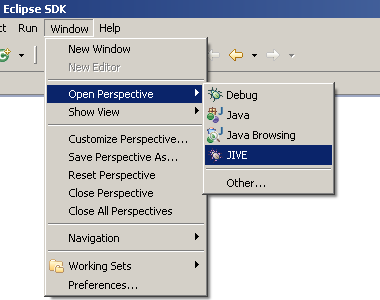
JIVE provides two main views for visualizing the execution of Java programs: the Object Diagram view and the Sequence Diagram view. These views are available through the JIVE perspective. If your program hits a breakpoint, Eclipse will prompt you to open the JIVE perspective. Otherwise, you may open it manually by selecting Window → Open Perspective → JIVE. If the JIVE perspective is not an available option, select Other... instead and find it in the list.
Both views provide controls for stepping and running through a program. You may traverse a program's execution either forward or backwards. These controls are available after a program terminates or if it is fully suspended. The normal stepping controls provided by Eclipse are also available when a program is suspended.

Also, zoom controls are available for the object and sequence diagrams. They serve to scale the diagrams geometrically.

Object Diagram View
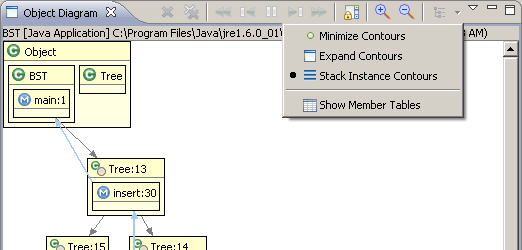
The Object Diagram view depicts the execution state of a program. The program's static context is located at the top portion of the diagram. All instantiated objects are placed immediately beneath the static context. Connections between objects represent object references. Method activations also appear in the diagram within their appropriate object or static context. A colored connection between method activations represents a return links. Each thread is assigned its own color.

The object diagram uses a contour model as its underlying representation. By default, member tables are hidden and only the derived most object contexts are shown. The pull-down menu can be used to specify a different level of granularity.
Sequence Diagram View
The Sequence Diagram view depicts the execution history of a program. The object and static contexts existing during the the program's lifetime are listed across the top of the diagram. Method activations appear as vertically growing rectangles placed below their object or static execution contexts. As with the object diagram, each thread is assigned its own color. Solid connections in the diagram represent method calls, and dashed connections represent method returns.

The sequence diagram's vertical axis represents time. The long dashed line running horizontally across the entire diagram (not pictured) represents the current point of execution. The runtime state that occurred at this point is shown in the object diagram. Using the stepping controls mentioned earlier, a past program state can be revisited. Alternatively, one may jump directly back to a particular state using the sequence diagram. To do this, right-click on a method activation of interest to bring up its context menu. Then select the the event corresponding to a state change.

Conclusion
This tutorial served as a crash course in debugging with JIVE. It gave a brief run-through of how to initiate a JIVE debugging session and also described the runtime diagrams that JIVE provides. The object diagram was used to show the execution state while the sequence diagram depicted the history of execution. JIVE's stepping and jumping mechanisms were also covered. Future tutorials will cover JIVE's more advanced debugging capabilities.