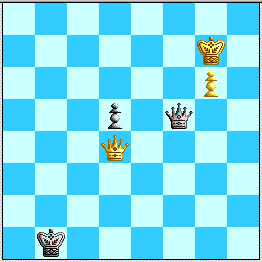
Diagram 1: Position after 58...Qf5.
Diagram 1: Position after 58...Qf5.
[Status: 11/20. Incomplete]
The most basic ideas for both players are:
The Kasparov-Alterman winning plan mixed strategy (1)---banking on a certain position they labeled "G" being a win---with strategy (2) in a key goal line in which White's Queen penetrates to b6 with check and helps White's King walk along the 7th rank. World Team member IM2429 showed the effectiveness of strategy (3) in his "funerals" post, preserved on the 99% Energy BBS at http://www.gamersx.com/messages/view.asp?id=wnwcg. We shall demonstrate that the Kasparov-Alterman plan fails because "Position G" is in fact a draw, and that Black can survive strategy (3) by timely counterattacks and a stalemate defense.
The earliest instance of this general theme that I see comes in a line against Fritz's 65...Qc3 defense not mentioned by Kasparov and Alterman: 58...Qf5 59. Kh6 Qe6 60. Qd1+ Kb2 61. Qd2+ Kb1 62. Qd4 Ka2 63. Kg5 Qe7+ 64. Qf6 Qe3+ 65. Qf4 Qc3!? 66. Kf5!?. Their idea is to transpose into their main Kf7 idea via 66...Qc8+ 67. Kf6 Qd8+ (67...Qf8+ is no good after 68. Kg5 Qe7+ 69. Kh6 Qe6 70. Qf3! forcing a breakthrough with 71. Kh7 next) 68. Kf7, but along the way Black can try 67...d4. Then 68. g7 d3 leaves a position where White curiously cannot cover g8 with checks, and cannot capture on d3 with check either, e.g. 69. Qd2+ Ka1 70. Qc3+ Ka2. However, White wins via the quiet 69. Qd4!
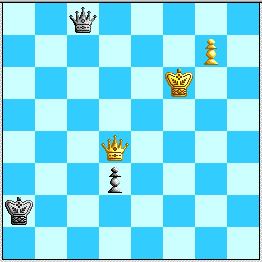
Diagram H: "Hogtie".
Neither Black's King nor Pawn can move on pain of capture with check and an EGTB loss. White's plan is to walk his King carefully over to take Black's pawn on d3, leaving a White win known from the Averbakh study. This setup is known to win for all configurations of White's King and Black's Queen except:
Because of the last point, play from the diagram might continue 69...Qc6+ 70. Ke5(!) Qe8+ 71. Kf4 Qf7+ 72. Ke3! Qb3 73. Ke4!, and this Zugzwang forces Black to give way. Less careful play by White yields 70. Kf5!? Qf3+ 71. Ke5 Qh5+, when 72. Ke4 Qe2+ 73. Kd5 Qg2+! lets Black escape. White however can still win by exploiting a second pretty theme: 72. Kd6 Qg6+ 73. Kc5 Qf7 74. Qc4+! Qxc4+ 75. Kxc4 d2 76. g8=Q d1=Q 77. Kc3+ and mate soon! "Hogtie" positions arise in "Position G" and in the main lines A and D of 58Qf5.html.
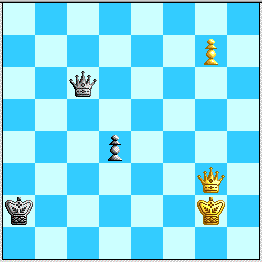
Diagram P1: Perpetual on h6, g6, c6, c2, c1, and c4!
This works with Black's King on any of the squares a1, a2, b1, and b2, as White never gets to interpose his Queen on f2 or e1, and White's King is prevented from ever retiring to h1, which would win.
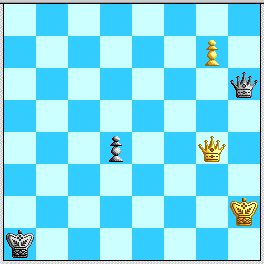
Diagram P2: Perpetual on c1,d2,e3, h6, and g5.
As with the "Cannon Smelter", this works with Black's King on any of a1,a2,b1,b2, and it is important that Black's use of h6 prevents White from interposing on h3. Unlike the "Smelter", this one works also with White's g-pawn on g6, but it needs Black's d-pawn to be on d4 in order to support the Queen after 1. Kg2 Qd2+ 2. Kf1 Qc1+ 3. Kf2 Qe3+. (With Black's pawn on d5, an attractive line here is 3. Kf2 Qc5+ 4. Kg2 Qc2+ 5. Kh1 Qh7+ 6. Kg1 Qb1+ 7. Kf2! Qb6+ 8. Kg2 Qb2+ 9. Kh1! +/-.) Curiously, c6 is no longer a good square to check from: 1. Kg2 Qc6+? 2. Kg3! (2. Kf2 wins too) Qc7/c3+ (2...Qd6+ 3. Kf2 Qf6+ 4. Ke1 Qe5/e7+ 5. Kd1 +/-, or 3...Qh2+ 4. Kf1 Qh1+ 5. Qg1 Qf3+ 6. Ke1 +/-) 3. Kh4! Qh2/e1+ 4. Kg5/h5 Qe5+ 5. Kh6! reaching a sneaky position (to be covered in full in PositionGextra.html) in which Black is helpless!
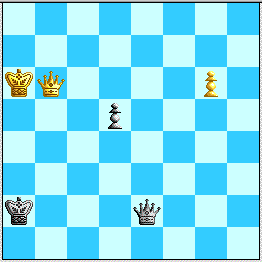
Diagram P3: A major blow to White's Q-side run plan.
Black checks on e1, e2, e7, and e8 until White runs his King to b7. If 1. Ka7 Qe7+ 2. Ka8 Qe8+ 3. Kb7, Black replies 3...Qd7+ when 4. Ka6? d4! equalizes and 4. Qc7 Qb5+ 5. Ka7 Qa4+ 6. Kb6 Qb3+! leads nowhere. So 1. Kb7, and now 1...Qe7+ 2. Qc7! Qb4+ 3. Ka8! and 1...Qg4 2. Ka8! Qc8+ 3. Ka7! work well for White. (In the last line, not 2. Kb8? d4! when 3. Qa7+ Kb2 4. g7 d3 and 3. Qa7+ Kb2 4. Qb7+ Ka1!? 5. g7 d3 give White no win.) However, Black has the subterranean resource 1...Qg2!?!, when I've left this "unclear" for now: White can essay 2. Kb8 d4 3. Qa7+ Kb1 4. g7 d3 5. Qb6+ Kc2 6. Qc5+ Kd1, but I see no win there as Black has enough room for checks after 7. Qf8 Qb2+. Both 2. Qe6 Kb1 3. Qf5+ Kc1! and 2. Qc6 Qb2+ seem not quite to be working.
[Status Update, 11/20: It actually draws!]