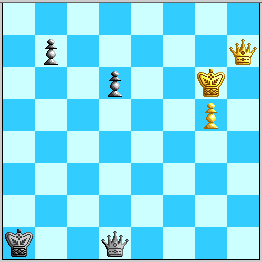
Diagram 1, White to move. The easiest draw for Black.
Diagram 1, White to move. The easiest draw for Black.
Black steps away from the discovered check, and White must move his Queen. Players may have feared 52. Qxb7 (hence the votes for 51...b5?!), but 52...Qc2+, 52...Qd3+, 52...Qd4, 52...Qg4, and 52...d5! (strategically the best reply) all draw. For example,
52.Qxb7 d5 53.Kf7 (53.Kh6 Qd2! 54.Kg6 d4 55.Kf5 Qf2+ is equal) 53...d4 54.g6 d3 55.g7 Qf1+ 56.Ke8 Qe2+ 57.Kf8 d2, leads to a draw.
Also, 52. Qh5!? seems no more effective than 51. Qh5 would have been. Indeed, it is less effective: 52. Qh5 Qc2+! 53. Kg7 Qc3+! 54. Kh7 Qc7+! 55. Kh6 Qc1! and now Qg6 is not check and White has no checks at all. Black's Queen is well-placed on the c-file and pinning from behind, and Black will proactically equalize the Pawn race with either 56...b5 or 56...d5 when after White's Queen moves. White's only real strategy is to try to inch the Queen in with checks:
52.Qg7+ Ka2 53.Qf7+ d5. (Here 53...Ka3?! appears to make the 54. Kg7! idea effective. More analysis is needed---currently I [KWR] believe that Black has exactly one holding move after 53...Ka3 54. Kg7, and likely one we might not have played! Finding this move and proving why is an excellent test of understanding the Move 54 analysis, most specifically that of 54. Qf2 Qd3.) Now White has three major tries.
A. 54.Qf2+ Kb1 55.Kf6 d4 56.g6 d3 57.g7 (57. Qf5 Qc2! is an immediate draw, e.g. 58. g7 d2! 59. Qb5+ Qb2+ 60. Qxb2+ Kxb2 61. g8=Q d1=Q 62. Qg2+ =, or 58. Qf1+ Kb2 59. g7 Qc6+ and Black has a perpetual as White cannot gain by offering to trade Queens, as with 60. Kg5 Qd5+ 61. Qf5 Qxf5+ 62. Kxf5 d2=) Qg4!
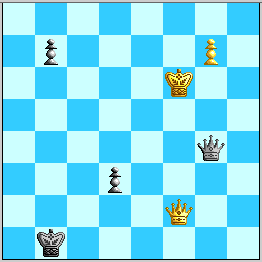
Diagram 2, White to move. Delicate but not too dangerous for Black.
This defense was found by SmartChess Online analysts and further refined by Regan, Richard Maisiak as "Spy49", and other WT analysts. It is vital that Black's Queen covers c8 as well as g8. Now 58. Qe1+ and 58. Qf1+ are both ineffective after 58...Kc2, and 58. Kf7 Qd7+ is nothing, so White is down to 58.Qb6+ Kc1, and now:
A1) 59.Qc5+!? Kb1! 60.Qd5 Qf4+ 61.Ke6 Qg4+ 62.Kf7 Qf4+ 63.Ke8 Qa4+! maintains equal chances.
A2) 59.Qc7+ Kb1 60.Qxb7+ (EGTB=) Kc2 61.Qc7+ Kd1 (but not 61...Kb2?? 62.Qb8+, and White wins) 62.Qf7 Qf4+ (all Black Q checks draw), and Black is OK, for example: 63.Kg6 Qg3+! (Regan's move, which looks better than the 63…Qe4+ that had been explored by SmartChess Online*) 64.Kf5 Qf2+ 65.Ke6 Qa2+ 66.Ke7 Qa7+ 67.Kf8 Qa8+ 68.Qe8 Qf3+, with equal chances.
(*But 63...Qe4+ draws too: after 64. Qf5 Black can even stand pat with 64...Qc4! An instructive win, however, is 63...Qe4+ 64. Qf5 Qg2+ 65. Qg5 Qc6+? 66. Kh5! Qh1+ 67. Kg4!, with the continuation viewable here. White's King's plan is to eat Black's pawn on d3 and explose Black's King, and Black cannot stop it.)
A3) is somewhat delicate---we knew that on 61. Qc6+, Black must play 61...Kb1/b2!, as 61...Kd1 leads to a White win with 62. Qd5! The EGTB server started at 60. Qxb7+ backs this up, showing that 62. Qd5 is the only move to win and ckeckmates in 42 more moves. However, World Team analysis had removed all terror from this line, and from other tries by White between 54. Qf2+ and 60. Qxb7+.
B. 54.Kg7 is well met by 54…Qd4+! If the moves g6 and b5 were already played then the reply Kf8 would be a winning Pin Battery for White, but now 55. Kf8?? Qh8+! 56. Ke7 Qe5+ or 56. Qg8 Qxg8+ favor Black! This is the point of Black's play---the weakness of g5 factors also into 55. Kh7 Qh4+. White has only:
B1) 55. Qf6 Qe3! (55…Qe4 or 55…Qc4 also seem playable) 56.g6 d4 57.Kf7 (57.Kf8 d3 58.g7 Qc5+! is equal) 57...d3 58.g7 d2 59.g8=Q Qb3+ 60.Kf8 Qxg8+ 61.Kxg8 d1=Q 62.Qf2+, with a draw.
B2) 55. Kg8 b5! 56. g6 (White has no checks) b4 57. g7 b3 58. Kf8 Qc5+ =.
C. During the actual game, we believed that 54. Kh7 was White's most dangerous try, and since 54...b5 55. Qf2+ K-moves 56. g6 looks difficult for Black, that
C1) 54...Qc2+ 55. g6 b5
was necessary. Now 56. Kh6 leads to dangerous play---in order to prevent White from penetrating on the Queenside, Black must organize an "e-file block" by 56...Qh2+ (or 56...Qd2+ 57. Kh5 Qe2+) 57. Kg5 Qe5+. White has some dangerous tries here, however. One is to try to penetrate the King by 58. Kg4 Qe4+ 59. Kg3 Qd3+! (Black keeps an eye on White's pawn to prevent interpositions that would set up the "Cannon" theme) 60. Kg2 Qe4+ 61. Kf2 Qc2+ 62. Ke3 Qe4+! (else White penetrates) 63. Kd2 Qd4+ and White is stopped. More dangerous is 58. Qf5, when our original idea 58...Qe7+ 59. Qf6 Qe3+ 60. Qf4 Qg1+? 61. Kf6 b4 loses as 62. Qxb4 is EGTB+/-, mate in 77 more moves (transposing into lines that could have been reached in the actual game from 58...Qf5). Black can, however, defend simply by 60...Qe7+ 61. Kg4 b4!
However, all this is mooted by the discovery (later by KWR---did B.McC have it?) that 54...Qh1+! is a bang-bang draw:
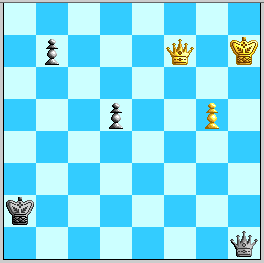
Diagram 3: Black's b-pawn is faster!
C2) 54. Kh7 Qh1+! 55. Kg8 (there does not seem to be much independent point in 55. Kg7) b5! and now White's most dangerous order of moves seems to be:
C21) 56. g6 b4 57. Qf2+! Ka3!
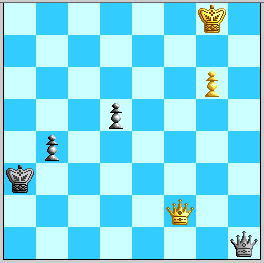
Diagram 4. Black is doing fine in the Pawn race, though Q is on the edge.
Not 57...Kb1? 58. g7 b3 59. Qf5+! K-any 60. Kf7 and White's queening first is decisive. Black may transpose to the present line by 57...Ka1!? 58. Qa7+ Kb2 (58...Kb1 59. Qh7! looks like a winning shot), but this gives White the extra chance 58. Qf6+!? d4 (more or less forced) 59. g7 b3 60. Qa6+ and 61. Kf8. Now comes:
C21a) 58. Qa7+ Kb2 (58...Kb3? 59. g7 d4 60. Kf8 looks winning) 59. g7 b3 60. Kf8 Qh6
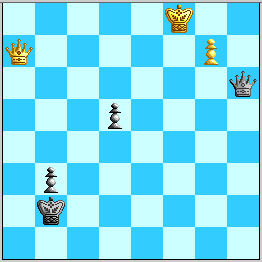
Diagram 5. Black has to pin from the edge but holds comfortably.
Black looks passive, but the dominating factor in the position is Black already having the b-pawn at b3! White has:
C21a1) 61. Qd4+ Kc2! (61...Ka2 62. Qa4+ Kb2 63. Qg4! is a little sticky for Black) 62. Qf2+ Kc1 63. Qf1+ Kd2! (Black cannot allow Qf5 with check) 64. Qf5 Qd6+. Black's point is that White cannot win by offering to trade Queens by an interposition. Hence this is a perpetual check.
C21a2) 61. Qf2+ Kc1 transposes into C21a1), although 61...Ka3 is also fine. Incidentally, now 62. Qe1+ Kc2 63. Qe2+ Kc1 64. Kf7 is nothing after 64...Qf4+.
C21a3) 61. Ke8 Qe6+ 62. Qe7, and now all of Black's three major alternatives to the losing 62...Qc8/c6+?? 63. Kf7+/- appear to hold:
Other move orders by White allow Black no worse than transposing into the above:
C21b) 58. Qa7+ Kb2 59. Qd4+ Ka2!? (59...Ka3 60. g7 b3 61. Kf8 Qf3+! 62. Ke7/e8 Qg3! is fine too) 60. Qxb4 d4! EGTB=.
C21c) 58. g7 b3 (58...d4 59. Kf8! Qa8+?! 60. Ke7! Qb7/e4+ 61. Kf6 looks sticky, but 59...Qh6 may still be fine) 59. Qc5+ (59. Qa7+ transposes into C21a) Ka2 60. Qa5+ Kb1, and Black is out of difficulty.
C22) 56. g6 b4 57. g7 b3 58. Kf8 (58. Qa7+ Kb2/b1 transposes into the above or the following), Qh6! and now after 59. Qa7+ Kb1 (!---again, 59...Kb2 ytansposes into C21a) 60. Ke8, the same enumeration of three drawing lines as above:
C23) 56. g6 b4 57. Qf2+ Ka3! 58. Qa7+ Kb2 59. g7 b3 60. Kf8 Qh6! 61. Ke8 Qg6+ 62. Qf7 Qc6+, and neither 63. Qd7 Qg6+ nor 63. Ke7 promises much, the latter because the Kxd5 positions 8/5QP1/8/3K4/8/1p2q3/1k6/8+b and 8/5QP1/1q6/3K4/8/1p6/1k6/8+b are (easy) draws.
C24) 56. Qf2+ Ka3 57. Qe3+ Ka4! 58. Qa7+ Kb3 59. g6 (Qd4 Qe4!=) d4! and looks =, or 58. g6 d4!= (ditto if White played 55. Kg7). That appears to exhaust this line.
If any WT member saw 54...Qh1+ out to a draw, please let us know. It is not in the latest pre-Move-51 FAQ I saved---file "0928a.pgn"---but Paul recalls 54...Qh1+ 55. Kg8 b5 56. g6 b4 57. g7 b3 58. Qa7+"!" Kb1 59. Kf8 Qh6 60. Ke8 Qe6+ 61. Qe7 appearing, with a note on 61...Qc8+(?) losing after 62. Kf7 Qf5+ 63. Qf6 Qd7+ 64. Kg6 Qg4+(?!---maybe 64...Qc8 holds here) 65. Kh7+/- and "more analysis needed" appearing in one from the following days. This certainly is a fairly short demonstration of a clean draw, compared to anything else in the analysis of this ending! (And we can cut the bulk by ignoring 59...Kb1 in C22.) Knowledge of it would have greatly improved the perception of 51...Ka1! as a drawing resource, overcoming the doubt that the line 54...Qc2+ 55. g6 b5 56. Kh6!? caused.