(a) 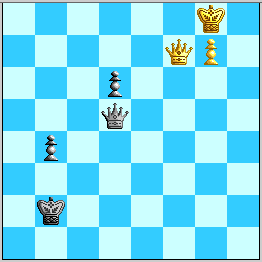 (b)
(b) 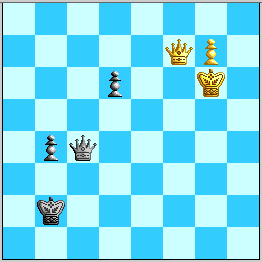
(c) 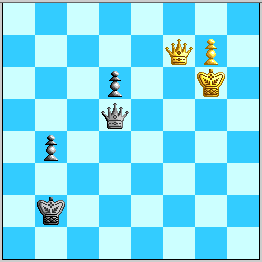 (d)
(d) 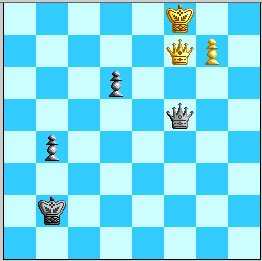
Diagram 1, Black to move. Four forms of the Qf7 winning plan.
(a)  (b)
(b) 
(c)  (d)
(d) 
Diagram 1, Black to move. Four forms of the Qf7 winning plan.
The above are some of the many ways that this basic tabiya can arise. [Status 3/10/00: (a) and (d) are draws, owing to Helio Cardoso's spotting of an oversight in Diagram 4, but (b) and (c) appear to be still wins.] These particular diagrams also show some limitations of the defense that matter in variants with Black's King on other squares. The theme works in its general form, however, only with Black's King on the "bogey square" b2. Diagram 1(a) seems to be the best for the defender, as by 1...Qa8+ or 1...Qe4, Black gets to choose which side White's King will emerge from. This position arises via the psychedelic main line 54. Qf4 Qd3 55. g6 Qc3+ 56. Kf7 Qc7+ 57. Kf8 Qb8+! 58. Kg7 b4 59. Qd4+! Ka2 60. Kh7 Qb7+! 61. g7 Qf7! 62. Qd2+ Ka3 63. Qc1+ Ka4 64. Qc6+ Kb3 65. Qe4! Ka3! 66. Qa8+ Kb2 67. Qf8! Qh5+ 68. Kg8 Qd5+ 69. Qf7. We analyze, then, from Diagram 1(a), re-numbering White's last as 1. Qf7.
A. 1...Qe4 2. Kf8 Qa8+ 3. Ke7. Black's choices show the main reasons the whole strategem wins for White.
(A1) 3...Qb7+ 4. Ke6 Qe4+ 5. Kxd6! The new Peter Karrer tablebases prove that this position is winning for White (mate in 26), but the reason can be explained without them: White has escaped having to guard his Queen, and Black, who must continue checking, cannot get "behind" the White King anymore. White's King can amble over to each Black's b4-pawn, thereby exposing Black's King to cross-checks down the b-file. Black then cannot prevent White's King from heading to the 8th rank, and eventually runs out of checks.
(A2) 3...Qa7+ 4. Ke6 Qe3+ 5. Kxd6! EGTB+/- (mate in 25).
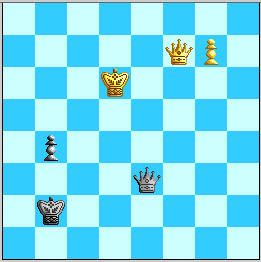
Diagram 2. Key goal position of the whole stratagem.
Now by 5...Qb6+ Black "gets behind" and can guard the pawn, but the blocking effect of Black's b-pawn is felt after 6. Kd5''' Qb5+ (6...Qd8+ is technically the longest defense but introduces no new challenges over line A1) 7. Kd4!'' (Key for annotations of EGTB moves). On the forced 7...Qb6+, White does not try to win the pawn by 8. Kc4 Qc6+ 9. Kxb4? Qb6+! as his King is "trapped" on b4-a4 owing to the skewer 10. Kc4 Qb3+, but switches direction with 8. Kd3!'' Now 8...Qa6+ 9 Kd2 Qd6+ 10. Ke2 Qe5+ (...Qa6+ 11. Ke1 Qa1+ 12. Kf2 +/-) 11. Kf3! Qc3+ 12. Kg2 Qc6+ 13. Kg1 Qc1+ 14. Qf1+/- loses quickly, as does 8...Qa6+ 9. Kd2 Qh6+ 10. Ke2 Qh2+ 11. Qf2 Qb8 12. Kf1+! +/-, so best is 8...Qb5+. Then White must be a bit careful, e.g. 9. Qc4? only draws, and 9. Kd2?! Qg5+! makes life much harder (mate in 29), but 9. Ke3!'' works. To avoid transposing into the above losses (or 9...Qg5+ 10. Kf3!+/-) Black must continue 9...Qc5+ 10. Kf3!''' Qc6+, but 11. Kg3 Qd6+ 12. Kg2 Qc6+ 13. Kg1 is the same end anyway.
(A3) 3...Qb7+ 4. Ke6 Qc8+ 5. Kxd6 EGTB+/-., as play will transpose into (A1) or (A2).
However, Black can check and force White's King onto the squares g6 and f6. Looking at Black's ability to play ...Qg3+ and ...Qe5+ with the d-pawn's support, one might even dismiss this as an "instant draw", as I did at first! White is able to win because the squares f5 and g5, "spacewalking" away from the Queen on f7, are not the same as f6 and g6 for White's King, and take key squares away from Black's Queen. This "King dance" is IMHO the finest and most delicate one in the entire Queen ending, and of more import than the Kf6-f7-e6-f6-f5 dance in the main 58...Qf5 line. The following play, in which all checking squares for Black's Queen down to the first rank have independent significance, is gossamer and exact. If there is an error in my analysis, and if Black can hold, then not only this file but likely White's entire winning ideas in the 54. Qf4 Qd3 and 54. Qf2 Qd3 lines all go "poof"!
B. 1...Qa8+ 2. Kh7 and now:
(B1) 2...Qh1+ 3. Kg6 Qg2+ 4. Kf6 Qf3/f2+ 5. Ke6 Qe4/e3/e2/e1+ 6. Kxd6 wins as in line A, while 5...Qb3/h3+ 6. Ke7 Qe3+ 7. Kf8+/- and 5...Qg4+ 6. Ke7 Qe4+ 7. Kxd6+/- take care of alternatives.
(B2) 2...Qh1+ 3. Kg6 Qe4+ 4. Kg5! (Not 4. Qf5 as after ...Qc4! it is not clear whether White has gained anything!) Now we have seen from (B1) how 4...Qg2+ loses, and 4...Qe3+ 5. Qf4! Qg1+ (5...Qc5+ 6. Kh4! Qd5/c8 7. Qf2+ Ka1/a3 8. Qg1/g3+ +/-) 6. Qg4! transposes as a forward reference into move 9. of line (B3bi) below. So 4...Qe5+ 5. Kg4, and again a big branch for Black:
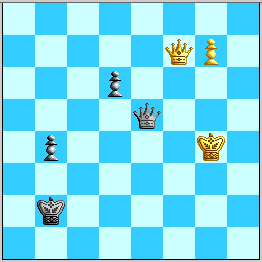
Diagram 3. White has just enough room to escape on the kingside.
(B3) 2...Qe4+ 3. Kh6 (3. Qg6? Qh4+ 4. Qh6 Qe4+ 5. Kh8 Qe5/d4 or 4. Kg8 b3 seems only to draw) Qe3+ 4. Kg6, and now:
(B3a) 4...Qg4+ 5. Kf6 Qf4+ 6. Ke7! Qe5/e3+ 7. Kf8 +/-, while 6...Qe4+
7. Kxd6! is +/- as in line (A2). Meanwhile, 5...Qf3+ 6. Ke6! and
5...Qd4+ 6. Ke7! lead to the same places. So Black must play 5...Qh4+
6. Kf5! Qh3+! (6...Qf2+ 7. Ke6 leads to B1) 7. Ke4, and now some wild
King-walks result.
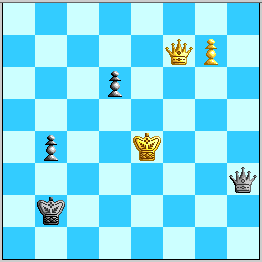
Diagram 4. A hazardous King march through the center.
(B3b) 4...Qg3+ 5. Kf5 Qd3+? (5...Qe5+ 6. Kg4 transposes into (B2), while 5...Qf3+ 6. Ke6 is line (B1) heading for A---but 5. Qh3+ is (B3a) with a draw) 6. Kg4! Now 6...Qe4+, 6...Qd4+, and 6...Qe2+ were all considered in (B2), so the only distinctive option is 6...Qd1+, and now White does a surprising reversal of motion: 7. Kg5!
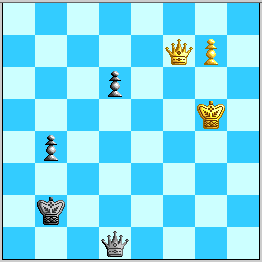
Diagram 5. Like a "reverse" play in American football!
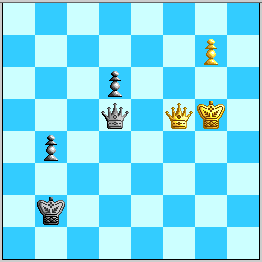
Diagram 6. Main point is that White's King is on g5 not g6!
9...Qd2+ now fails to 10. Kg6 Qg2+ 11. Kf7 Qb7+ 12. Kf6+/-, and 9...Qg2+ 10. Qg4 is +/- as before. The first main point of White's King being on g5 is 9...Qc4 10. Qg4! and we likewise head into the lines with 7...Qc1+. Also 9...Qb3 10. Kf6! Qc4 11. Ke7 Ka3 12. Qf3+ is +/-, as is 10...Ka3 11. Ke7 Qg3 12. Kf7 Qb3+ 13. Kf8. Hence Black has nothing left but 9...Qg8, and finally White can cash in all his tempo gains: 10. Kf6! Qd8+ (10...b3 11. Qe6 Qd8+ 12. Kg6 +/-) 11. Kg6! Qa8 (11...b3 12. Qf8+/-; 11...Qe8+ 12. Kh7! Qe7 13. Qf4!+/- has been seen before) 12. Qe6 Qg2+ 13. Kf7 Qb7+ 14. Kf8 Qb8/a8+ 15. Ke7 Qb7+ 16. Qd7 Qe4+ 17. Kf8 Qa8+ 78. Qe8 Qf3+ 19. Qf7! and we have found line A again!
(B3c) 4...Qd3+ 5. Kg5! This appears to be quicker than 5. Kf6 Qc3+ 6. Kf5 Qc2+ 7. Kg5 Qd2/c1+. Now all of Black's checks lead to already-treated lines: 5...Qg3+ 6. Kf5 is (B3b), 5...Qe3+ 6. Qf4! is in (B2) referring to (B3bi), and 5...Qd2+ 6. Qf4 is (B3bii).
This completes the analysis Diagram 1(a), and it encompasses the wins from (b) and (c) as well. Diagram 1(d), however, is again a draw:
C. 1...Qc8+ 2. Ke7 Qc7+ (2...Qb7+ loses as in line A) 3. Kf6 (inserting 3. Ke6 Qc4+ 4. Kf6 does no harm, as Black's other checks besides 4...Qc3+ have been handled in line B) Qc3+ 4. Kg5 (or 4. Kf5 Qh3+! holding), and now:
The variant cases appear to be still wins.
Variations with Black's Pieces on Other Squares:
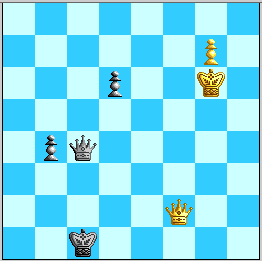
Diagram 7. A potentially knotty problem solved by scurrying back to h7!
The problem is that 1. Qg1+ Kb2! 2. Qg2+ Kb1! 3. Qg5 Ka2! appears to get nowhere. Hence White must use some subtlety:
1. Qf7! and now:
D. 1...Qg4+ 2. Kh6! and the point is that Black cannot access the saving square e3! 2. ... Qh3+ (...Qh4+ loses faster) 3. Qh5 Qe6+ 4. Kh7 Qe4+ 5. Kh8 Qd4 6. Qf3! and 6...b3 7. Qxb3 is not a perpetual, or 5. ... Qc3 6. Qh1+! Kc2 (6...Kb2 7. Qd5! wins) 7. Qg2+ and White either penetrates to d5 with check or traps Black's King on b1 or c1 when playing Kh7.
E. 1...Qc2/d3/e4+ 2. Qf5 Qc4:
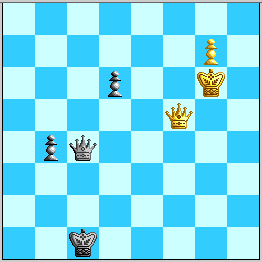
Diagram 8. How can White win without letting Black get back here?
White wins by 3. Kh6! Qg8 (3...Qh4+ 4. Qh5 Qf6+ 5. Kh7 Qe7 6. Qh6+ K-any 7. Qf4! wins) 4. Qf1+ and:
(E1) 4...Kb2 5. Kf7! Qe8+ 6. Qf7 is the standard Qf7 win.
(E2) 4...Kc2 5. Qf8 Qe6+ 6. Kg5 Qe3+ 7. Qf4 Qe7+ 8. Kh6 Qe6+ 9. Kh7 Qh3+ 10. Qh6 wins.
(E3) 4...Kd2 5. Qf8 Qe6+ 6. Kg5 and now:
(E3a) 6...Qe5+ 7. Kg4 Qe6/e2+ 8. Kg3 Qe3+ (8...Qg6+ 9. Kf2! +/-; 8...Qd3+ 9. Kh2! Qh7+ 10. Kg3 Qg6+ 11. Kf2 is the same thing) 9. Qf3 Qg5+ 10. Qg4 Qe3+ 11. Kg2+/-.
(E3b) 6...Qd5+ 7. Qf5! and:
We note also that with Black's King on a3 in Diagram 7, 1. Qf3+! forces 1...Kb2, as otherwise Black is pinned on f7 or eventually cross-checked on e8, and then 2. Qf7 is Diagram 1(b). And with Black's King on a1, 1. Qf6+ wins quickly, as 1...Kb1 2. Kh7 Qh4+ 3. Qh6 Qe4+ 4. Qg6 or 3...Qe7 4. Qf4! makes an end to Black.
Black's Pawn on d5, with King on b2:
This actually makes no essential difference. When White's King reaches e6 (1. Ke6), Black loses control on 1...Qc6+ 2. Ke5! and so must play 1...Qe3+, but 2. Kd6! Qb6+ 3. Kxd5 transposes to line (A2) at the top of this file.