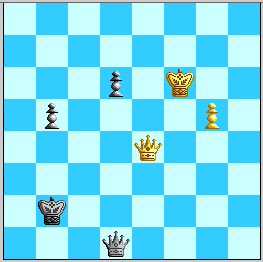
Diagram 1. Position after 53. Qe4! Stronger than everyone thought...

Diagram 1. Position after 53. Qe4! Stronger than everyone thought...
This move centralizes White's Queen and prevents 53...b4, when 54. Qxb4+ is a stunningly quick EGTB+/- mate in 33 more moves, even though White's pawn is only at g5! The other pawn cannot advance either: on 53...d5, 54. Qb4+ Ka2/c2 55. Qa5/c5+ Kb2 56. Qxb5+ is EGTB+/- #49 (footnote1). Finally, 53...Qd2/b3 54. g6 Qc3+ 55. Kf7 Qc7+ (55...Qc4+ 56. Qxc4 bxc4 57. g7 EGTB+/- #27) 56. Qe7 Qc4+ 57. Kf8 Qc8+ 58. Qe8 Qf5+ 59. Qf7 Qc8+ 60. Ke7 wins because Black's King is on the "bogey square b2": 60...b4 61. g7 transposes into the basic Qf7 win, and 60...Qb7/c7+ 61. Ke6! Qc8/c4/e4+ is EGTB+/- #40 with BQ on c8, #64 with BQ on c4, #64 with BQ on e4. (This is a fantastic example of how the EGTB server and familiarity with "basic" winning themes makes it possible to compress a long analysis into a short paragraph!) Hence Black is essentially down to the move we envisioned playing anyway:
53. ... Qf1+
Now we mainly analyzed only 54. Qf5, when WT analysis gave 54...Qc4 55. g6 b4 56. g7 b3 as holding for Black, which it is (footnote2). We intended to meet White's next the same way, believing (also correctly) that 54. Ke7 Qc4 55. Qg2+ Ka1 56. g6 was not dangerous. However, this is another case where the effectiveness of the square e1 for White's Queen shines through, and even more clearly than in the only win Kasparov had at Move 54.
54. Ke7! Qc4
Here again 54...b4 55. Qxb4+ was a quick end (EGTB+/- #33 again), and 54...d5 is not much better: 55. Qe5+ d4 56. g6 Qg2 57. g7 b4 (or 57...Qb7+ 58. Kf6 and White gets the interposition on f5 or e6 that is known to win from the 58...Qe4 ending in the actual game without Black's b-pawn, and the b-pawn doesn't help here) 58. Kf7 Qb7+ 59. Qe7 Qf3+ 60. Qf6 Qb7+ 61. Ke6 Qc8+ 62. Ke5 b3 (62...Qc7/c5+ 63. Ke4 Qc2+ 64. Kf3 wins as in lines without Black's b-pawn, and other checks allow a Kxd4 "Pin battery" to fire) 63. Qf2+ and wins with a check on f8, g1, or g3 next. A second line that appears to win quickly is 55. Qd4+ Ka3 56. g6 b4 57. g7 Qe2+ 58. Kf6! Qf3+ (58...Qa6+ 59. Kg5 Qc8 60. Qa7+ Kb2/b3 61. Qf7 wins, or 58...Qe8 59. Qa7+ Kb2/b3 60. Qf7 ditto) 59. Kg5! Qg2/g3+ (59...Qf7 60. Qa1+ Kb3 61. Qf6 should win fairly readily) 60. Qg4 Qe5/e3/d2+ 61. Kh4 Qh6+ (61...Qe7+ 62. Kh3+/-, 61...Qf6+ 62. Qg5+/-) 62. Kg3 Qd6+ 63. Kg2+/-.
55. Qg2+ ...
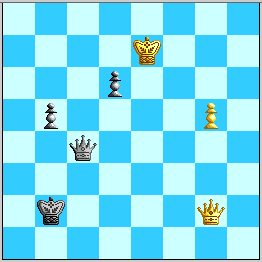
Diagram 2. Decision time for Black's King.
Black has three main modes of defense here: (A) Run the King to a4 ("Strategy K") before White's Queen can reach the e-file; (B) Allow White's Queen to check on e1 but deny it e3; (C) Force the Queen to check from e3, hoping to use h4.
A. 55...Ka3 56. Qf3+, and now the independent options are as follows.
A1) 56...Ka4 57. g6 and now:
A1a) 57...b4 58. g7 and:
(1) 58...Qc7+ 59. Kf6 Qd8+ 60. Kf7! Qd7+ 61. Kg6 Qe8/e6+ 62. Kh7 Qe7 63. Qf4+/-, or 60...Qc7+ 61. Kg6 Qc2+ 62. Kf6+/-.
(2) 58...Qh4+ 59. Ke8! Qg5 60. Qf7+/-.
A1b) 57...Qc7+ 58. Kf6 Qd8+
Now 59. Kf7 gets nowhere after 59...Qc7+ 60. Kg8 Qc4+!, when Black's ability to check on h4 means that White's King will be forced to g7, and then Black has time for ...b4. [Note, however, White's winning ideas in 60...Qd7+ 61. Kg8! and: (a) 61...b4 62. g7 Qe6+ (62...b3 63. Kh8+/- 4Q, 62...Qe8+ 63. Kh7 Qe7 64. Qf4+/-) 63. Kh7+/-; (b) 61...Qe8/e6+ 62. Kh7+/-, eventually transposing into (a); (c) 61...Qd8+ 62. Qf8+/-; (d) 61...Qc8+ 62. Kh7 Qc2 63. Kh6! Qd2+ (63...Qc1+ 64. Kh5 Qc5+ 65. Kh4 b4 66. g7 Qc4+ 67. Kg5! Qg8 68. Qf8! Qd5+ 69. Qf5 Qg8 [69...Qg2+ 70. Qg4 Qd5+ 71. Kf6 Qe5+ 72. Kf7 Qd5+ 73. Qe6 Qb7+ 74. Kf6 Qf3+ 75. Ke7+/- is White's basic way of winning this] 70. Qd7+ Ka3 71. Qa7+ Kb2 72. Kf6+/-, or 66...Qd4+ 67. Qg4 with a similar end) 64. Kh5 Qh2+ 65. Kg5 Qe5+ (65...b4 66. g7 Qe5+ 67. Kg6 Qe6/e8+ 68. Kh7+/- as before) 66. Qf5 and this is +/- owing to the 4th rank crosschecks.] Hence White's King must go the other way:
59. Kf5!
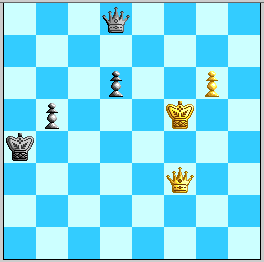
Diagram 3, Black to play. Black gains a tempo but cannot keep it.
A1b1) 59...b4 60. g7 and:
A1b11) 60...Qg8 61. Kf6! b3 (61...Qd8+ 62. Kf7! Qd7+ 63. Kg6 Qe8/e6+ 64. Kh7 Qe7 65. Qf4+/-, or 62...Qc7+ 63. Kg6 Qc2+ 64. Kf6+/-) 62. Qc6+ K-any 63. Qxd6(+) +/-.
A1b12) 60...Qd7+ 61. Kg6 +/- as in A1b11).
A1b13) 60...Qc8+ 61. Kg5! and:
A1b14) 60...d5! Now the fruits of "Strategy K" are that 61. Qg4? Qd7+ 62. Kf4 Qc7+ 63. Kf3 Qc3+ is a draw by perpetual check, as Black's King is shielded from any harmful interpositions. But White has:
61. Kg6!! b3 62. Qf8 Qb6+ (62...b2 63. Qxd8 b1=Q+ 64. Kf7 EGTB+/- #26) 63. Kh5! b2 64. g8=Q b1=Q 65. Qa8+ Kb4 66. Qgf8+ +/- (seen quickly by MacChess 5.0.1).
Black, however, can improve on these variations by delaying ...b4.
A1b2) 59...Qd7+ 60. Kg5 (!-not much else!) b4
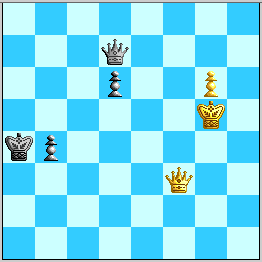
Diagram 4, White to play. Many tricky possibilities...
Now time out for a 1Q vs. 2Q draw: 61. Kh6 Qe6! 62. Kh7 b3 63. g7 b2 64. Qd1+ Ka3! 65. g8=Q Qh3+ 66. Kg7 Qc3+! 67. Kg6 Qg3+ 68. Kf7 Qf4+ 69. Ke7 Qe4+, and now 70. Kxd6 Qb4/f4+ or 69...b1=Q EGTB=, and neither 70. Qe6 b1=Q =, 70. Kd7 Qb7+, nor 70. Kf8 Qf5+! 71. Qf7 b1=Q = fare any better.
61. Qa8+!, and now:
A1b21) 61...Kb5 62. Kf6!
Footnote: interesting but apparently insufficient are: [1] 62. Qd5+ Ka4 63. Qa2+ Kb5 64. Qf7! Qd8+! 65. Qf6 Qc8!, and White's lack of 66. Qf5+ seems to leave insufficient maneuvering room, as 66. Qf7, Qf8, and Qg6 are all answered by 66...Qc5+!, e.g. 66. Qf7 Qc5+ 67. Kg6 Qc2+! 68. Kf6 Qc3+ 69. Kf7 Qc7+ 70. Kf8 Qd8+ 71. Qe8+ Qxe8+ =; [2] 62. Qf8 Qb7! 63. Qf5+ Kb6 64. Kf6 b3 65. g7 Qa8, and now (a) 66. Qf2+ Kc7! (66...Kb5 67. Qe2+ Kc5 68. Qe3+ Kb5 69. Qd3+ Kb4 70. Qxd6+ EGTB+/- #19) 67. Qe2 b2! 68. Qxb2 (or 68. Qc2+ Qc6!) Qf3+! EGTB=, (b) 66. Qg4 Qd8+ (66...Qg8 67. Qe6! Qd8+ 68. Qe7 Qa8 69. Qxd6+ EGTB+/- #18, or 68...Qc8 69. Qxd6+ EGTB+/- #14, or 68...Qb8/g8 69. Qf8+/-; 66...Qa1+ also loses) 67. Kg6 Qg8!, and (c) 66. Qe6 Qf3+ 67. Ke7 Qb7+, all fail.
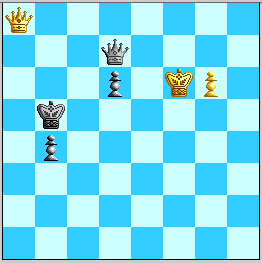
Diagram 5, position after 62. Kf6. Crowding out Black's Queen...
A1b22) 61...Kb3 62. Qf8! (62. Kf6 d5!, or 62. Qd5+ Kc3!, or 62. Qg8+ Kc3 63. Qh8+ Kc2! 64. Qh7 Qd8+ 65. Kh5 Qe8! seem impenetrable)
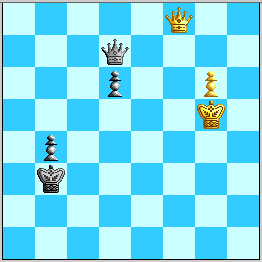
Diagrams 6., after 62. Qf8! Another crowding of Black's Queen.
A1b3) 59...Qc8+
A1b4) 59...Qf8+
A2) 56...Ka2
A3) 56...Kb2
B) 55...Ka1/b1/c1
56. Qg1+! Ka2/b2/c2
57. Qf2+
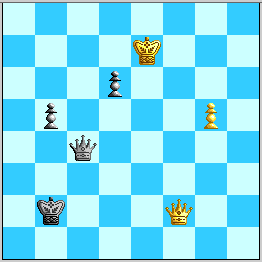
Diagram 2. Black's King could also be at c2.
B. 57...Ka1 58. Qe1+! Ka2 59. g6 and:
B1) 59...b4 60. Qf2+! Ka3 61. g7 b3 62. Qf8!! Qe4+ 63. Kd7/d8!!
Kxd6 is drawn with Black Queen on e4 and g2.
Kxd6 is EGTB+/- with Black's Queen on b5, a5, a4, b7, a7, c4, g4, h7.
Qxd6+ is EGTB+/- with Black's Queen on e4 and White's King on d7, d8.
C. 57...Kc1
58. Qe1+! Kc2
59. g6 ...
Black has played to deny White a later Qd2+, and if White's King stood on e8 as in an analogous major line of the 54. Qf2 Qd3 win, then 59...Qg4 would probably draw. But now
C1) 59...Qg4 60. Qe6! keeps the whips cracking, and 60...Qg3 61. Qf7!, 60...Qd4 61. Qf5+, 60...Qg5+ 61. Qf6 Qe3+ 62. Kf8!, and 60...Qh4+ 61. Kf8! all look bad for Black. And 59...Qc7+ 60. Kf6! is no better---notice how White's Queen is covering all the squares Black needs and will interpose strongly on e7 on 60...Qd8+.
[More to come...]
I [KWR] expect that analysis will show that Black's King is no better on other squares and that 53. Qe4 is actually a fairly snappy win!
(1) Worthy of a footnote: White can also play 54. Qf4!?, and after 54...d4 55. g6 d3/Qb3 56. g7 Qb3/d3 has a very pretty win: 57. Qf2+! Ka3 58. Qf3!!, or 57...d2 58. Qxd2+ is EGTB+/- #20, or 57...Kc3 58. Qg3! Qg8 59. Qe5+ followed soon by a check on h2, c5, or d6 on the way to h8 or f8.
(2) White's best try is 57. Qf3 Qd4+ 58. Kf7---White avoided 58. Kg6 because of 58...Qc4---when both 58...Qa7+ 59. Kg6 Qg1+ 60. Kh7 Qh2+ 61. Kg8 Qh4 (61...d5 is iffy) 62. Kf8 Qd8+ 63. Kf7 Qd7+ 64. Kf6 Qd8+ 65. Kg6 and 58...Qc4+ 59. Kf8 Qc8+ 60. Ke7! Qc7+ 61. Kf6 Qd8+ 62. Kg6 lead to the same position. Black's drawing recourse, found by the GM-School, is 62...Ka3!! 63. Qf8 b2! 64. Qxd8 b1=Q+ 65. Kf7 Qb3+! and a perpetual check.