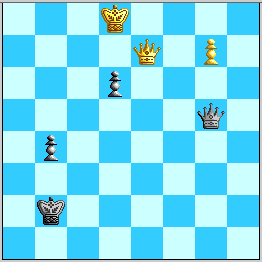
Diagram 1. Black to play. Find the trickiest Black defense.
Diagram 1. Black to play. Find the trickiest Black defense.
This position is reached in the critical "Amazing Maze" line 51. Qh7 b5 52. Kf6+ Kb2 53. Qh2+ Ka1 54. Qf2 Qd3 55. Qe1+! Kb2 56. g6 Qf3+ 57. Kg5 Qg2+ 58. Kh6 Qh3+ 59. Kg7 Qf5! 60. Qe7! Kc2 61. Qc7+! Kd2! 62. Qf7! Qe4 63. Kf8 Qa8+ 64. Ke7 Qb7/a7+ 65. Kf6! Qf3/d4+ 66. Ke6 Qe3+ 67. Kd7 Qa7+ 68. Kc6! Qc5+! 69. Kb7 b4! with 70. Qf4+ Kc2! 71. Qe4+ Kb2 72. g7 Qb5+ 73. Kc8 Qc5+ 74. Kd8 Qg5+ 75. Qe7. I had also reached it in other ways in analyses going back to late October, and had chalked it up as a quick win in view of the following lines (re-numbering 75. Qe7 as 1. Qe7):
A. 1...Qg6 2. Kc7! b3 or K-moves 3. Qf8 Qc2+ 4. Kb8+/-, or 2...d5 3. Qf8 Qc2/g3+ 4. Kb7+/-, or 2...Qg4/g3/g2 3. Qf7+/-, or 2...Qg1 3. Kb7 K-or-P-moves-or-Qg6/g3 4. Qf8 Qe4/f3+ 5. Kb8+/-, or in this last line, 3...Qg4 4. Qf8 Qd7+ 5. Kb6!+/-, or 3...Qg2+ 4. Kb8 Qd5 (else 5. Qf8+/-) 5. Qe8!+/-.
B. 1...Qg4/g3 2. Qf7 Qg5+ 3. Ke8 Qb5+ 4. Kf8 Qb8+ 5. Qe8+/-, or 3...Qe3+ 4. Kf8 Qh6 5. Qf5 and 6. Kf7+/-, or 2...Qh4+ 3. Kc7! +/-.
C. 1...Qg2 2. Kc7 (I didn't know back then that 2. Qf7 wins) Qd5 (2...Qc2+ 3. Kb8 Qc4 4. Qe8!+/-; other alternatives basically transpose into A or B) 3. Qe2+ Ka3 (3...Ka1/b1/c1 allows White to queen; 3...Kb3/c3 4. Qe3+ Kc4 5. Qf4+ Kb5 6. Qg4! Qc5+ 7. Kd7 Qc6+ 8. Ke7 or 6...Qg8 7. Qf5+ Ka4 8. Qf4 Qc4+ 9. Kd8 Qh4+ 10. Qe7 Q-any 11. Qe8+ also wins in short order) 4. Qg4! and now:
(i) 4...Qg8 5. Qf3+ b3 6. Qf8! Qc4+ 7. Kxd6! is the marquee idea, and is confirmed as being +/- at chess.liveonthenet.com/scripts/dbexplore?size=30&fen=5Q2/6P1/3K4/8/2q5/kp6/8/8+b with main line 7...b2 8. Qa8+! Kb3/b4 9. g8=Q and +/- because of either check or skewer.
(ii) 4...Qf7+ 5. Kb6 Qg8 6. Qf3+ b3 7. Qf8 b2 8. Qxg8 b1=Q+ 9. Kc7! Qc1/c2+ 10. Kd7/d8 +/-
(iii) 4...Qa5/c5+ 5. Kd7 Qb5+ (...Qa7+ will transpose) 6. Ke7 Qe5+ (...Qb7+ ditto) 7. Kf7 Qd5+ 8. Kf8! Qa8+ 9. Ke7 Qa7+ (9...Qb7+ 10. Kf6+/-, or 9...Qg8 10. Qf3+ b3 11. Qf8+/-) 10. Kf6 Qf2+ 11. Kg6 Qc2+ and now 12. Kg5! reaches Move 8 of the win with Black's King on a3. (Back then I thought 12. Qf5 Qg2+ 13. Kf7 Qb7+ 14. Kf6 was +/-, but around Dec. 15 I found that 14...Qa8! seems to force White to rewind to that win by 15. Qg4! Qd8+ 16. Kf7! Qc7+ 17. Kf6 Qc3+ 18. Kg6 Qc2+ 19. Kg5!)
However, the above train of thought led me to think that forcing Black's Queen off the g-file was the aim, and I simply overlooked 1...Qd5! at move 1! The point is that ...Qg8 is now a check, e.g. 2. Qe2+ Ka3! 3. Qg4 Qg8+ and 4...b3=, and that 2. Kc7 accomplishes nothing because on 2...b3 3. Qf8 Black can check on c5 or a5. Suddenly, White has a lack of useful moves: 2. Qe8 allows Black to repeat by 2...Qg5+ ; 2. Qf8 Qa8+ 3. Ke7 Qb7+ is a perpetual check, and 2. Qe2+ Ka3 3. Qa6+ Kb2 goes nowhere. Hence the following is the only winning try:
D. 1. Qe7 Qd5! 2. Qf6+ Ka3 (2...Kb3 3. Qg6! and Black will soon fall to an interposing check along the a2-g8 diagonal), and now 3. Qg6 Qg8+ 4. Ke7 b3 5. Qxd6+ is EGTB= in view of 5...Ka2 6. Qa6+ Kb2! 7. Qf6+ Ka2 8. Qf8 Qh7!, and moreover 3...Qa8+ 4. Ke7/d7/c7 Qa7+! also draws as 5. Kf8 Qa8+! 6. Qe8 Qf3+ 7. Qf7 Qa8+ 8. Ke7 fails as all Kxd6 positions hereabouts are EGTB=. Hence White's only promising try is 3. Qa1+ Kb3 and now what? King moves leave White's Queen too far away to stop Black's checks, and 4. Qb1+ Ka3 5. Qg6 just repeats a drawing line above, and the only other queen move that avoids losing the g-pawn to 4...Qg8+ or 4...Qg5+ is 4. Qg1.
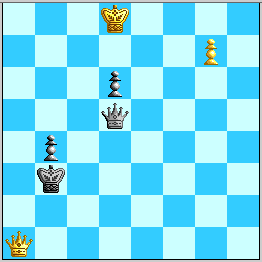
Diagram 2. What should White play at move 4?
Now the 4. Qg1 idea has some legs: 4...Qg8+ 5. Ke7 wins for White, and both 4...Qa8+ 5. Kc7 and 4...Qa5+ 5. Kc8! Qa6+ 6. Kc7 show that White is able to achieve an interposition to stop the checks (or 6...Qc4+ 7. Kb6! Qg8 8. Qd1+! assures an f-file check and +/- as after 8...Ka3 9. Qf3+ b3 10. Qf8 b2 11. Qxg8 b1=Q+ 12. Kc7!)---and in two different ways: (i) 6...Qa5+ 7. Qb6 or (ii) 7. Kb5 Qb5+ (7...Qd5+? 8. Kb6! +/- as above) 8. Qb6. However, (i) continues 7...Qg5! 8. Qd4 (forced) Qe7+!, and Black has a surprising perpetual check, as evinced by 9. Kc6 Qe8+ 10. Kd5 (Kxd6 is EGTB=) Qg8+!! 11. Ke4 Qh7+! 12. Kf3/e3 Qh3+ and further inspection shows that White will never achieve a useful interposition or crosscheck. And (ii) is frustrated by 7. Kb5 Qb5+ 8. Qb6 Qd5+! 9. Ka7 Qe6! setting up a spate of checks on the e-file that White cannot effectively counter, or 9. Qc6 Qf7+ 10. Qc7 Qe6! and White (with no helpful checks to give) will find the same e-file perpetual threat impossible to meet.
The lines (i) and (ii) in the last paragraph make such a powerful effect when one studies them that one might now abandon the whole line as a draw. However, White has the paradoxical idea of giving Black an extra tempo---before going to the nether square g1!
4. Qb1+!! Ka3
Instead, 4...Ka4? makes 5. Qg6 effective with a looming interposition on e8, and 4...Kc3? 5. Qe1+ Kc4 6. Qf1+ Kb3 (else White queens) 7. Qh3+ Ka4 8. Qg4! also eventually procures the same interposition.
5. Qg1! ... and now:
D1: 5...Qg8+ leads to thematic play: 6. Ke7 b3 (6...d5 7. Qa1+ Kb3 8. Qf6 Qa8/b8/c8 9. Qf7! sets up a winning Pin Battery, e.g. 9...Qc7+ 10. Ke6 Qc6+ 11. Ke5 Qc3+ 12. Kd6! and soon +/-, or 9...Qa7+ 10. Kf6! Qd4/f2+ 11. Ke6 and Kxd5 soon) 7. Qa1+ Kb4 8. Qf6!, and now to stop 9. Qf8 Black must move his Queen, but every Queen move makes 9. Qxd6+ a forced win. The first element is the b-file skewer after 8...Qd5/b8 9. Qxd6+ Qxd6 10. Kxd6 b2 11. g8=Q b1=Q 12. Qb8+. The second reason is the ambush along the a3-f8 diagonal (not a true "Pin Battery", but see later when we reach the same position with Black's Queen on g6 and 8...Qg4 available!) after 8...Qa8 9. Qxd6+ (EGTB+/- ) 9...Ka4/c4 10. Qf4+ Ka3 11. Qf8! hitting with tempo, and 8...Qc8 9. Qxd6+ ditto. The longest holdout is 8...Qc4, when 9. Qxd6+ (EGTB+/- #26) Ka4' 10. Qd7+ Ka3' 11. Qa7+ Ka3 12. Qf8! sets up the ambush.
D2. 5...Qa8+ 6. Kc7 Qg8 (6...Qa5+ transposes into D3) 7. Qa1+ Kb3 8. Qd1+! Kb2 (8...Ka3 9. Qf3+ transposes; other moves lose more quickly) 9. Qe2+ Ka3 10. Qf3+! b3 11. Qf8 Qc4+ 12. Kxd6! with a true "Pin Battery" is EGTB+/-, with main line 12...b2' 13. Qa8+ (technically 13. Kd7+ is one move quicker to mate, and 13. Ke5+ wins too, but this is the key idea) Kb3/b4 14. g8=Q b1=Q 15. Qab8+ +/-.
D3. 5...Qa5+ 6. Kc8! Qa8/a6+ 7. Kc7 Qa5+ (10...Qc4+ 11. Kb6 Qg8 12. Qa1+ Kb3 13. Qd1+! wins as discussed in the first paragraph under line "D.") 8. Qb6! Qg5, and now the entire point of White's 4. Qb1+!! was to regain the tempo with check by 9. Qa7+!
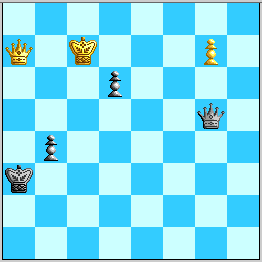
Diagram 3. Black to play.
Now Black has:
D3a) 9...Kb2 10. Qf2+ Ka3 11. Qf3+! Kb2 (else 12. Qa8+ +/-) 12. Qf7! enters the "basic Qf7 win", while 10...Kc1 11. Qf7! Qa5/c5+ 12. Kb8 Qb6/b5+ 13. Qb7 is +/- with 14. Qc8+ next. This leaves Black with 10...Kb3/a1/b1, but 11. Qf3/f1+ forces 11...Kb2 anyway and 12. Qf7 follows. [Also effective against 10...Ka3 may be 11. Qf7!? Qa5/c5+ 12. Kb8 Qb6+ (12...Qd8+ 13. Kb7+/-; 12...Qb5+ is hmm...) 13. Qb7 Qd8+ (13...Qg1 14. Qa7+) 14. Qc8! Qb6+ 15. Ka8 Qa5+ 16. Kb7 Qd5+17. Kb8 Qb5+ 18. Ka7+/-.]
D3b) 9...Kb3! 10. Kc8! again leaves Black at a crossroads:
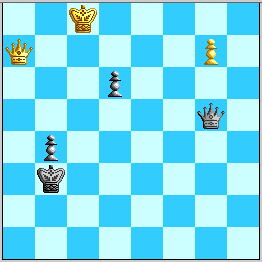
Diagram 4. Black to play. Here timing is everything...
King moves and 10...d5 allow 11. Qf7 winning as described above, and only four Queen moves meet this threat:
D3b1) 10...Qd5 11. Qe3+ Kc4 (11...Ka4 12. Qe8+; 11...Ka2/b2/c2 12. Qf2+ and 13. Qg1/g3+) 12. Qf4+ Kb5/c5 13. Qg4! Qg8+ (other Queen checks let White's King run to f7/f6 for an easy win) 14. Kd7! b3 (14...Qf7+ 15. Kd8 Qg8+ 16. Ke7 is no better for Black) 15. Qf5+ and now:
(i) 15...Ka4 (from b5) 16. Qf8 Qh7 17. Qf7! Qh3+ (17...b2 18. Qa2+ is the point) 18. Kd8 b2 (18...Qh4+ 19. Kc7+/-) 19. Qa2+ Qa3 20. g8=Q +/-.
(ii) 15...Ka6 is similar to (i).
(iii) 15...Kb4 16. Qf8 Qh7 17. Kxd6! is EGTB+/-, mate in 15 more moves.
(iv) 15...Kb6 16. Qf8 Qh7 17. Qf7 b2 18. Qb3+ Kc5 19. Qxb2 is EGTB+/-, mate in 25 more moves.
(v) 15...Kc4 16. Qf8 Qh7 17. Qf7+ +/-.
(vi) 15...Kd4 (from c5) 16. Qf8 Qh7 17. Qf7 b2 18. Qf6+ K-any 19. Qxb2 wins (OK, I haven't clicked all 6 EGTBs:-). This finishes off line D3b1) with 10...Qd5.
D3b2) 10...Qf5+ 11. Qd7 (11. Kd8 wins too) and now:
(i) 11...Qc5+ 12. Kd8 Qa5/g5+ 13. Ke8 is soon +/
(ii) 11...Qd5 12. Qh3+ Ka4 13. Qg4! Qg8+ 14. Kd7! Ka3 (14...d5 15. Ke7 d4 16. Qxd4 is EGTB+/- mate in 25 more moves) 15. Qf3+ b3 16. Qf8 Qh7 17. Kxd6! is EGTB+/-, mate in 22 more moves)
D3b3) 10...Qg6 11. Qe7! Qf5+ (11...Qg4+ 12. Kb8 d5 13. Qf8 Qg3+ 14. Kb7+/- or 12...Qc4 13. Qe3+ +/-; or 11...K-any 12. Qf8 Qe6/g4+ 13. Kb8+/-) 12. Kd8! Qa5+ (12...Qg6 13. Kc7! works just as in line A. way above) 13. Ke8 Qa8+ 14. Kf7 Qf3+ 15. Qf6 Qb7+ 16. Kg6 Qg2+ 17. Qg5 Qe4/c2+ (the lack of 17...Qc6+ is the "tragedy") 18. Qf5 Qg2+ 19. Kf7 Qb7+ 20. Kf6+/-.
BUT:
D3b4) 10...Qg4+! has an amazing point in contrast to line D3b2): now 11. Qd7 Qc4+! 12. Kb8 (White eventually has to try this, as 12. Kd8 Qg8+ 13. Kc7 Qc4+ 14. Kb7 Qd5+ 15. Qc6 Qf7+ transposes into the drawing line in the note to move 4 above) Qg8+ (else 13. Qe8! +/-) 13. Ka7 Ka3! (but not 13...Qd5? 14. Qg4! andWhite's King will make a triumphant return to the K-side, winning as in line D3b3). Now Black is not even threatening 14...b3 as 15. Qxd6+ (EGTB+/- mate in 21 more moves) Ka2/a4 16. Qf8 Qh7 17. Qh8 wins. But what can White do in the meantime? The main bogey is that 14. Qe7 allows 14...Qd5! (now!), when White has no effective check and 15. Qf8 Qa5+ is a perpetual check. 14. Qc7 is answered the same way, while 14. Qb7 and 14. Qg4 lose contact with d6 and allow 14...d3! drawing. Finally, 14. Ka6/b6 b3 is a draw as 15. Qxd6+ Ka2 (even ...Kb2 draws) 16. Qf8 gives Black a check at e6. The position after 13...Ka3 is almost a case of mutual Zugzwang in the strongest sense, as Black to move can hold only by 14...Qc4! In any event, this whole line is a strange case of timing gone awry.
To regain the momentum, White must bring his King closer and then concede Black two whole tempi!
Now on 11...Qc4, 12. Qe3+ queens in short order, ditto 11...Qh4+ 12. Qe7 Qc4 13. Qe3+, and 11...Qe6/g5+ 12. Qe7 Qd5 is not a repetition of Move 1 because Black's King is on b3 not b2, and 13. Qe3+ wins essentially as in line D3b1) above. But 11...Qg6 reveals Black's final point that with White's King off the c-file, 12. Qe7 is too slow: 12...Ka3 13. Kc3 b3=. Meanwhile, 12. Qe3+ Ka2 13. Qd2+ Ka3 14. Qc1+ Kb3 (or 14...Ka4 15. Qa1+ Kb3 likewise transposing to what comes next, ditto 15. Qc6+ Ka3 and White has nothing better than 16. Qc1+) 15. Qd1+ Ka3 (15...Kc3/c4!?) 16. Qa1+ Kb3 leaves White nothing better than 17. Qd4. So White is down to 12. Qd4!
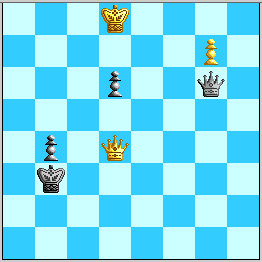
Diagram 5. Black to play. Can Black do better than 12...Ka3---?
Now we first consider Black's Queen moves: 12...Qf7 13. Qg4! wins as we've already seen; 12...Qe6 13. Qf4! and Black cannot stop the twin threats of 14. Qg3+ and 14. Qf8. This leaves:
D3b4a) 12...Qg5+ 13. Ke8 and now:
(i) 13...Qg6/h5+ 14. Ke7 Qg5+ 15. Qf6+/-.
(ii) 13... Qb5+ 14. Ke7 Qb7+ 15. Kf6 Qf3+ 16. Ke6! Qh3+ 17. Ke7+/-, or 16...Qg3 17. Kf7 Qf3+ 18. Qf6 Qb7+ 19. Kg6 Qg2+ 20. Qg5+/- as before, or 16...Qe2+ 17. Kf7 ditto.
(iii) 13...Ka3/a4 14. Qa7+ Kb5/b3/b2 15. Qf7(+) +/-.
(iv) 13...d5 14. Kf7 Qf5/h5+ 15. Ke7! Qg5+/g6 16. Qf6 is much like the denouement of line C(iii) above.
D3b4b) 12...Qg2 13. Ke7! (13. Kc7 may win too, but not 13. Qe3+ Kc2!=) Ka3 14. Qa7+ Kb2 15. Kf8 Qf3+ 16. Qf7 is the basic Qf7 win, or 13...d5 14. Kf7 and soon +/-.
D3b4c) 12...Ka4. 13. Ke7! is like lines above and soon +/-. But of course, Black can actively unblock his b-pawn by:
D3b4d) 12...Ka3
and now the White King bravely stares down Black's b-pawn:
13. Ke7! b3 14. Qa1+ Kb4 15. Qf6!
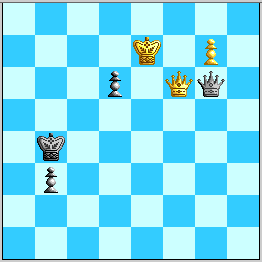
Diagram 6. Amazing to win with Black's Pawn on b3. Shown as +/- by MacChess 5.0.1 at just over 2 billion nodes.
White banks on the b-file skewer after 15...Qxf6+ 16. Kxf6 b2 17. g8=Q b1=Q 18. Qb8+ or 15...Qg3 16. Qxd6+! Qxd6+ 17. Kxd6 b2 18. g8=Q b1=Q 19. Qb8+. Black now has:
(i) 15...Qe4+ 16. Qe6 Qh4+ (16...Qb7+ transposes) 17. Ke8 Qh5+ 18. Kf8 Qf3+ 19. Ke7! Qb7+ 20. Kf6 Qf3+ 21. Kg5! +/-. (Note also that 16. Kxd6? fails to win because in the analogous line without Black's d-pawn, Black can answer 18. Kf8 with ...Qc5+!)
(ii) 15...Qg1 16. Qxd6+ EGTB+/- mate in 25 more moves.
(iii) 15...Qg2 16. Qf8! Qb7+ 17. Kxd6! (EGTB+/- mate in 19 more moves, but look:) b2' 18. Qf4+' (18. Ke5+ wins too, but 18. g8=Q only draws! Instead, White optimizes this Queen while Black has fewer interposition options...) Ka3 19. Qe3+' (19. g8=Q still only draws!) Ka4' 20. Qd4+ (still!) Ka3' 21. Qc5+ (still!) Ka4 and only now 22. g8=Q! Or: 18...Ka5 19. Qd2+! Ka4 20. Qc2+' Ka3' 21. Qc5+ as before.
(iv) 15...Qg4/g2 16. Qf8! Qe4+
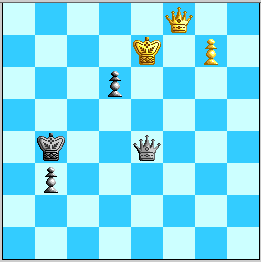
Diagram 7. Find White's thematic win---but what is the theme?
and now surely the idea is 17. Kxd6, no? No!---17. Kxd6 (EGTB=) b2! 18. g8=Q b1=Q is a 4Q hold, as Black's Queens connect nicely and White's King blocks diagonals that White's Queens would need to penetrate! The point of the winning move(s) becomes visible only after playing through this 4Q draw. First I and then MacChess 5.0.1 found 17. Kd8!, but the idea of vacating d7 for a check turns out not to be relevant, and the alternative seems to be snappier:
17. Kd7! b2 18. Qxd6+ (EGTB+/- mate in 17 more moves; 18. g8=Q may be faster) Ka4' 19. Qa6+! (19. g8=Q only draws after 19...Qb7/f5+!) Kb4' 20. g8=Q Qd4+' 21. Qd6+ and the skewer takes over.
This finishes the demonstration of White's win with 1. Qe7.
A curiosity: 17. Kd8 b2 (17...Qa8+ 18. Kc7 Qa7/a5+ 19. Kxd6 is EGTB+/-, not nearly as close as line (iii) in which Black achieved ...Qb7+. Incidentally, if Black is allowed a check on b5 then the whole thing is a draw!) 18. Qxd6+? Kb5! is EGTB=, mainly because 19. g8=Q hangs this Queen to a skewer, but 18. g8=Q still wins: b1=Q (MacChess 5.0.1 gave as its main line 18...Qd3 19. Qa2 [!---is it necessary?] b1=Q 20. Qf4+ Kc3 21. Qa3+ Kc2 (tableau!) 22. Qxd3+ Kxd3 23. Qf5+ +/-) 19. Qxd6+ (EGTB+/- mate in 14 more moves) Ka4 (19...Ka5/b5 20. Qg5+ Ka4 holds out longer; a side curiosity is that on 19...Kb5, the quiet 20. Qgg3 also wins!) 20. Qa6+! is the only winning move.