CSE 115 - Spring 2008 - Introduction to Computer Science for Majors I |
CSE 115 - Spring 2008 - Introduction to Computer Science for Majors I |
|
|
Lab 2IntroductionWe are just learning what goes into creating our own Java files. We will begin exploring these ideas in this lab. Furthermore, you will learn some of the basic skills you will need to complete your lab assignments for the rest of the semester. ObjectivesThe high-level objectives of this lab are to have you,
Assignment SpecificationsIn this lab, you will create some objects using the DrJava interactions pane and then you will create your first class definition. This first class will not be terribly sophisticated, but will teach you the important skills of checking out lab skeletons from the repository, creating a new Java file, and then creating a Jar file that you will submit. Helpful HintsRead through the entire lab before you start working, so that you know what to expect. Make sure you save your work often, and keep track of what you are expected to submit. Do not be afraid to refer to earlier labs to recall what things mean or what commands are available for you to use. ReadingMake sure you have read chapter 1 and chapter 2 of the book before coming to lab. Also make sure you have reviewed your lecture notes. It might also be helpful to begin looking at Chapter 1 of the Eclipse book (if you have it). Lab set-up tasksAt your lab session your teaching assistant will briefly discuss how to carry out each of the set-up tasks below. She or he will also be available to answer questions you might have. Before you start work on the lab itself, you must carry out each of the following set-up tasks. Your teaching assistant will guide you through this process. These are things that you must do that you learned how to do last lab. If you don't remember how to do any of these tasks, refer to Lab 1. Step 1: Log inStep 2: Open EclipseStep 3: Make sure you have the DrJava interactions pane visibleStep 4: Make sure you can see the connections to the code repositories
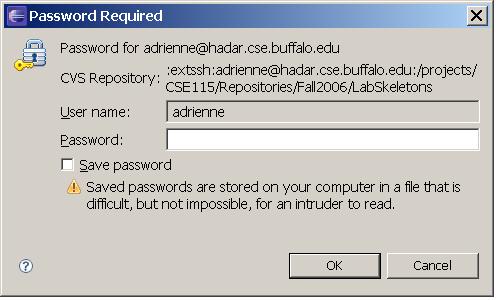
Now, for some new stuff: Step 5: Check out Lab2 project from LabSkeletons repositoryOpen the LabSkeletons repository (click on the "+" or triangle to the left of its name to "spin" it open). Open "Head", and then a dialog will pop up prompting you for your password. The password here is the same one you typed to log into the machine in Baldy 21. Type your password in and then click "OK".
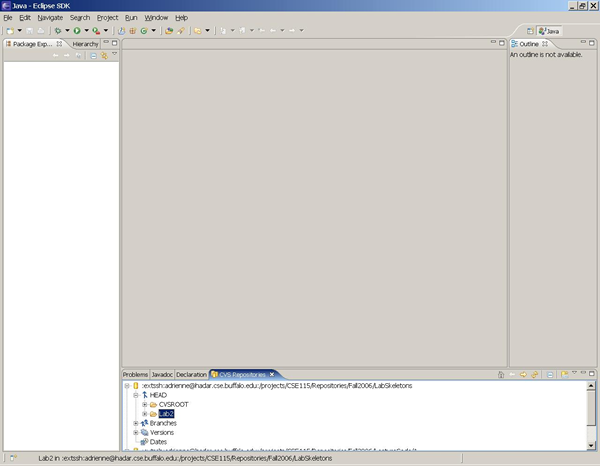
Then the files in the Lab Skeletons Repository will be visible. Select Lab2:
Now right-click, and select "Check out". In the left-most pane you will now see the Lab 2 project in your workspace. You should expand out the project to see what is inside it. You will notice a package that is empty. You will be adding things to this package shortly.
Lab Assignment (To be completed in Lab and checked by TA for attendance)You will redo the exercises at the end of Chapter 1 of the text in the DrJava interactions pane. To ensure that you are able to execute the commands, check out a version of the Book Chapters into your workspace using the same method as checking out the Lab 2 skeleton. You should create an instance of a Terrarium and then place a new Ant in the Terrarium by calling the add method. It would be good practice to try to do this all on your own without relying on the text for assistance. However, if you get stuck, refer back to the code at the end of Chapter 1 to help. Once you have completed this task, leave the Terrarium window running and then ask your TA to come over and view your interactions pane and the Terrarium winodw. The TA will be giving you credit for completing this part of the assignment, thereby giving you credit for attendance in lab this week. Lab Assignment (To be completed and submitted - can be finished in lab or may have to be finished outside of lab time)Use the Dr. Java interactions pane to create an instance of the class Open GreenRight click on the package Create MyFirstClass Class using GreenClick on the Class box button in Green and then click on the canvas to create a new class in the diagram. You will see a "New Java Class" window open. In this window you need to enter the name of the new class your are creating, in the field labeled "Name:". You should type:

Click "Finish" when you've entered the class name. A new class will appear in the Green editor. It will also create a file named Open the Java source code by double clicking on the name in the package explorer. You should see the framework for a class that Eclipse creates for you. Using comments you are to correctly identify the following parts of the class file that was created for you. If there is more than one example, you only need to indicate one example of each. Note, that to indicate just one word from a line of code, you can surround your comment with the
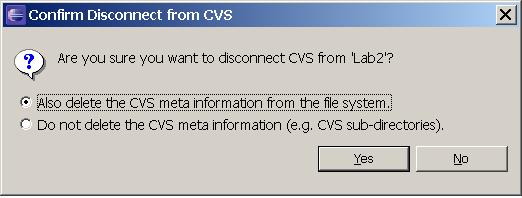
Create MySecondClass Class using GreenPerform the same operation as above and create another class named To test out if you have done this correctly, use the DrJava interactions pane to create an instance of the class you just created ( You should save the UML diagram that you have been working on in the lab2 project as well. Note that when you are finished the package named If you would like to see more of what Green can do, right click on the package name and create a totally new class diagram. You will see the class boxes for the classes you created in it. If you select the What you hand inWhen you are finished, you need to export your solution from the Eclipse environment so that you can submit it. You should now disconnect your completed project from the CVS repository from which you checked out the lab skeleton. To do this, right click on the project name, and select "Team" -> "Disconnect". In the "Confirm Disconnect from CVS" window that pops open select "Also delete the CVS meta information from the file system.", then click "Yes":
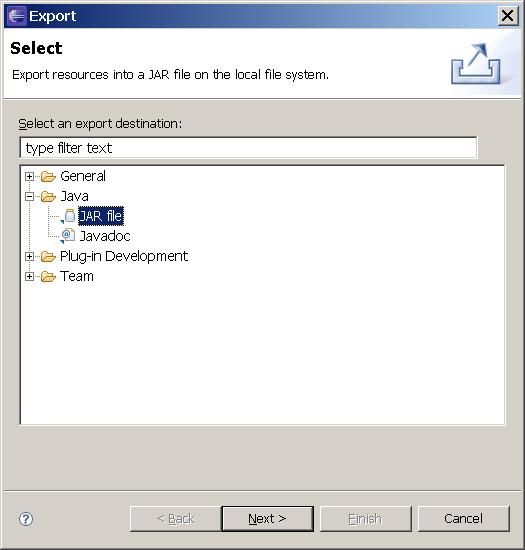
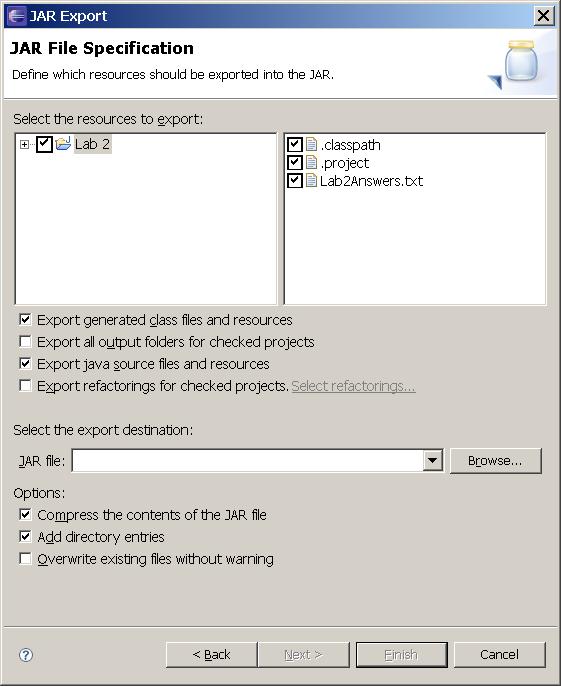
Now it is time to package up your completed work to get it ready for submission. Right click on the project name, and select "Export...". An "Export" window will open. Under Java, select "JAR file":
Click "Next>". This brings up a new screen. Make your screen look like the one below: VERY IMPORTANT: MAKE SURE THAT THERE IS A CHECK IN THE BOX NEXT TO THE OPTION FOR EXPORT JAVA SOURCE FILES AND RESOURCES!!!!
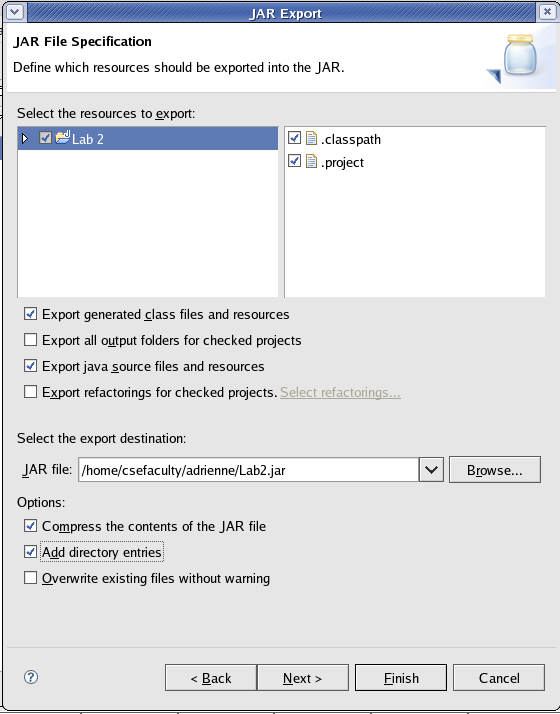
Now you can submit the resulting jar file, Lab2.jar. This file should be in your home directory. To submit, you use the electronic submission program that corresponds to your recitation. For instance students in section A1 will submit by typing
at the Unix prompt. If when you try to submit you get a message stating "submit_cse115XX: Command not found." then you need to add the following line to your
And then type the same command at the prompt. The changes to your Due datesYou have one week from the meeting of your lab to submit the portion that needs to be submitted. For example, if your recitation meets on Tuesday, January 29th then you must submit the lab by 11:59 pm on Monday, February 4 th. The due dates are summarized in the table below. You are always welcome to submit early. If you submit more than once, the later submission will simply overwrite the previous one. To check that your lab was submitted, you can always refer back to the Submit Inspector on the Resources page of the website. After you have entered your user name, your submissions will be shown. Clicking on the name of a file that is a zip file will show you the contents of the zip file so you can verify that you indeed zipped up all the correct files.
|