Lab 8
Introduction
The time has come for you to take the design of a project into your own hands. We'll give you a specification of what the program is supposed to do, and some hints, but the rest is up to you.
New
Concepts Covered
The following are the new concepts covered in this lab.
- Designing your own solution from a specification
- if-statements
- Key Listeners
Assignment Specification
You will write an Application that can be used to solve one of the biggest puzzle crazes today - Sudoku. Your UI will show the user a puzzle. If you are going for basic implementation, the puzzle you show should be hard coded into your program and leave spaces where the user has to enter in numbers.
Your interface should then have three buttons:
- First button provides a "hint" on the puzzle, that is, it puts in the answer for one of the squares, making it so that the user can not re-enter another number in that spot. This button should only work once for the basic implementation. Also, it can provide the same "hint" every time you run the program.
- Second button "checks" the puzzle that has been entered. That is, the puzzle should be a valid sudoku. If it is not, the UI should report this in some meaningful way. For basic functionality, you do not have to fix the problem or even suggest solutions, just simply report whether the user is correct or not.
- Third button clears all the user entries so that they can start again.
When the user is running your game as an application and closes the window, the game should end.
Helpful Hints
Think and plan before you begin. Start early. Set goals and milestones for yourself as you go. Make sure you have reached a goal before moving on to the next step. Make goals small and attainable.
Lab tasks
At your lab session your teaching assistant will briefly discuss how to carry out each of the tasks below. She or he will also be available to answer questions you might have. You must carry out each of the following tasks.
Create a new project in Eclipse
This time, there's no skeleton. You must create your own project from scratch. Here are the steps you need to follow:
- You're going to be developing your code in a project called "Lab8." To create a new Java project in Eclipse, under the File menu, select New -> Project.
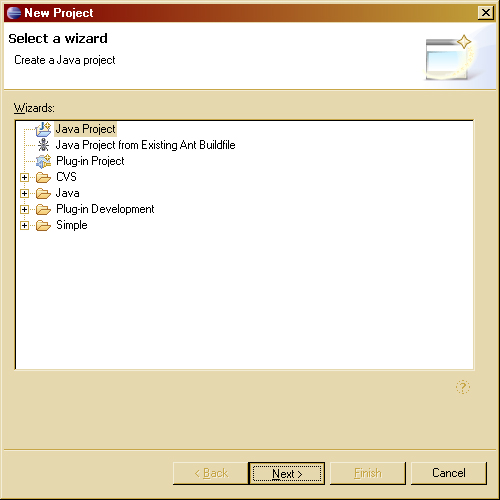
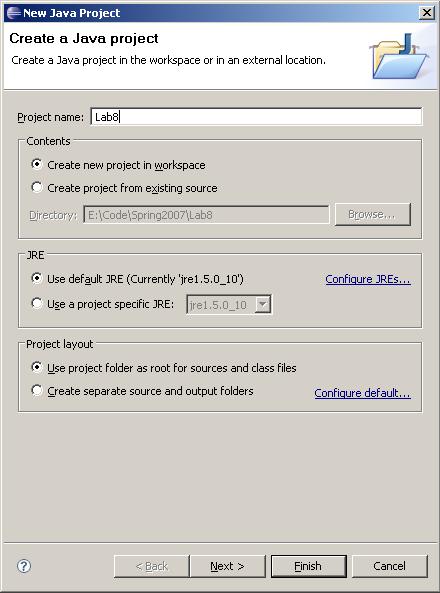
- Select "Java Project" and click Next. Name your project "Lab8." If you see that the Java compiler being used is 1.4 in the "JDK Compliance" section, click the "Use a project specific compliance" button and select "5.0" from the dropdown menu. Then click Finish. You will see the new project pop up in the Package Explorer.
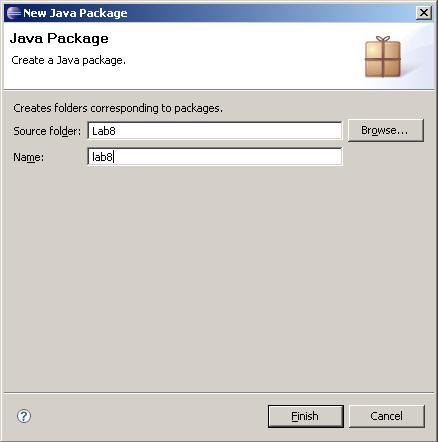
- Now right click on the project, and select New -> Package.
- Name the package "lab8." Then click Finish. All of your work will be in the lab8 package.
Congratulations: your project, along with a new package, is officially created! But, in order for you to use cse115-specific libraries, such as the graphics package, you must explicitly tell your project to include the Classlibs.jar archive. Steps 5-8 will explain this process.
- Right-click on your project folder and select "Properties."
- In the left pane of the "Properties for Lab8" window, select "Java Build Path."
- In the right pane of the "Properties for Lab8" window, click the "Libraries" tab.
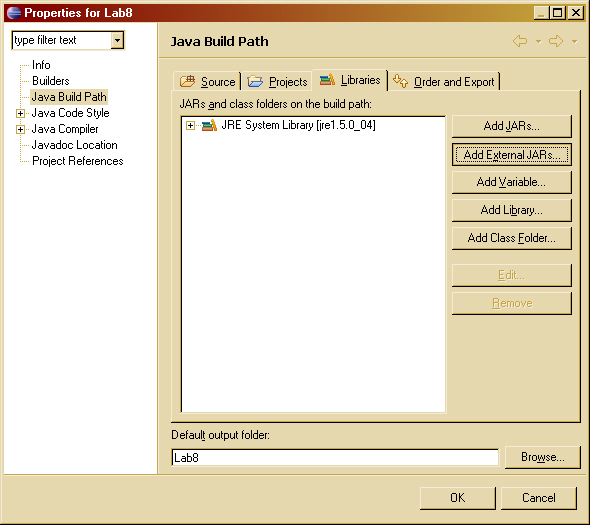
- Click "Add External JARs..." This is where the magic happens. Navigate to /projects/CSE115/Classlibs/Spring2008/ in the JAR Selection dialog and double click
Classlibs.jar. Click OK on the Properties window. You're done!
(Well, except if you have creating this project for the first time NOT on styx. If you have done this at home or on your laptop, then you need to follow steps 9 - 13. Failure to do these steps will result in your project not working and automatic grade of 0 being assigned for your solution.)
- When you attach an external archive on a non-Unix machine, the information about the location of the archive gets saved (for example, the C:\). This will cause your project not to work on the Unix systems on campus, or even perhaps another Windows machine running Eclipse. Therefore, we need to change the classpath variable associated with this project. You need to modify a file named
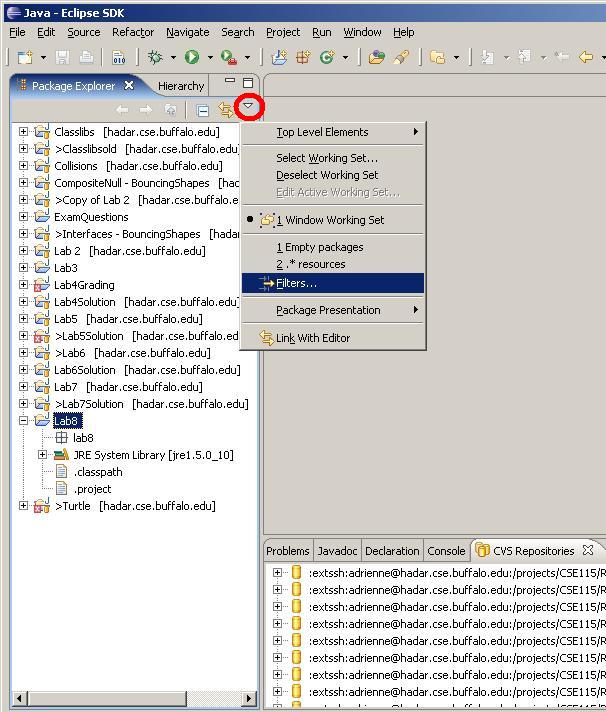
.classpath in order to do this. This file is actually a part of every Java project that is created, but by default, it is not shown in the package explorer, so we need to make it visible, first, you select the downward facing arrow on the package explorer tab (circled in red below) and get the menu shown below to drop down.
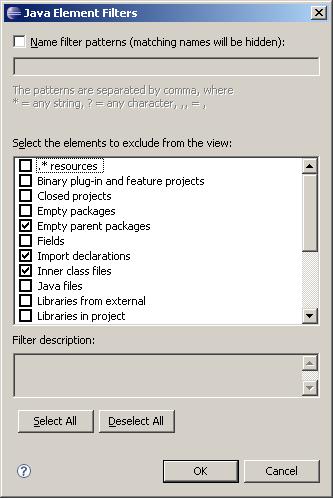
- The following pop up will appear. It is important that the .* resources is UNCHECKED just like the image below.
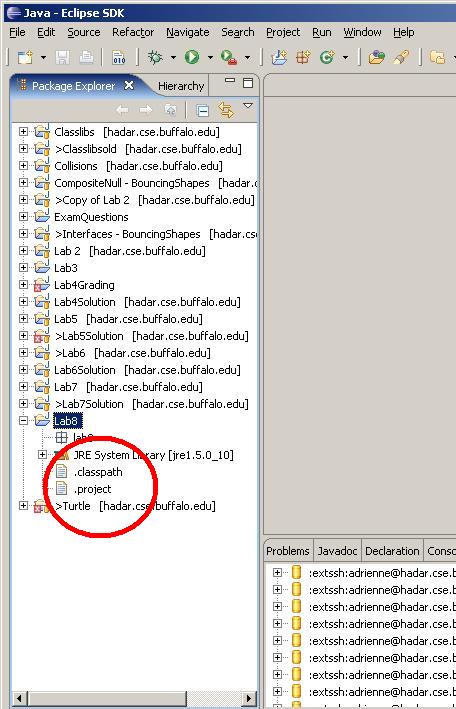
- When you select "OK", notice that the following files (circled in red) appear in your package explorer window. Double-click on the file named
.classpath to open it in the editor. If you are not seeing these files, go back to step 9 and redo steps 9 & 10.
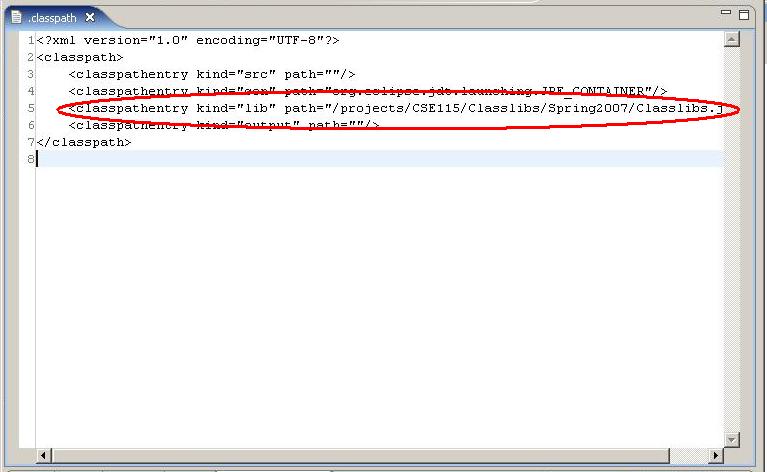
- Note the contents of the .classpath file. The actual contents are not important, but you are looking for the entry that is highlighted in the image below. Note that there is a E: before the library entry for classlibs. We want to remove that (and any other directory information from the file.
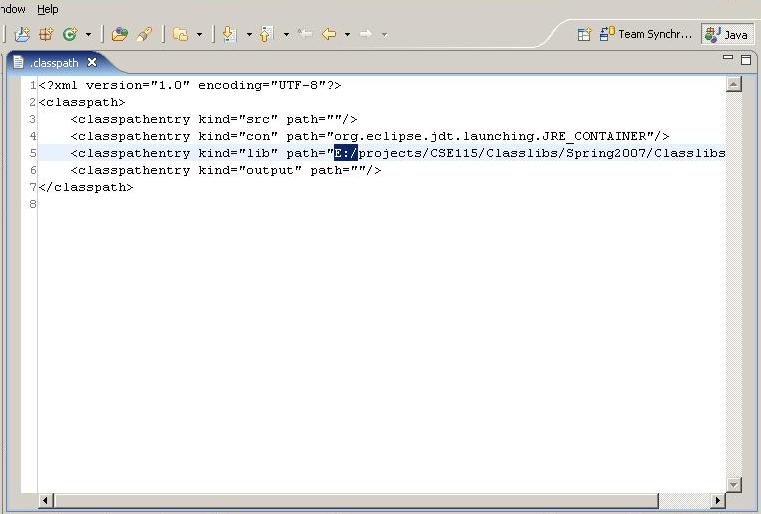
- You should make the above entry look like the finished entry in the image below. Save this file and close it when you are done.
Lab Design
Once again you are required to design your solution to
the lab. Create a file called Lab8.grn in your project and
submit it with your jar file.
Once again, remember to design and code iteratively.
Extra Credit
To encourage you to be creative we are holding a contest for lab 8
submissions.
The grand prize is 10 points extra credit (up to
a maximum of 100 total points) on your exam average!
There are 2 categories: 1) Overall technically most improved and 2) Most
creative take on the theme of game.
Second place contestants will receive 8 points extra credit
while third place gets 5 points extra credit on
their exam
average.
To compete in this competition, you should decide whether you want to be in
the creative competition or the technical competition, and complete your Lab
8 program.
After the labs are graded, those submissions that have successfully completed
all the requirements of the lab will be eligible to be judged.
To be judged, you will be required to present your program and
its technical
or creative
merit
in
lecture on Friday, April 11th. You can bring a laptop to class or bring your submission in on a flash drive and we will get it up and running on the classroom projector.
You should not prepare any slides or other materials for the presentation, you should simply come to class prepared to demo what your program is and how it works. If you are in the creative competition - BE CREATIVE!
Good luck to all!
What you hand in
Creating an executable jar file
OK, so now we know we can run (Java) programs without relying on DrJava. Can we also run (Java) programs without relying on Eclispe? The answer is yes !
One (relatively) easy way to do this is to package up all the code needed to run your program into what's referred to as an executable jar file . You can do this using Eclipse's export functionality. However, since your project relies on the code in Classlibs.jar , we must somehow include that code in this new jar file that we're creating. What about all the code in the standard Java class libraries? It turns out that every jvm has access to that code already, so we don't need to include that in our jar file.
In order to include the code that is in the Classlibs.jar file, this code must be accessiblein your workspace as a project. Here's how you do that. First, create a new Java project - name it "Classlibs". Next, import contents of Classlibs.jar into this new project, overwriting any pre-existing resources (like the .project or .classpath files).
To create the jar file, right-click on the Lab8 project in the package explorer, and select Export... . In the "Export" dialog window that opens, select "JAR file", and click "Next>". In the "JAR Export/JAR File Specification" dialog window that opens, click both the "Lab8" and "Classlibs" projects, and click "Next>". The next dialog that opens is called "JAR Export/JAR Packaging Options". Simply click "Next>". The next dialog is the last one, and it is called "JAR Export/JAR Manifest Specification". It is in this dialog that you can specify in which class you defined the main method. If you click "Browse..." a "Select Main Class" window will open, and it should show the name of the class in which main is defined. Just click on the name of the class, and click "OK". Finally, click "Finish" in the "JAR Export/JAR Manifest Specification" dialog window. You may see a window appear saying that the export of the Jar file completed with warnings. This is (in all likelihood) OK.
You're all done! On a Windows system, at least, you can now simply double-click on the jar-file icon of the project you just exported to run it! On other platforms you may need to run the jar file from a command prompt, in which case you would type the following at the prompt:
java -jar Lab8.jar
You will submit this executable jar file. It should contain your Lab8.grn file as well as your sourcecode and Classlibs files.
Due dates
The due dates are summarized below. You are always welcome to submit early. If you submit more than once, the later submission will simply overwrite the previous one.
To check that your lab was submitted, you can always refer back to the Submit Inspector on the Resources page of the website. After you have entered your user name, your submissions will be shown. Clicking on the name of a file that is a zip file will show you the contents of the zip file so you can verify that you indeed zipped up all the correct files.
If you submit during the week of March 31st, your raw lab score will be scaled up to potentially earn a maximum of 120%.
If you submit during the week of April 7th, your lab will be graded as normal, out of 100%. You must have submitted your Lab by Thursday, April 10th to be eligible to present for extra credit on April 11th.
If you submit during the week of April 14th, your raw lab score will be scaled down to earn out of a potential 80%. The absolute last day to submit Lab 8 to earn any credit is Thursday, April 17th. No late labs are accepted or will be graded.