Diagram 9a, after 60...Kb4. Not as silly as it looks.
I. The "Loco K" Defense:
54. Qf2 Qd3 55. Qe1+ Kb2 56. g6 Qd4+ 57. Kf7 Qf4+ 58. Ke8 Qg4!
59. Qd2+!? and now:
B1d51) 59...Kb1 60.Qd3+ Kc1 (60...Ka1 61.Qc3+ Ka2 62.Qa5++- followed by 63.Qxb5+) 61.Qc3+ and now:
B1d511) 61...Kd1 62.g7 Qg6+ 63.Kf8 Qf5+ 64.Ke7 Qg5+ (64...Qe4+ 65.Kxd6+-) 65.Qf6 Qe3+ 66.Kf8+-
B1d512) 61...Kb1 62.g7 Qg6+ 63.Kf8 Qf5+ 64.Ke7 Qg5+ (64...Qe4+ 65.Kxd6+-) 65.Qf6 Qe3+ 66.Kf8+-
B1d52) 59...Kb3. Now both 60. Qd3+ and 60. Qd5+ should work, but some details remain:
a) 60.Qd3+ and now
B1d52a1) 60...Kb2 61.Qxb5+ EGTB+/- #
B1d52a2) 60...Ka2 61. Qc2+ Ka3 62. Qc3+ Ka4 (else 63. Qa5+) 63. g7 and now:
B1d52a21) 63...Qg6+ 64. Ke7 Qe4+ (64...b4 65. Qf6+/-) 65. Kf7 (simpler than 65. Kd8 Qd5!, though 66. Qc2+ Ka3 67. Qg6 wins there) Qd5+ (65...Qf5+ 66. Qf6 Qd7+ 67. Kf8 Qc8+ 68. Ke7 Qc7+ 69. Ke6 Qc8+ 70. Kxd6 EGTB+/- #34; #38 with BQ on b7, #34 with BQ on c4, #34 with BQ on e4. Black has few survival chances with g7 vs. b5 in general) 66. Kf6 b4 67. Qa1+ Kb3/b5 68. Qb1/f1+ K-any 69. Qf5+/-. The best Black can achieve is to have the King on a3 here, heading into the basic win vs. Ka3.
B1d52a22) 63...Qe6+ 64. Kf8 (again, simpler than 64. Kd8 Qd5!) Qf5+ 65. Ke7, transposing into B1d52a21).
B1d52a23) 63...b4 64. Qa1+ and:
B1d52a231) 64...Kb5 65. Qf1+ Ka5 66. Kf7! (faster than 66. Qf7) Qd7+ (66...Qh5+ 67. Kf8+/-) 67. Kf6 Qd8+ 68. Kg6 b3 69. Qf8+/- as Black's Queen falls with check; or 65...Ka4 66. Qf7! Qc8+ 67. Ke7 Qc7/b7+ 68. Kf8+/-; or 65...Kb6 66. Qf2+ Kb5/c6 67. Qf7+/-.
B1d52a231) 64...Kb3 65. Qa7! and now:
Black is not done yet, however---the 4th-rank King moves are both tricky to meet.
B1d52a3) 60...Ka4 61. Qc2+! Kb4 (61...Ka5 62. Qc7+ and 63. g7 wins; 61...Ka3 62. Qc3+ is B1d522) 62. Qb2+ Ka4 (62...Ka5 63. Qa3+ Kb6 64. Qxd6+ EGTB+/- #47; 62...Kc5 63. Qf2+ should win; 62...Kc4!? 63. Qf6 Qc8+ 64. Kf7 Qd7+ 65. Kg8! looks convincing) 63. Qa2+ Kb4 64. Qf7! Qc8+ 65. Ke7 Qb7/c7+ 66. Kf8! (This is the new idea) Qc8/d8+ 67. Kg7!, and since 67...d5 loses to 68. Qf8+, it looks to me that White will decisively regroup.
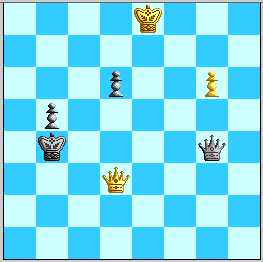
B1d52a4) 60...Kb4!
Diagram 9a, after 60...Kb4. Not as silly as it looks.
61. Kf7 and:
B1d52a31) 61...d5 62. Qxd5 EGTB+/- #63. But 62. Qd2+ intending to check on e3 or b2 and play Qe5! is probably much quicker. (Note that 62. g7? Qh4+! is a perpetual!)
B1d52a32) 61...Qf4+ 62. Ke6! Now 62...d5 63. Qxd5 transposes into the EGTB win just above, although 63. Qf5! must be much quicker. Black has:
B1d52a321) 62...Ka4 63. g7 Qh6/g4+ 64. Kf7 Qf4+ 65. Kg8 b4 (65...d5 66. Qxd5 EGTB+/- #43) 66. Qa6+ Kb3 67. Qa7 Kc2 (67...Kb2 68. Qf7 heads into the basic Qf7 win, while 67...Kc3 blocks c3 for Black's Queen in these lines, as above) 68. Qf7 Qe4 (68...Qg4 69. Qf2+ K-any 70. Kf7 Qc4+ 71. Kf6 Qc3+ 72. Kg6 runs Black out of good checks and soon reaches a form of the Qf7 win, while 70...Qd7+ 71. Kf6 and 70...Qh5+ 71. Kf8 lose more quickly) 69. Qf2+. Now all options except 69...Kb3 and 69...Kb1 transpose into the analysis below of 56...Qf3+ 57. Kg5 Qg2+ 58. Kh6 Qh3+ 59. Kg7 Qf5 60. Qe7 Kc2 61. Qc7+ Kd2 62. Qf7 Qe4 63. Kf8 b4 64. Qf2+ K-moves 65. g7. And 69...Kb1 will lead to the same line with Black perishing to Kh7 and Qg6, so 69...Kb3. Then White ekes it out by 70. Kf8 Qa8+ 71. Ke7 Qe4+ 72. Kf6 Qe5+ 73. Kg6 Qe6+ 74. Qf6 Qg4+ 75. Kf7 Qd7+ 76. Kg8!, and since 76...Ka3 77. Qf3+! b3 78. Kh8 is +/-, 76...Qc6 77. Qe6+ ditto, so Black plays either 77...Qg4 or 77...Qc8+ 78. Qf8 Qg4! 79. Qf7+, and the final points are that 79...Kc2 80. Qf2+ transposes into the above note to 68...Qg4, and 79...Ka3 80. Qa7+ Kb2 81. Kf8 Qc8+ 82. Ke7 is a recurring winning pattern first explored here. (Maybe 63. Qf5 wins more quickly than 63. g7; note that 63. Qxd6? is drawn.)
B1d52a322) 62...Qg4+ 63. Qf5! (63. Kxd6? Ka4! only-move, EGTB=) Qd4! (63...Qc4+ 64. Ke7 Qc7+ 65. Qd7 Qc3 66. Qg4+ +/-) 64. Qf6! Qg4+ (64...Qe4+ 65. Kxd6 EGTB+/- #42; 64...Qc4+ 65. Kxd6 EGTB+/- #75 or better 65. Kd7! and +/- as Black runs out of checks and can't get his Pawns moving fast enough, e.g. 65...Ka4 66. Qf7!) 65. Ke7! (oops, 65. Kxd5? Ka3! is drawn) Ka3 (little else to do) 66. g7 b4 67. Qf7! Qe4+ (67...Qg5+ 68. Ke8 Qb5+ 69. Kf8+/-; 67...Qh4+ 68. Kd7! Qh3/g4+ 69. Kc7+/-) 68. Qe6 Qb7+ 69. Kf6 heads into the basic win against Black's K on a3.
B1d52a323) 62...Qe5+ 63. Kd7 and now:
B1d52a3231) 63...d5 64. Qf3! and:
B1d52a32311) 64...d4 65. Qf8+ Kc3 66. g7 Qd5+ 67. Kc7 Qe5+ 68. Kb7 Qd5+ 69. Ka7 Qa2+ 70. Kb8 Qh2+ 71. Kc8 Qh3+ 72. Kc7 Qh7/g3/h2+ 73. Kb6 Qg6/h6+ 74. Kh5+/-.
B1d52a32312) 64...Ka4 65. Qf8 Qd4/e3 66. g7 Qa7+ 67. Ke8 Qb8+ 68. Kf7 Qf4+ 69. Kg8+/-, or 68...Qc7+ 69. Qe7+/-
B1d52a32313) 64...Qd4 65. Qf8+ Kc3 66. g7 is essentially the same as the previous line.
B1d52a3232) 63...Qg7+ 64. Kc6! d5 65. Qxb5+ EGTB+/- #53.
B1d52a3233) 63...Ka4 64. Qd1+ (64. Qc2+ Ka3! 65. Qc1+ Ka4! leaves White no better option) Ka5! (64...Ka3 65. Qf3+ and 66. Qf7+/-; 64...Kb4 65. Qg4+ +/-) Now by rights, 65. 65. Qxd6 should be the finisher, but 65...Qg5! is EGTB=! Now, however, 65. Qg4 Qg7+! 66. Ke6 b4! seems to go nowhere for White, and 65. Qf3 b4 66. Qa8+ Kb5 67. Qf8 Ka4! ditto. White's best try seems to be 65. Qb3 (or 65. Qd2+ b4 66. Qa2+ transposing):
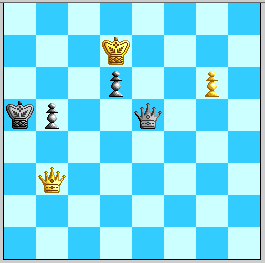
Diagram 9b. Black is retreating but hanging in there.
B1d52a32331) 65...Qf5+ 66. Qe6 Qf2 (else 67. Qa2+ and 68. Qf7 is even better for White) 67. Ke8! Qg2 68. Kf8! Qa8+ 69. Qe8 Qf3+ 70. Qf7 Qa8+ hmmm..., maybe 69. Kf7!?
B1d52a32332) 65...b4! 66. Qa2+ Kb5! (66...Kb6 67. Qf7 Qh5 68. Qf6! sets up a lateral "Pin Battery" that appears to win) 67. Qf7 Qh5! 68. Qe6 Qg5! 69. Ke8 Kc5! 70. Qf7 Qe5+ 71. Kd7 Qe4!! 72. g7 Qb7+ and this is drawn!!
It seems to me that White's improvements would have to come earlier: 62. Kg7!? and 61. Ke7!? (61...Qg5+ 62. Kd7 Qg4+ 63. Kc5 d5! looks like the main line there) are still to be investigated, and there's also 61. Qb1+!? Kc3! 62. Qa1+ Kc2!
II. Black pushes back from the Front:
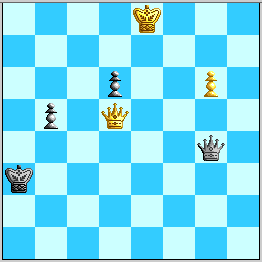
Diagram n. Is d5 the best square for White's Queen in this case?
This position arises via 51. Qh7 b5 52. Kf6+ Kb2 53. Qh2+ Ka1 54. Qf2 Qd3 55. Qe1+ 56. g6 Qd4+ 57. Kf7 Qf4+ 58. Ke8 Qg4 59. Qd2+ Kb3! 60. Qd5+ Ka3!
61. Kf7 and now:
b11) 60...Qc4 61. Qxc4 bxc4 62. g7 EGTB+/- #25.
b12) 60...Qf4+ 61. Ke7! and:
b121) 61...Qe3+ 62. Kf8! Qh6+ (62...b4 63. g7 Qf4+ 64. Qf7 Qh6 65. Qf5+/-; other moves are no better) 63. g7 Qf6+ 64. Kg8! b4 65. Kh7 Qh4+ (65...Qe7 66. Qa5+ Kb3 67. Qf5 K-any/d5 68. Qf4+/-) 66. Kg6 Qg4+ 67. Kf6 Qh4+ 68. Kf7 Qf4+ 69. Ke8 Qe3+ 70. Kf8 Qf4+ 71. Qf7+/- as before.
b122) 61...Qh4+ and again White has two branches. 62. Kf8(!) Qd8+ transposes into b13 next, while 62...Qf6+ 63. Qf7 transposes into A2c1. (Note, however, that 62. Kd7?! appears to fail to 62...Qg4+ 63. Qe6 Qg2!). However, we pick up here with
62. Ke6!?
when as 62...Qg3 63. Qxd6+ and 62...Qh6 63. Qf3+ are killing, Black has only:
b1221) 62...Qg4+ 63. Qf5 Qc4+ 64. Ke7 Qc7+ (64...b4 65. g7 b3 66. Qf8! is a win appearing many places in this analysis) 65. Qd7 transposes into line A2d above.
b1222) 62...Qh3+ 63. Qf5 Qe3+ and now White executes a maneuver one can call the "Dipsy Doodle":

Diagram 9b. Start of a longwinded "funneling" maneuver.
64. Kf6 Qd4+ 65. Ke7! Qa7+ 66. Qd7 Qe3+ 67. Qe6! Qa7+ 68. Kf8! Qa8+ 69. Kf7! Qb7+ 70. Kf6! Qf3+ 71. Qf5! and we have transposed into line A2d of 54Qf2Qd3win.html with 71...Qc3+ 72. Ke7!! The relevant notes along the way are:
b1223) 62...Qe1+ 63. Kf7! Qf2+ 64. Ke8! Qe3+ 65. Kf8+/- as before, or 64...Qg3 65. Qf7! also seen before.
This completes the play against 60...Qf4+. Black's other major choice is:
b13) 60...Qd7+ 61. Kf6 Qd8+ 62. Kf5 and now:
b121) 62...Qd7+ 63. Qe6 Qg7 64. Qf6 Qd7 65. Kg5+/-
b122) 62...Qf8+ 63. Qf7 Qc8+ 64. Kg5 Qc5+ (64...b4 65. g7 Qc5/c1+ 66. Qf5/f4 heads into the basic win against Black's King on a3) 65. Qf5 Qc1+ 66. Qf4 Qg1+ (66...Qc5+ 67. Kh6+/-) 67. Qg4 Qe3/c1+ 68. Kh4 Qh6+ (only chance) 69. Kg3 Qg7 70. Qf3+ and:
70...Ka4 71. Qf7 Qc3+ 72. Kg4 b4 73. Qa7+! Kb5 74. g7 Qc8+ 75. Kh4! Qb3 76. Qf7 Qc5+ 77. Kh4

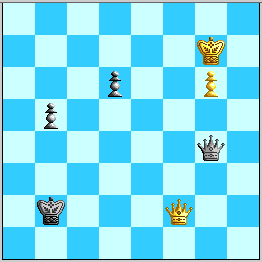
Diagram 1(a) arises after 51. Qh7 b5 52. Kf6+ Kb2 53. Qh2+ Ka1 54. Qf2 Qd3 55. Qe1+ 56. g6 Qd4+ 57. Kf7 Qf4+ 58. Ke8 Qg4 59. Qf2+. Diagram 1(b) arises via 56...Qf3+ 57. Kg5 Qg2+ 58. Kh6 Qh3+ 59. Kg7 Qg4 60. Qf2+!? It also arises via 51. Qh7 Ka1 52. Qg7+ Ka2 53. Qf7+ Ka3!? 54. Kg7 Qg4! 55. g6 b5! 56. Qa7+ Kb2 57. Qf2+. Because White's major try will be Kf7 in all cases, we consider these diagrams to be equivalent, and we pick up from 1(a) with its move numbering.

Qc8+ (65...d5 66.
66. Kf7 Qd7+ (66...Qb7+ 67. Kg6 Qg2+ 68. Qg5 is soon +/-; 66...Qc7+ 67. Qe7+/-) 67. Kg8! is the funny new idea, and it looks deadly, e.g. 67...Ka3 68. Qf3+! b3 69. Kh8+/-. Black's best is probably 67...Qg4 68. Qf7+ Kc3 (68...Ka3 69. Qa7+ leads to familiar territory, and 68...Kc2 69. Qf2+ looks familiar too, but these need checking...) 69. Kf8! Qc8+ 70. Ke7 Qb7+ (70...Qc7+ 71. Kf6+/-, Black's problem being that the King blocks c3) 71. Ke6 Qc8+ (71...Qe4+ 72. Kxd6 EGTB+/- #19, the only case in this row that wins!) 72. Kf6+/-.
67. Qe3+ Ka4 (67...Kb2 68. Qf2+ Ka3 69. Qf7 heads into the basic win vs. Ka3, while other King moves lose more quickly) 68. Kf6! Qh4+ (68...Qc8 69. Qe6+/-; 68...b3 69. Qa7+ +/-) 69. Qg5 Qd4+ 70. Kg6 Qc4