Lab 3
Introduction
In order to successfully design and built large software systems we
need to manage their complexity. We will do this by designing systems
so that they are composed of small, independent parts with
well-defined responsibilities which interact with each other. These
small simple parts can be developed and tested independently of each
other. The complexity of the software system as a whole arises from
the interconnections and interactions amongst the component pieces.
In lecture we discussed how to model systems of interacting entities
in terms of their properties (or characteristics) and their
capabilities (or the services they can offer to other entities). The capabilities of objects determine how they can communicate
with each other. The relationships which a given object has
with other objects determines which objects it can communicate
with.
In lecture we explored one of the relationships which objects can have with
each other. In this lab we will focus in particular on the instantiation dependency relationship.
The instantiation dependency relationship exists between two objects when one object uses
another object in some way. It is for this reason that the relationship is
sometimes called the uses a relationship. This relationship can be
expressed in Java by simply having one object create a new instance of the
other object.
You have spent some time in the last two labs working in Eclipse. In
this lab, you will use Eclipse to write and run a working Java program.
Objectives
The high-level objectives of this lab are to have you,
- create and edit some Java source code files using Eclipse,
- compile, debug and run a small Java applet, and
- implement a design which is provided to you in the form of a UML diagram.
The following are the new concepts covered in this lab:
- declaring classes,
- defining constructors,
- modeling the uses a relationship using object dependency,
- instantiating classes using the
new operator,
- using the
Applet class.
Assignment Specifications
It's tough being an artist. It's hard to please yourself with your own
work, but it is even harder to please your critics. You are going to help
a local struggling artist in this lab by building a system where he will begin a
painting, but be able to stop working on it and start again if he so chooses.
Also, you will be able to gauge the reaction of the artist's critics and
encourage the artist to start over if the critics do not seem impressed.
You will write some Java code for this assignment on your own but not all
of it. We have written the Java code (the classes) for the Painting, the
Painter, and the Critics; you will write the code to create instances of these
classes. When you run your finished program the objects will demonstrate their
capabilities to you. The painting paints itself, and the painter and
critics do something when you click on them with the mouse.
In fact, in practice you rarely write all the code that is
required to solve a problem. Instead, you use existing code as part of
your solution. This is called code reuse, an important software
engineering concept. In Java (and other object-oriented programming
languages) code reuse is accomplished by making use of existing class
definitions. Thus, instead of writing everything from scratch your
solution will consist at least in part of existing components arranged
in the proper fashion.
The components you will be working with are classes whose objects
have fairly sophisticated capabilities. For instance (no pun intended)
one of the classes, called lab3lib.Painter, models a
painter. When you click on the painter, he walks over to his canvas,
erases everything on it and then starts the painting over from scratch. This class has a constructor
method, lab3lib.Painter(), which you will need to use
to create a painter object. The constructor method takes care of
lots of work for us - it not only ensures that the painter is drawn, but
also that it is positioned correctly with respect to the rest of the
program. When you click on the painter, he will exhibit his behavior.
If you are now thinking that there is not all that much which you need to
specify in the course of this lab, you are right. You will simply have to create
a dependency relationship between your Applet and a
PaintingProgram and then the PaintingProgram will have a
dependency to all its component parts (a painting, a painter, and some
hard-to-please critics).
As mentioned in the Objectives
section above, in this lab we want to model the uses a
relationship between objects. This means that you need to create instances of
each of the classes that the PaintingProgram object depends on. The objects
that PaintingProgram is dependent on are instances of the
following three types of face classes:
lab3lib.Paintinglab3lib.Painterlab3lib.Critics
Helpful Hints
Read through the entire lab before you start working, so that you know
what to expect. Make sure you save your work often, and keep track of
what you are expected to submit.
Do not be afraid to refer to earlier labs to recall what things mean or what
commands are available for you to use. It might be especially important to
refer back to Lab 2 for information about checking files out from the repository
and Jarring and submitting your work.
Reading
Make sure you have read chapter 2 of the book before
coming to lab. Also make sure you have reviewed your lecture
notes.
Lab set-up tasks (If you are working at home see these directions for this
lab)
At your lab session your teaching assistant will briefly discuss how
to carry out each of the set-up tasks below. She or he will also be
available to answer questions you might have.
Before you start work on the lab itself, you must carry out each of
the following set-up tasks. Your teaching assistant will guide you
through this process.
Step 1: Log in
Step 2: Start Eclipse
You may have an icon on your desktop that you can double-click. If you
did not set that up in Lab 2, you will need a terminal window and will need to
type eclipse at the prompt.
Step 3: Check out Lab3 project from LabSkeletons repository
Click on your CVS view (or open it if it is not already open) and open the LabSkeletons repository (click on the "+" or triangle to the
left of its name to "spin" it open). Open "Head", and then select
Lab3.
Now right-click on Lab3, and select "Check out". The Lab3 project will
appear in your workspace.
Lab Design
Now you're ready to start
working on the lab itself!
It is important to come up with a design for your program prior to
writing it. The UML class diagrams introduced in lecture will help in
this endeavor and will be central to discussions throughout the
class. Right now we want you to understand how to take a UML class
diagram that includes the dependency (uses a) relationship and
generate Java code for that. Since it is your first programming lab,
the TAs will develop the appropriate class diagram in recitation. Your
submitted lab must implement the UML class diagram discussed in
recitation.
Open the Applet class in the Java editor
Open up the Lab3 project, and then the lab3 package.
Double-click on the Applet class in the Package Explorer. The Java
editor will open on the Applet.java file in the center
view. Notice that the Applet has no statements in its constructor.
You should fill in the comments for modified by with your name. You should
make sure that your name appears in all the files that you write this semester.
Define the PaintingProgram class
Create an PaintingProgram class in lab3 package.
Your class must implement the design shown in recitation.
Right click on the lab3 package name and
select the "New" option, and from the sub-menu that appears, select "Class".
A "New Java Class" window
will open. In this window
you need to enter the name of the new class your are creating, in the
field labeled "Name:". You should type: PaintingProgram. Look at
the screen shot below and make sure yours matches.
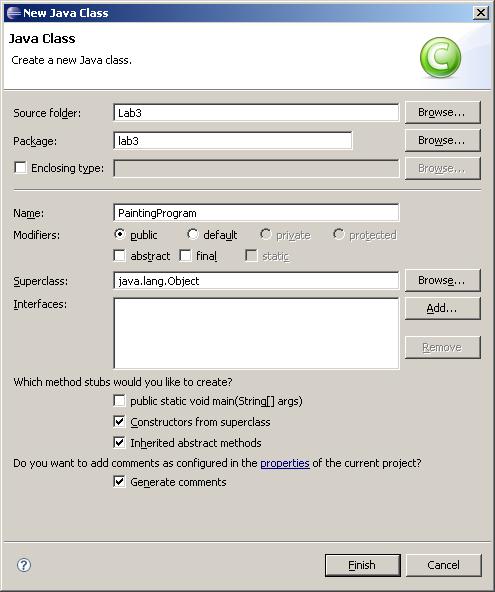
Click "Finish" when
you've entered the class name. A new class will appear in the editor.
Create the Dependency Relationship between Applet and
PaintingProgram
Now you will create your first class relationship! Inside the constructor
for Applet, type the code that will create an instance of an
PaintingProgram.
After you have finished that, be sure
to save Applet.java, either by clicking on the diskette
icon on the toolbar, by selecting "File" -> "Save", or by typing
"Ctrl"-"s" (i.e. pushing and holding the "Control" key while at the
same time typing the lower-case "s" key).
You will notice that
as you make changes to a file the name on the Java editor
tab is
*Applet.java, whereas on the later one it is
Applet.java. The "*" in front of the name indicates that
there are unsaved changes.
Fix errors
Eclipse automagically compiles your code as you type and reports
problems it finds. Syntax errors are shown with little red X's
or yellow and red X's in the left margin of the Java editor window.
If you hover over the X Eclipse will tell you what the error is (you
can see the errors in the "Problems" view as well). If you click over
the X Eclipse will offer ways to fix the error. Usually one of the
suggestions is what you'd like to do, but not always (so do choose
carefully). If you do not understand any of the syntax errors
reported by the compiler, ask your TA for an explanation.
Run
Once your applet compiles, run it! Right click on
Applet.java in the "Package Explorer" tab. Select
"Run As" -> "Java Applet". (Or possibly: Run... and fill in)
You should see a blank AppletViewer window appear:
The window is blank because you have not filled in the definition
of the PaintingProgram class: there is nothing to show yet! Notice that the AppletViewer window is pretty small. We will
need it to be a bit bigger to see all the parts that will eventually
appear in our program. Exit the AppletViewer by selecting "Applet" -> "Quit" from
the AppletViewer menu (or by closing the window). Next, to make the default size for this AppletViewer window a bit bigger, right-click on
Applet.java and select "Run As" -> "Run..." This brings
up a window labelled "Run" through which you can manage run
configurations.
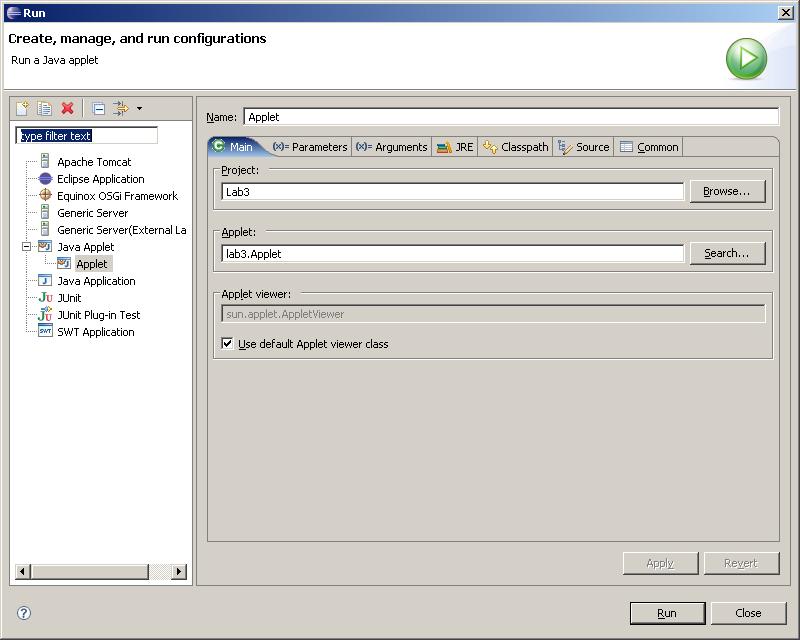
Select the "Parameters" tab and set the width to 800, and the height to 600 so
that it looks like the screen below. Click "Apply":
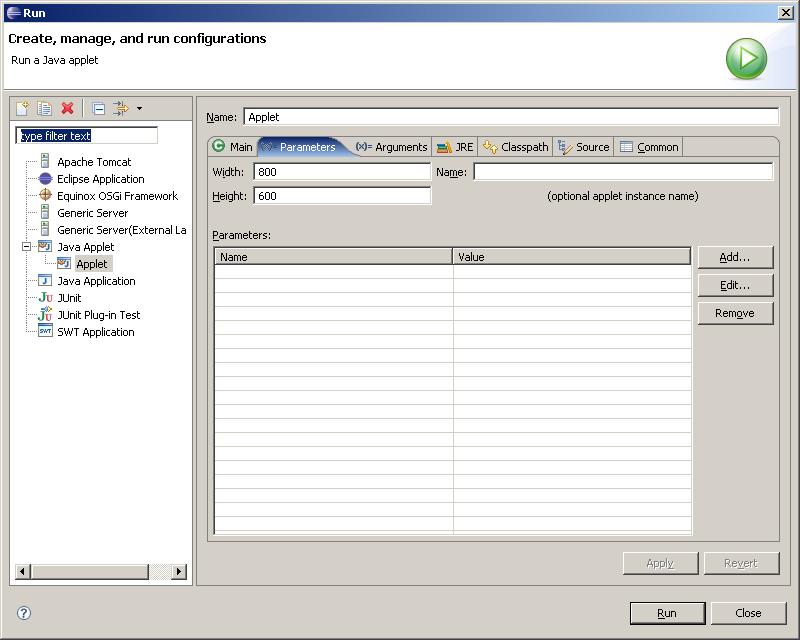
If you now click "Run" you will see a large (but still blank)
AppletViewer window.
Exit from the AppletViewer again ("Applet" -> "Quit").
Modify the PaintingProgram class
OK, we've got the basics down. Now we need to populate our
PaintingProgram
class. Let's start with creating a lab3lib.Painting instance.
So you need to add a dependency relationship between PaintingProgram and the
lab3lib.Painting
classes. To
do this, switch back to the PaintingProgram.java file, and add
the code so that the PaintingProgram uses a
lab3lib.Painting. Fix any syntax
errors. Save your work!
Now run the Applet again. Eclipse remembers what run configuration
you used last, and let's you run that one again simply by pressing the "Control-F11" key. Press the "Control-F11" key
on your keyboard now. You should see the painting begin to appear on the screen.
Build up the Code Incrementally
Complete the PaintingProgram.java file by adding the
Java code for the Painter class next. When you run the Applet and click
on the painter watch what happens. To insert the instantiation dependency
relationship for the PaintingProgram and the Painter, you should follow the same
steps as described in the paragraph above. After the painter has been
created, create the critics. You will see that their behaviors are
different amongst the three critics and different each time you click on them. Building
a little of the code and testing it as you go is an important
habit to get into that will help you as the projects get larger
throughout the semester.
What you hand in
When you are finished, you need to export your solution from the Eclipse
environment so that you can submit it. You need to follow the same steps
as you did for disconnecting from the repository and exporting as you did in
Lab 2. If you are not sure how to do this, please refer back to those
instructions. This time, you should name your Jar file Lab3.jar.
Then you can submit the Lab3.jar
file using the electronic submission program. If you do not remember how
to use the the submission program, refer back to earlier labs.
Due dates
You have one week from the meeting of your lab to submit your solution.
The due dates are summarized in the table below. You are always welcome to
submit
early. If you submit more than once, the later submission will simply overwrite
the previous one.
To check that your lab was submitted, you can always refer back to the Submit
Inspector on the Resources page
of the website. After you have entered your user name, your submissions will
be shown. Clicking on the name of a file that is a zip file will show you the
contents of the zip file so you can verify that you indeed zipped up all the
correct files.
| Date of lab |
Due date for electronic submission |
| Wednesday, September 20 |
Tuesday, September 26 |
| Thursday, September 21 |
Wednesday, September 27 |
| Friday, September 22 |
Thursday, September 28 |
| Tuesday, September 26 |
Monday, September 29 |