CSE 115 - Fall 2006 - Introduction to Computer Science for Majors I |
|
|
Lab 5IntroductionThe big lesson this past week was that we can name objects using instance variables. Having a name for an object allows us to easily call methods on it many times. We have also learned about the composition relationship. In this lab you will have an opportunity to implement these relationships in code. ObjectivesThe high-level objectives of this lab are to have you,
Assignment SpecificationsGrouping is an important idea. We group together similar things and treat them as a whole to enable us to effectively deal with large numbers of individual entities. For example, Bart Simpson can talk about his mother, Marge, his father, Homer, and his sisters Lisa and Maggie. But sometimes it makes more sense for him to just talk about his family. The notion of family is more abstract (and therefore simpler) than the individuals which make up a particular family (like Marge, Homer, Lisa and Maggie). Similarly it is easy to talk about the Brady family (from the Brady Bunch, if you remember that show or have seen the recent movie), but a bit harder to remember that it is made up of Carol, Greg, Maria, Peter, Mike, Jan, Bobby and Cindy. Moreover, I can talk about my family without you knowing specifically who is in my family. If the exact membership of the grouping isn't important, then you and I can have a perfectly good conversation about "things we do with our respective families", like have cookouts, go to the movies, watch the game on the weekend, and so on. The same thing goes for software. It is often the case that one part of a software program needs to communicate with a group of other components of the same program, and have them all do the same thing, but it isn't really important how many components are in the group. We saw in class how we can build an object which serves a grouping function. In this lab you will do the same - you will build various groups of objects. The objects are shapes: we are providing you with three shapes:
In this lab you will work with a framework that we have built for you. The framework consists of an Applet with two drawing canvases, each with a set of buttons. Each drawing panel has the three buttons, labelled "Random Color", "Speed Up" and "Slow Down". If a shape is placed into one of the two drawing canvases, it can be hooked up to the corresponding set of buttons - which means that if you click any of that set of buttons, then the shape will be affected (its color will change, it will speed up or slow down, depending on which button you click). How do you add a shape to a drawing canvas? Here the framework takes over some of the hard work. The framework makes sure that all of the shapes that you create, until you hook up one shape to the buttons, are attached to the left drawing canvas. All the shapes you create after that end up in the right drawing canvas, until you hook up one shape to the right set of buttons. After you do this, you can add no more shapes to any drawing canvas. How do you hook up a shape to the buttons? If you have an instance
of the class Helpful HintsRead through the entire lab before you start working, so that you know what to expect. Make sure you save your work often, and keep track of what you are expected to submit. Do not be afraid to refer to earlier labs to recall what things mean or what commands are available for you to use. ReadingMake sure you have read to the end of the composition section of chapter 4 before coming to lab. Also make sure you have reviewed your lecture notes. Lab set-up tasks (If you are working at home see these directions for this lab)At your lab session your teaching assistant will briefly discuss how to carry out each of the set-up tasks below. She or he will also be available to answer questions you might have. Before you start work on the lab itself, you must carry out each of the following set-up tasks. Your teaching assistant will guide you through this process. Refer back to other lab assignments if you do not remember how to complete these tasks.Step 1: Log inStep 2: Start EclipseStep 3: Check out Lab5 project from LabSkeletons repository
Step 4: Do the required lab work (instructions below)
Step 5: When finished, export your project and submit it (instructions below)Lab DesignOnce again, the TAs will help you to develop the appropriate class diagram for this assignment in recitation. Your submitted lab must implement the UML class diagram discussed in recitation. When running this lab, you must create four run configurations, one for each part of the lab. In each, set the size of the AppletViewer window to 800 pixels wide by 400 pixels tall. If you do not remember how to do this, refer back to Lab 3. The TAs can show you how to duplicate an existing run configuration and modify it so that it will run the Applet of a different sub-package, and also how to rename the run configuration. You should be sure to check out all of the Javadocs for the Classlibs.jar, located here. Build up the Code IncrementallyAs we have said in the last several labs, it is important to build
your code in small stages until you get to the finished product.
This is even more important now that your labwork is becoming a bit
more substantial. You should write the part of the code so that
Part 1In this part, your job is to implement the design shown in the UML
class diagram below. We will guide you through the implementation of
this design in part 1, step by step. In part 2 we will give you a
diagram but less guidance: you will need to follow the same approach
in part 2 as we show you in part 1. Make sure you put your code for
this part in the 
So where do you start? Start with setting up the instantiation dependency between Applet and Lab5System classes. If you don't recall how to implement the instantiation dependency relationship between two classes, review your notes and previous lab work. Next, set up the relationship between Lab5System and the Triangle class. Run and test. This should result in a triangle bouncing around in the left drawing panel. It will look something like this: 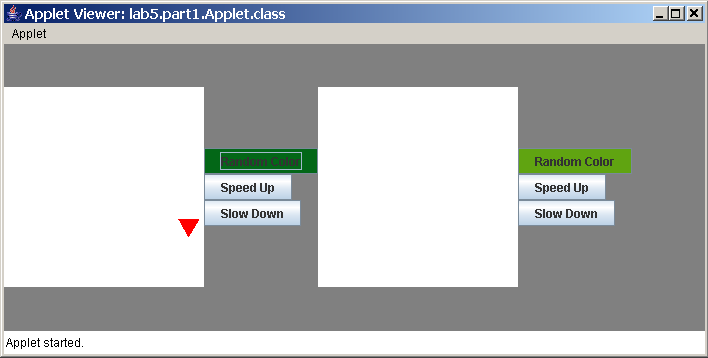
Next, create the class Hmm. This sounds like a lot of work to do all at once. Let's break this down into more manageable chunks. First create a stubbed out version of Next set up one composition relationship between
The next step is to define one of the methods. Let's do
Compile and run. Now, clicking the "Slow Down" button on the right should cause the triangle on the right to slow down. Do the same sort of thing for the other two methods, making note of
the fact that the Finally, add the second composition relationship between
You must use Green to produce a UML class diagram of the
To get Green working, you will need to follow the directions below. Step 1: Make local plug-ins availableTo do this, go to "Help" -> "Software Updates" -> "Manage Configuration". 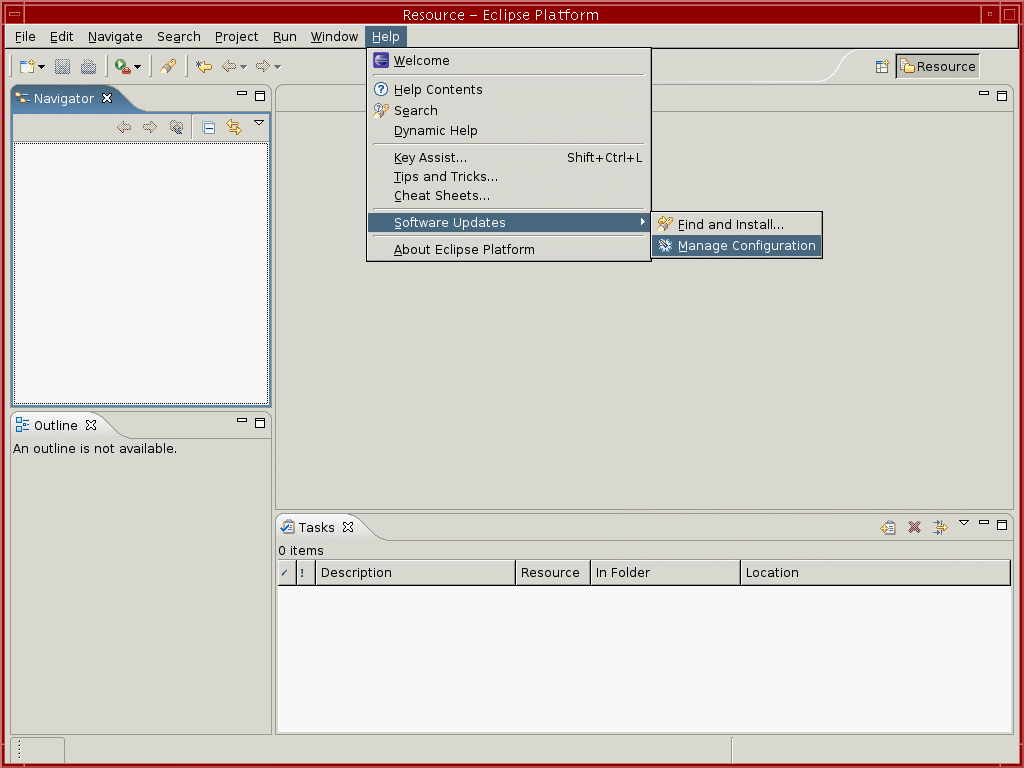
This will open up the "Product Configuration" window.
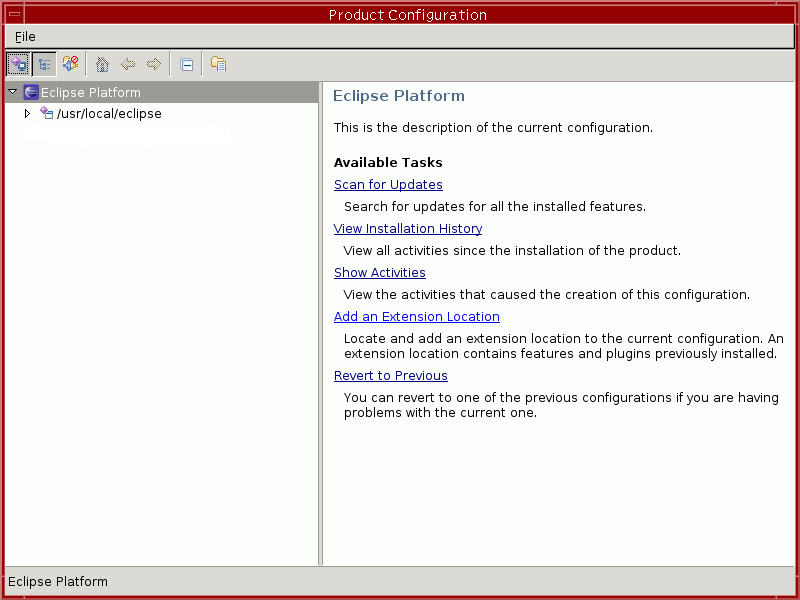
Select "Add an Extension Location" from the right-hand window. You will see the following window:
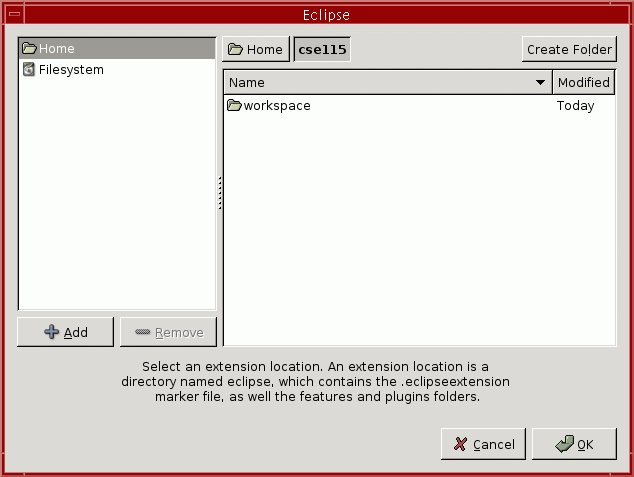
Click on "Filesystem" in the left-hand pane and browse to /projects/CSE115/eclipse Once you've done this, click "OK". After you click "OK" Eclipse will ask whether to restart the workbench:
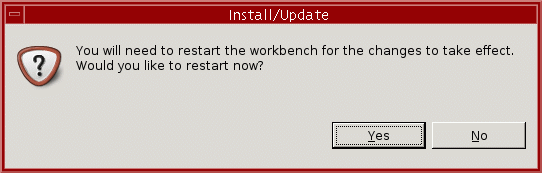
Click "Yes" to restart the workbench. When you do, your Eclipse window will disappear for a little while, then Eclipse will start up again.
Part 2In this part, your job is to implement the design shown in the UML
class diagram below. Make sure you put your code for this part in the
When you build your When you build your You must use Green to produce a UML class diagram of the
Note that in part 2, unlike part 1, you may use Green to draw part of the diagram, such as the composition relationships. The TA will help you use Green. Make sure your export includes both the Java source files and screenshots. 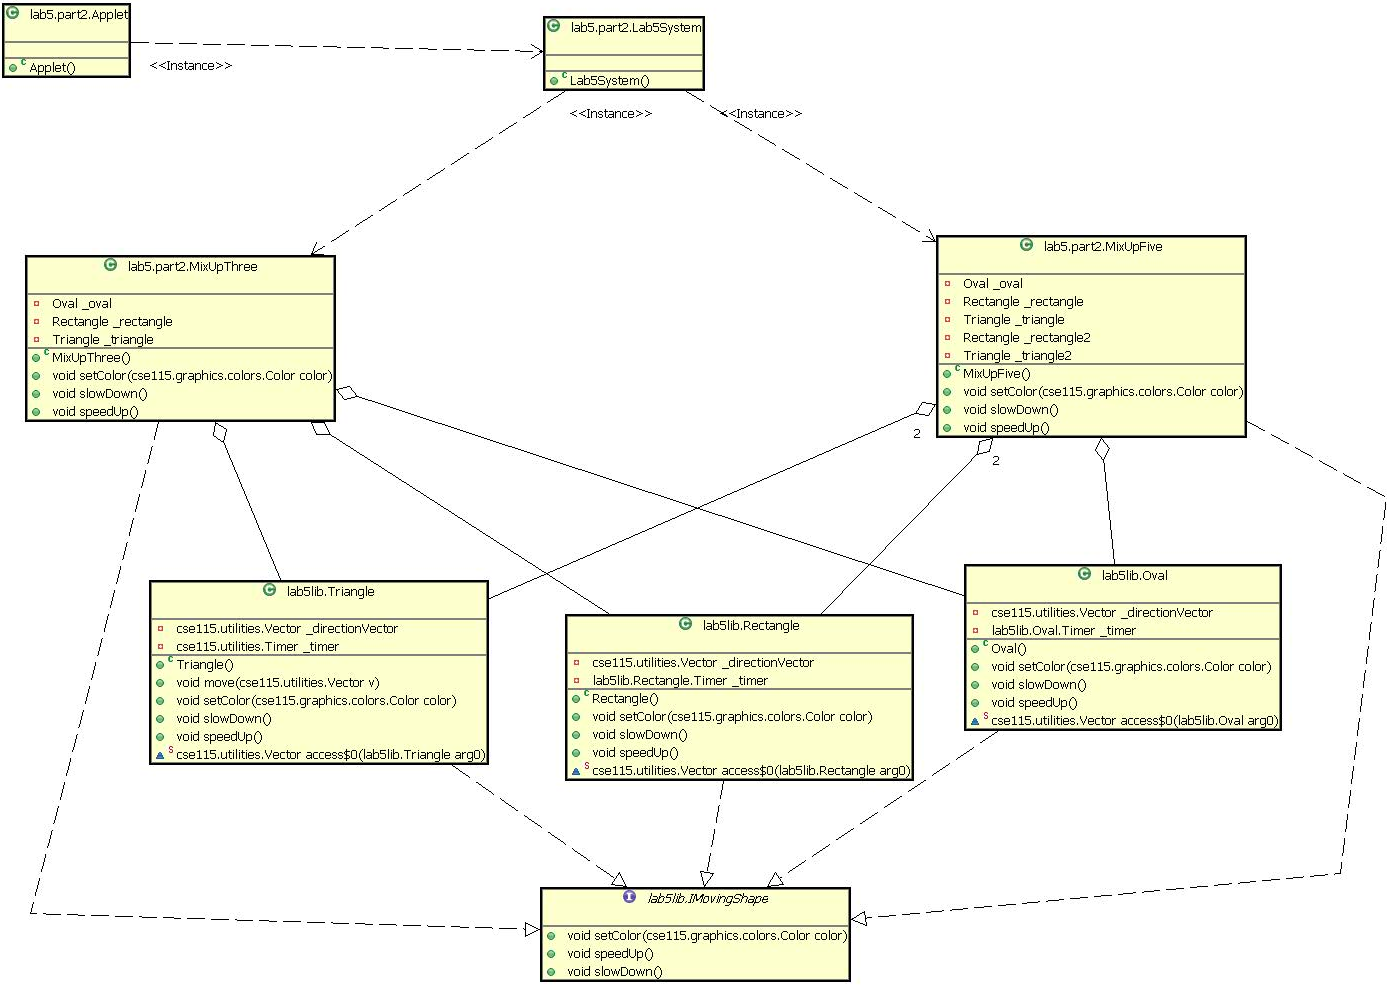
What you hand inWhen you are finished, you need to export your solution from the Eclipse environment so that you can submit it. You need to follow the same steps as you did for disconnecting from the repository in Lab 2. If you are not sure how to do this, please refer back to those instructions. This time, you should name your Jar fileLab5.jar.
Then you can submit the Lab5.jar file using the electronic submission program. If you do not remember how to use the the submission program, refer back to earlier labs. Due datesYou have one week from the meeting of your lab to submit your solution. The due dates are summarized in the table below. You are always welcome to submit early. If you submit more than once, the later submission will simply overwrite the previous one. To check that your lab was submitted, you can always refer back to the Submit Inspector on the Resources page of the website. After you have entered your user name, your submissions will be shown. Clicking on the name of a file that is a zip file will show you the contents of the zip file so you can verify that you indeed zipped up all the correct files.
|
Announcements | Labs | Meetings | People | Resources | Schedule | Syllabus |
Last modified: Wed Oct 4 08:35:35 2006 |