CSE 115 - Fall 2006 - Introduction to Computer Science for Majors I |
|
|
Lab 6IntroductionThis week's lab is a continuation of last week's lab in that it extends an idea introduced in that lab. The idea is that of a general composite object, an object which allows us to group two objects into a single unit. In order to do this, we make use of the association relationship that we learned about in class. ObjectivesThe high-level objectives of this lab are to have you,
Assignment SpecificationsBackground and motivationAs we said in lab 5, grouping is an important idea. In lab 5 we saw how to make define classes to help us group instances of specific classes. However, in doing so repeatedly we seem to be missing an important generalization: no matter which classes' instances we are composing, the composing class has the same basic layout. You probably felt when you were defining the MixUpThree and MixUpFive classes for lab 5 that you were doing essentially the same thing over and over again. Wouldn't it be great to be able to separate out the idea of putting together multiple objects into one from the specific objects being composed? It turns out we can! This is a such a common task in software development that there is a standard "best practices" solution available. It is called the composite design pattern. In this lab you will implement this design pattern, and build the same functionality you did in part 2 of lab 5 with much less coding effort. Design patternsThe composite design pattern is just one example of a design pattern. Design patterns are "best practices" solutions to recurring software development problems. Design patterns are mined from existing code, written by software developers, and therefore represent examples of high-quality designs that practicing software developers actually use. The idea of design patterns actually come from the field of architecture. The architect Christopher Alexander's work on patterns in architecture inspired the so-called "Gang of Four", Erich Gamma, Richard Helm, Ralph Johnson and John Vlissides (who sadly passed away recently), to catalog a set of design patterns in a book, called Design Patterns: Elements of Reusable Object-Oriented Software. This book catalogs several design patterns; since then (it was published in 1995) many design patterns have been catalogued. In this course we introduce you to several very useful design patterns. The first, as you know, is the Composite Pattern. Throughout the rest of the semester you will be introduced to a selection of fundamental patterns which will help you understand the design of pieces of the Java class libraries (such as the graphical library). What you need to doStep 1Remember, as we have said in the last several labs, it is important
to build your code in small stages until you get to the finished
product. You must also define the To build your composite class, you need to implement the design shown in the following UML diagram: 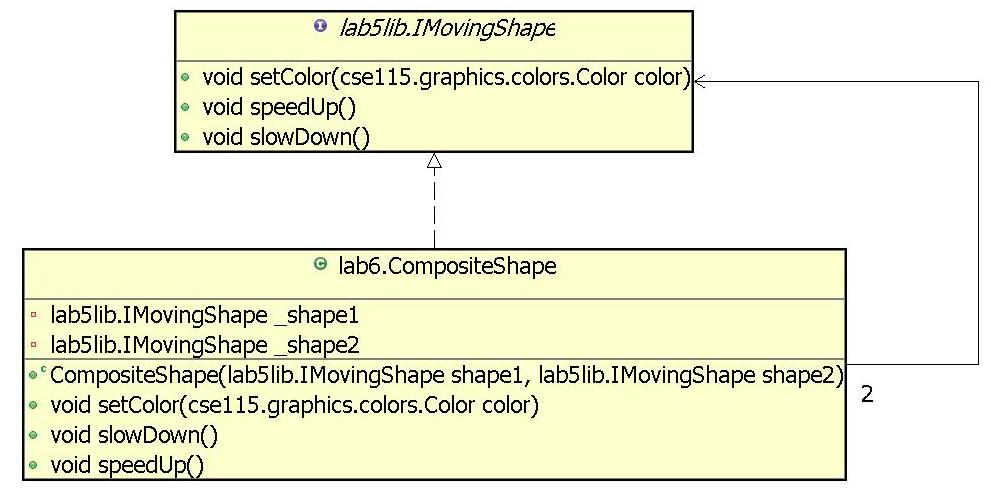
Notice that not only does the Step 2Now build a Hook this Step 3Now build a Hook this Step 4You must use Green to produce a UML class diagram of the
Helpful HintsRead through the entire lab before you start working, so that you know what to expect. Make sure you save your work often, and keep track of what you are expected to submit. Do not be afraid to refer to earlier labs to recall what things mean or what commands are available for you to use. ReadingMake sure you have read to the end of chapter 4 before coming to lab. Also make sure you have reviewed your lecture notes. Lab set-up tasks
At your lab session your teaching assistant will briefly discuss how
to carry out each of the set-up tasks below. She or he will also be
available to answer questions you might have.
Before you start work on the lab itself, you must carry out each of
the following set-up tasks. Your teaching assistant will guide you
through this process. Refer back to other lab assignments if you
do not remember how to complete these tasks.
|
| Date of lab | Due date for electronic submission |
|---|---|
| Wednesday, October 11 | Tuesday, October 24 |
| Thursday, October 12 | Wednesday, October 25 |
| Tuesday, October 17 | Monday, October 23 |
| Friday, October 20 | Thursday, October 26 |
Announcements | Labs | Meetings | People | Resources | Schedule | Syllabus |
Last modified: Mon Oct 9 18:24:37 2006 |